# EOS8 STANDALONE 开发示例
EOS8 STANDALONE即一个独立的eos8项目,不依赖于其他外部应用,将AFCENTER、BFP、LOWCODE、BPS依赖全部集成于自身,从而实现门户管理、流程中心、低开开发等功能。
# 环境准备
开发工具
- Studio作为后端开发工具,在EOS_Platform_8.2LA3_Private_Medium_Develop.zip解压后IDE目录下。
- mysql客户端工具,请根据自己情况下载。
注意: 如果不需要完整微服务环境,可以参考精简版的开发环境安装
运行环境 EOS运行环境依赖以下环境(安装介质中均包含),其中在运行应用时 jdk,mysql,redis,Nginx需要优先启动,其他介质无顺序要求。
| 应用 | 说明 | 默认端口 | 版本号 | 下载地址 |
|---|---|---|---|---|
| java | jdk运行环境 | 1.8.0_162以上 | ||
| mysql 服务 | 数据库服务 | 3306 | 5.7+ | http://mysql.org/ |
| nginx 服务 | 代理服务器 | 80 | 1.6+ | http://nginx.org/ |
| redis 服务 | 缓存服务器 | 6379 | 6+ | http://redis.io/ |
- 数据库初始化
作为一个独立应用需要将EOS的各个模块都需要进行数据库初始化,具体的数据库脚本请参考EOS开发架构中的初始化数据库脚本
下载express版本的介质EOS_Lowcode_Express_8.2.2.2.tar.gz 有完整的所有模块的初始化脚本,初始化独立应用(standalone)需要根据需求分别初始化数据库。
注意: 下面示例的过程是基于mysql数据库,并且在本地安装了mysql客户端,如果是其他数据库,请自行用对应用的客户端程序初始化
# 下面脚本需要分别每步独立执行,每个命令都需要单独输入mysql的密码
cd db-scripts

# eos框架
mysql -hlocalhost -uroot -p eosdemo < eos\Mysql\all.sql

# bps引擎,如果没有选中bps引擎,不需要初始化
mysql -hlocalhost -uroot -p eosdemo < bps\mysql\all.sql

# bfp流程框架
mysql -hlocalhost -uroot -p eosdemo < bfp\Mysql\all.sql

# afcenter组织机构与权限框架
mysql -hlocalhost -uroot -p eosdemo < afcenter\Mysql\all.sql

# lowcode低代码平台,如果没有选中低代码平台,不需要初始化
mysql -hlocalhost -uroot -p eosdemo < lowcode\Mysql\all.sql
注意: 如果下载是微服务的windows轻量化版本,初始化脚本的路径如下
D:\primeton\eos-8.2-dev\server\afcenter\db-scripts\afcenter\Mysql\all.sql
D:\primeton\eos-8.2-dev\server\afcenter\db-scripts\eos\Mysql\all.sql
D:\primeton\eos-8.2-dev\server\afcenter\db-scripts\bfp-framework\Mysql\all.sql 流程框架的初始化脚本
D:\primeton\eos-8.2-dev\server\afcenter\db-scripts\bfp-message\Mysql\all.sql 流程消息中心的初始化脚本
D:\primeton\eos-8.2-dev\server\afcenter\db-scripts\bfp-task\Mysql\all.sql 流程任务中心的初始化脚本
D:\primeton\eos-8.2-dev\server\afcenter\db-scripts\lowcode\Mysql\all.sql 低代码开发的初始化脚本
D:\primeton\eos-8.2-dev\server\bps\db-scripts\bps\mysql\all.sql 流程引擎的初始化脚本
# 项目开发
新建项目
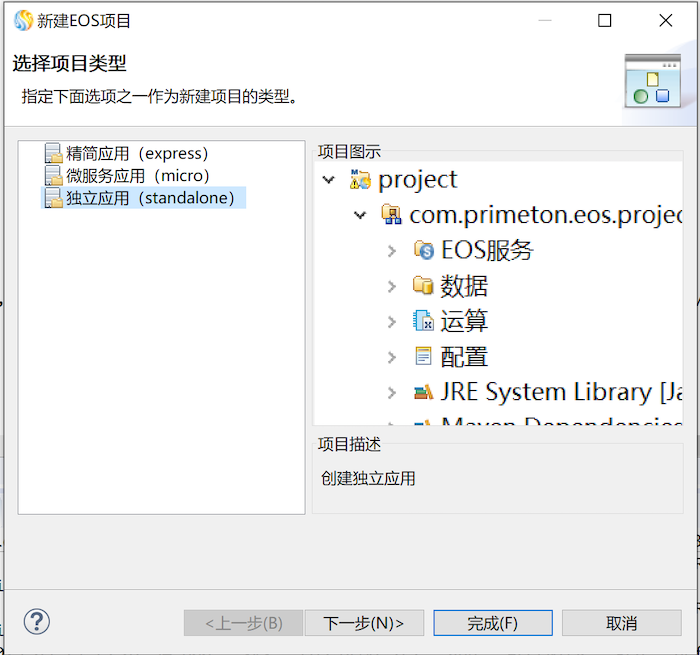
新建EOS项目,选择”独立应用(standalone)“
注意: 如果你的stdio版本是老版本,可以按照下面pom、properties、xml文件修改你的老工程得到独立应用

等待项目构建完毕,会构成以 api,boot,core,model.spi ,结尾的5个构建包
项目结构说明:
api构建包为项目的服务发布构建包
boot构建包主要是项目的启动类和配置文件
core构建包主要是业务构建包,可根据实际情况新增业务构建包,需要注意构建包之间的依赖关系,不可互相依赖,
model构建包主要的作用是存放项目中数据实体,
spi构建包主要是扩展业务用的
core,model构建包同EOS7版本的构建包保持一致,既可以通过之前的EOS开发模式进行开发,也可通过springboot形式进行开发,功能向导需在core构建包右键方可进行。
pom文件说明
根据项目的选择,bps流程引擎对应的是:bps-server-starter 和 com.primeton.gocom.afcenter.bps.om, lowcode低开平台是:com.primeton.gocom.lowcode.starter。
    <properties>
        <eos.version>8.2.2</eos.version>
        <bps.version>8.2.4</bps.version>
        <afcenter.version>8.2.2.2</afcenter.version>
        <bfp.version>8.2.2.2</bfp.version>
        <lowcode.version>8.2.2.2</lowcode.version>
    </properties>
    <dependencies>
        <dependency>
            <groupId>com.primeton.eos</groupId>
            <artifactId>eos-server-starter</artifactId>
        </dependency>
        <dependency>
            <groupId>com.primeton.eos.extension</groupId>
            <artifactId>com.primeton.eos.foundation</artifactId>
        </dependency>
        <dependency>
            <groupId>com.primeton.gocom</groupId>
            <artifactId>com.primeton.gocom.afcenter.starter</artifactId>
        </dependency>
        <dependency>
			<groupId>com.primeton.gocom.bfp</groupId>
			<artifactId>com.primeton.gocom.bfp.framework.starter</artifactId>
		</dependency>
		<dependency>
			<groupId>com.primeton.gocom.bfp</groupId>
			<artifactId>com.primeton.gocom.bfp.center.starter</artifactId>
		</dependency>
		<dependency>
			<groupId>com.primeton.gocom.bfp</groupId>
			<artifactId>com.primeton.gocom.bfp.message.starter</artifactId>
		</dependency>
        <dependency>
            <groupId>com.primeton.gocom</groupId>
            <artifactId>com.primeton.gocom.lowcode.starter</artifactId>
        </dependency>
        <dependency>
			<groupId>com.primeton.bps</groupId>
			<artifactId>bps-server-starter</artifactId>
		</dependency>
		<dependency>
            <groupId>com.primeton.gocom</groupId>
            <artifactId>com.primeton.gocom.afcenter.bps.om</artifactId>
        </dependency>
    </dependencies>

    <dependencyManagement>
        <dependencies>
            <dependency>
                <groupId>com.primeton.eos.extension</groupId>
                <artifactId>com.primeton.eos.foundation</artifactId>
                <version>${eos.version}</version>
            </dependency>
            <dependency>
                <groupId>com.primeton.eos</groupId>
                <artifactId>eos-server-starter</artifactId>
                <version>${eos.version}</version>
            </dependency>
            <dependency>
			    <groupId>com.primeton.bps</groupId>
			    <artifactId>bps-server-starter</artifactId>
			    <version>${bps.version}</version>
		    </dependency>
            <dependency>
			    <groupId>com.primeton.gocom</groupId>
			    <artifactId>com.primeton.gocom.afcenter.starter</artifactId>
			    <version>${afcenter.version}</version>
		    </dependency>
            <dependency>
                <groupId>com.primeton.gocom.bfp</groupId>
                <artifactId>com.primeton.gocom.bfp.framework.starter</artifactId>
                <version>${bfp.version}</version>
            </dependency>
            <dependency>
			    <groupId>com.primeton.gocom.bfp</groupId>
			    <artifactId>com.primeton.gocom.bfp.center.starter</artifactId>
			    <version>${bfp.version}</version>
		    </dependency>
            <dependency>
                <groupId>com.primeton.gocom.bfp</groupId>
                <artifactId>com.primeton.gocom.bfp.message.starter</artifactId>
                <version>${bfp.version}</version>
            </dependency>
            <dependency>
                <groupId>com.primeton.gocom</groupId>
                <artifactId>com.primeton.gocom.lowcode.starter</artifactId>
                <version>${lowcode.version}</version>
            </dependency>
            <dependency>
                <groupId>com.primeton.gocom</groupId>
                <artifactId>com.primeton.gocom.afcenter.sdk</artifactId>
                <version>${afcenter.version}</version>
            </dependency>
            <dependency>
                <groupId>com.primeton.gocom.bfp</groupId>
                <artifactId>com.primeton.gocom.bfp.message.sdk</artifactId>
                <version>${bfp.version}</version>
            </dependency>
            <dependency>
                <groupId>com.primeton.gocom</groupId>
                <artifactId>com.primeton.gocom.afcenter.bps.om</artifactId>
                <version>${afcenter.version}</version>
            </dependency>
        </dependencies>
    </dependencyManagement>
application.properties应用配置文件
修改应用端口和管理端口,默认端口会和其他应用冲突,导致项目无法正常启动。
redis的配置需要根据环境准备中安装的redis配置一致
server.port=28084
spring.application.name=AFCENTER
server.servlet.session.timeout=PT120M

server.app-server.accept-count=1000
server.app-server.max-connections=10000
server.app-server.max-threads=500
server.app-server.min-space-threads=50

#file upload
spring.servlet.multipart.max-file-size=100MB
spring.servlet.multipart.max-request-size=100MB

#spring.profiles.active=eureka
spring.profiles.active=nacos,afc,bps

management.endpoints.web.exposure.include=hystrix.stream,health,info,loggers,eos,mappings
management.health.redis.enable=false

out.config.folder=config

eos.application.sys-code=EOS-DEMO-SYS
eos.application.sys-key=dc6baaed30e541d78bb91274803d9432
# eos environment: dev prod test
eos.profiles.active=dev

# eos cache config
eos.cache.mode=redis

spring.session.store-type=redis
# redis
spring.redis.host=127.0.0.1
spring.redis.port=6379
spring.redis.password=
spring.redis.lettuce.pool.max-active=100
spring.redis.lettuce.pool.max-idle=100
spring.redis.lettuce.pool.max-wait=5000
application-afc.properties配置文件
如果选择bps引擎,afc的这个配置文件中的BPS部分的配置就不需要了
# 非嵌入模式bps引擎配置
#bps.application.name=BPS-SERVER  微服务模式下,配置BPS引擎在nacos注册的springboot应用名
bps.application.name=127.0.0.1:48084
bps.tenant.id=

# attachment
# mode: local,db,nexus,aliyun-oss
afc.attachments.persistence-mode=local
afc.attachments.local.dir=
afc.attachments.nexus.repository-url=
afc.attachments.nexus.username=
afc.attachments.nexus.password=
afc.attachments.aliyun-oss.endpoint=
afc.attachments.aliyun-oss.access-key-id=
afc.attachments.aliyun-oss.access-key-secret=
afc.attachments.aliyun-oss.bucket-name=
afc.attachments.libre-office.host=
afc.attachments.libre-office.port=
application-bps.properties配置文件
只有选择了bps引擎才需要这个配置文件,这个配置文件是通过application.properties下面的配置加载的
spring.profiles.active=nacos,afc,bps
bps.local.thread=true
bps.cache.mode=map
关闭nacos连接配置
通过新建”独立应用“向导生成了application-nacos.properties和bootstrap.properties,默认已经关闭了nacos的注册中与配置中心
打开application-nacos.properties文件,修改spring.cloud.nacos.discovery.enabled=false
打开bootstrap.properties文件,修改spring.cloud.nacos.config.enabled=false新增/bps/handler-startup.xml文件
打开boot子项目中的”配置“节点下_srv/config文件夹,在config下创建文件夹bps,在bps文件夹内创建文件handler-startup.xml,文件内容如下:
<?xml version="1.0" encoding="UTF-8"?>
<handlers>
    <handler handle-class="com.primeton.workflow.api.listener.WFAppConfigStartupRuntimeListener" order="450" />

    <!--OLAP 引擎监听器,启动缓存等 -->
    <handler handle-class="com.primeton.bps.statistics.olap.OLAPEngineListener" order="3100" />
</handlers>
bps引擎配置文件
打开_srv/config/wfengine-config.xml文件,将组织机构接口实现类配置修改AFCenter的组织机构实现
如果是通过新建”独立应用“向导生成的工程,下面的配置已经配好了
组织机构接口实现了配置:
        <group name="omservice_provider">
        	<!-- 组织机构接口实现类配置 -->
            <!--
            <configValue key="class">org.gocom.components.coframe.bps.om.WFOMServiceImpl</configValue>
            -->
            <configValue key="class">com.primeton.gocom.afcenter.bps.om.WFOMServiceImpl</configValue>
        </group>
将权限接口实现类配置:
        <group name="permission_provider">
        	<!-- 权限接口实现类配置 -->
            <!--
            <configValue key="class">org.gocom.components.coframe.bps.om.WFOMPermissionImpl</configValue>
            -->
            <configValue key="class">com.primeton.gocom.afcenter.bps.om.WFOMPermissionImpl</configValue>
        </group>
修改数据源配置
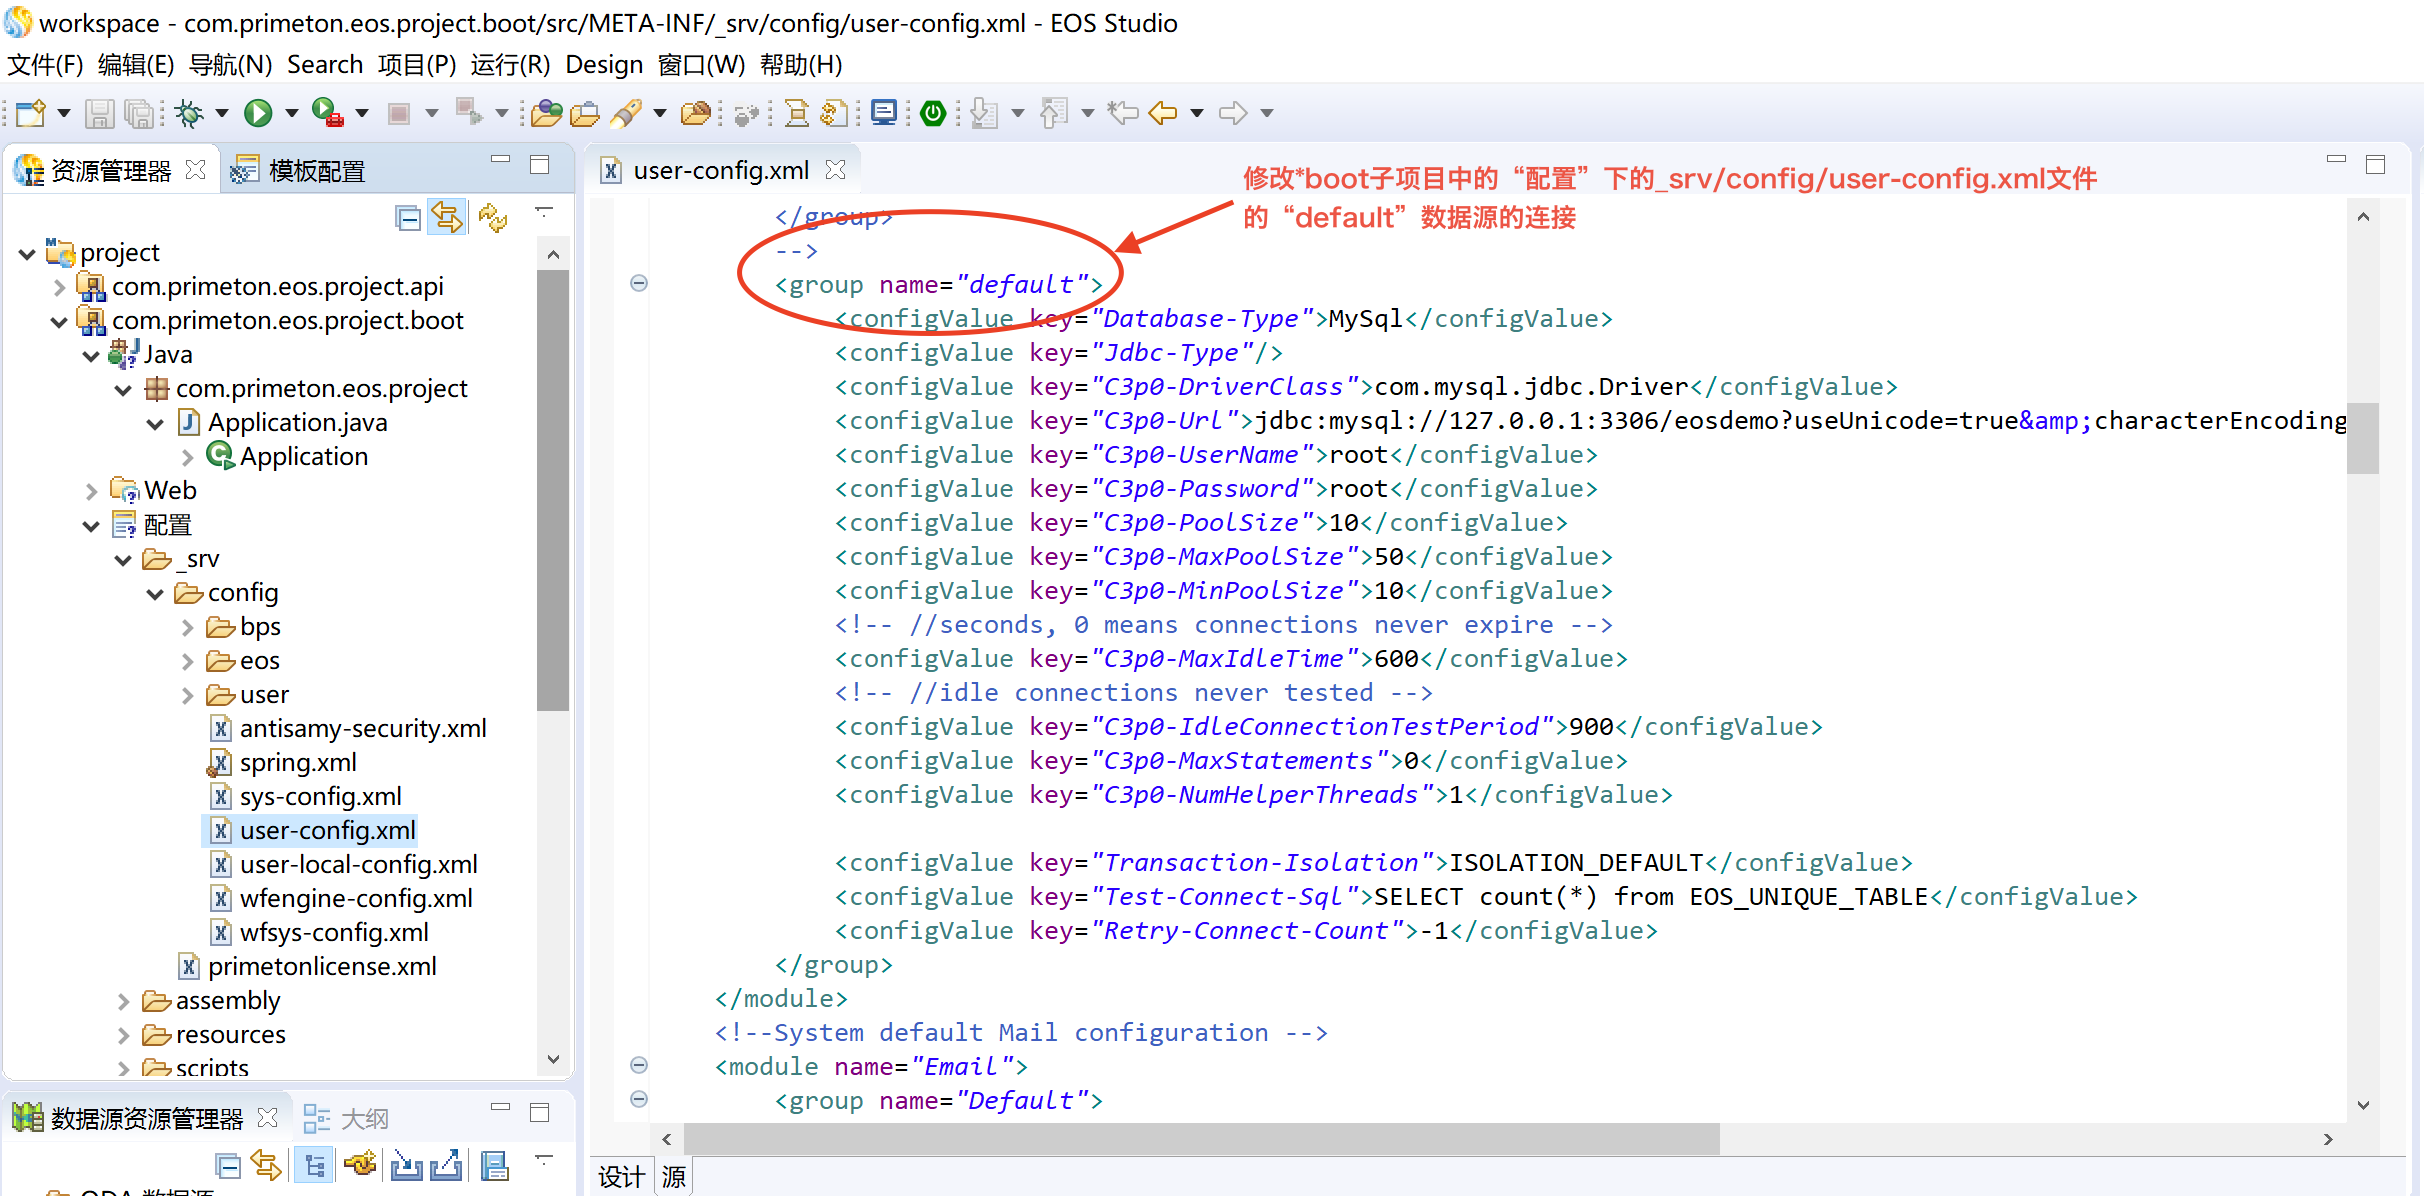
修改源代码中的数据库配置,配置文件在 boot结尾子项目中的“配置”下的“_srv/config/user-config.xml"文件

更新maven配置
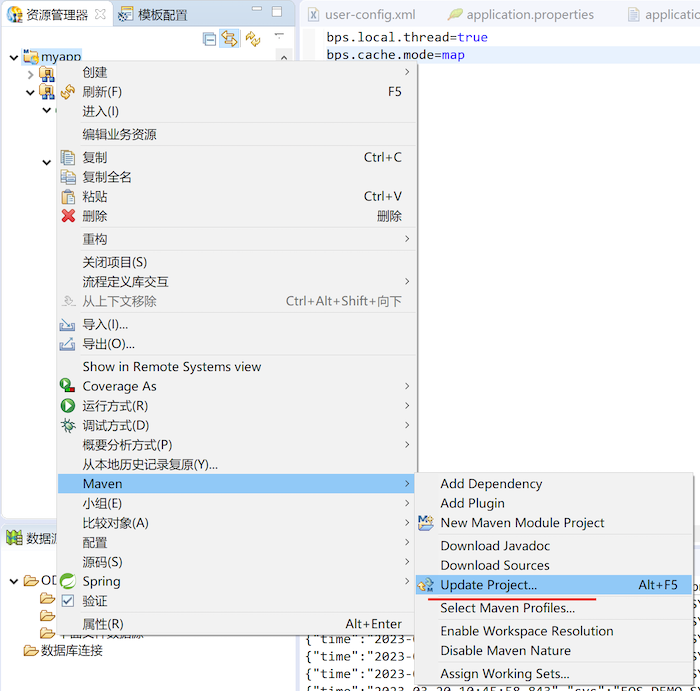
创建EOS项目工程后,如果编译出现问题,可以通过使用Maven Update更新当前环境,具体操作:

配置nginx
下载前端的完整介质EOS_Platform_AFCenter_UI_8.2.2.2.tar.gz,解压缩到本地目录(示例中是:D:\primeton\service\web)
如果使用的是windows轻量环境的介质,默认的web路径在 D:\primeton\eos-8.2-dev\web\afcenter
下面的配置可以直接拷贝到nginx.conf中使用(注意:ip、端口、静态资源目录配置正确)upstream eosapp { server 127.0.0.1:28084; } #EOS standalone server { listen 12080; location ^~/api/ { proxy_pass http://eosapp ; } location ~/(.*)/api/ { rewrite ^/(.*)/api/(.*)$ /api/$2 break; proxy_pass http://eosapp ; } location ~ \.biz\.ext$ { proxy_pass http://eosapp; } location / { root "d:/primeton/service/web"; access_log d:/primeton/service/access.log ; error_log d:/primeton/service/error.log warn; index index.html index.htm; try_files $uri /index.html; } }
以上步骤即已完成eos8项目中afcenter、bfp、lowcode、bps依赖集成配置,执行maven命令clean install后,即可启动项目;项目启动成功后可通过配置前端nginx代理,基于该应用server即可访问afcenter门户与完成ide表单、流程开发。