
# 认证中心使用说明
AFCenter的认证中心支持OAuth2的授权码模式认证,基本的流程如下:
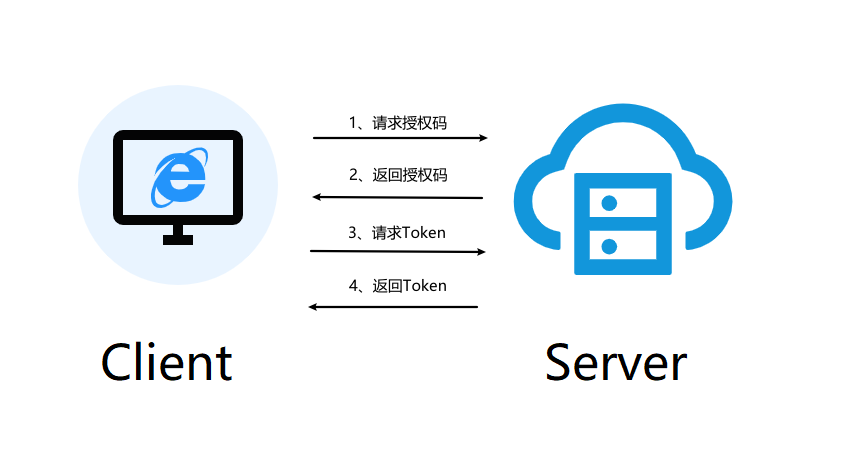
AFCenter中提供了授权码模式的实现,以RESTFull的方式提供对应接口,方便业务系统灵活的使用各种技术方案去集成。(提供的后端demo中使用了Spring security sso模式)
# 认证中心接口说明
获取授权码
根据以下格式构建url,引导用户访问(注意复制时删减掉多余空格或者换行符)
    http://127.0.0.1:8001/api/afc/oauth2/authorize
    	?response_type=code
    	&client_id={value}
    	&redirect_uri={value}
    	&scope={value}
    	$state={value}
参数详解:
| 参数 | 是否必填 | 说明 |
|---|---|---|
| response_type | 是 | 返回类型,这里请填写:code |
| client_id | 是 | 应用id(应用code/租户Id,eg:xxx/123) |
| redirect_uri | 是 | 用户确认授权后,重定向的url地址 |
| scope | 否 | 固定是all |
| state | 否 | 随机值,此参数会在重定向时追加到url末尾,不填不追加 |
🚩:
- 如果用户在AFCenter Server端(认证中心)尚未登录,会被转发到登录视图
- 有没有scope参数默认都是静默授权all
用户登陆成功之后,会重新自动携带之前的参数请求授权接口,授权成功后,会被重定向到redirect_url,并追加code参数与state参数,如下:
redirect_uri?code={code}$state={state}
Code授权码具有以下特点:
- 每次授权产生的Code码都不一样
- Code码用完即废,不能二次使用
- 一个Code码有效期为5分钟,超时自动作废
- 每次授权产生的新Code码,会导致旧Code码立即作废,即使旧Code码未使用
根据授权码获取Access-Topken
获得Code码后,可以通过以下接口,获取用户的Access-Token、Refresh_Token等关键信息
    http://127.0.0.1:8001/api/afc/oauth2/token
    	?grant_type=authorization_code
    	&client_id={value}
    	&client_secret={value}
    	&code={value}
参数详解:
| 参数 | 是否必填 | 说明 |
|---|---|---|
| grant_type | 是 | 授权类型,这里请填写:authorization_code |
| client_id | 是 | 应用id(应用code/租户Id,eg:xxx/123) |
| client_secret | 是 | 应用秘钥(应用的secret) |
| code | 是 | 步骤1.1中获取到的授权码 |
接口返回示例:
    {
         	"access_token": "7Ngo1Igg6rieWwAmWMe4cxT7j8o46mjyuabuwLETuAoN6JpPzPO2i3PVpEVJ",     // Access-Token值
            "refresh_token": "ZMG7QbuCVtCIn1FAJuDbgEjsoXt5Kqzii9zsPeyahAmoir893ARA4rbmeR66",    // Refresh-Token值
            "expires_in": 7199,                 // Access-Token剩余有效期,单位毫秒
            "refresh_expires_in": 2591999,      // Refresh-Token剩余有效期,单位毫秒
            "client_id": "1001",                // 应用id
            "scope": "all",                // 此令牌包含的权限
        	"token_type": "bearer" //令牌类型
    }
根据Refresh-Token刷新Access-Token(需要客户端自己实现本地刷新Access-Token的逻辑)
Access-Token的有效期较短,如果每次过期都需要重新认证授权的话,会比较影响用户体验,因此可以通过在后台通过Refresh-Token刷新Access-Token
    http://127.0.0.1:8001/api/afc/oauth2/token
    	?grant_type=refresh_token
    	&client_id={value}
    	&client_secret={value}
    	&refresh_token={value}
参数详解:
| 参数 | 是否必填 | 说明 |
|---|---|---|
| grant_type | 是 | 授权类型,这里请填写:refresh_token |
| client_id | 是 | 应用id(应用code/租户Id,eg:xxx/123) |
| client_secret | 是 | 应用秘钥 |
| refresh_token | 是 | 步骤2中获取到的Refresh-Token值 |
接口返回同第2步。
注销Access-Token
SSO客户端在单点退出的同时,需要在认证服务器端也进行单点退出
    http://127.0.0.1:8001/api/afc/oauth2/revoke
    	?client_id={value}
    	&client_secret={value}
    	&access_token={value}
参数详解:
| 参数 | 是否必填 | 说明 |
|---|---|---|
| client_id | 是 | 应用id(应用code/租户Id,eg:xxx/123) |
| client_secret | 是 | 应用秘钥 |
| access_token | 是 | 步骤2中获取到的Access-Token值 |
返回值说明:
    {
        "code":200,
        "msg":"ok"
    }
根据Access-Token获取相应用户的账号信息
http://127.0.0.1:8001/api/afc/oauth2/userinfo?access_token={value}
返回值样例:
    {
        "username":"sss", //登录账号
        "tenantId":"xxx", //所属租户Id
        "employeeId":"aaa" //登录账号绑定的员工Id
    }
# 基于Spring security sso 的客户端简单认证demo示例说明
- pom依赖说明
    <?xml version="1.0" encoding="UTF-8"?>
    <project xmlns="http://maven.apache.org/POM/4.0.0" xmlns:xsi="http://www.w3.org/2001/XMLSchema-instance"
             xsi:schemaLocation="http://maven.apache.org/POM/4.0.0 https://maven.apache.org/xsd/maven-4.0.0.xsd">
        <modelVersion>4.0.0</modelVersion>
        <parent>
            <groupId>org.springframework.boot</groupId>
            <artifactId>spring-boot-starter-parent</artifactId>
            <version>2.2.6.RELEASE</version>
            <relativePath/> <!-- lookup parent from repository -->
        </parent>
        <groupId>com.primeton</groupId>
        <artifactId>client2</artifactId>
        <version>0.0.1-SNAPSHOT</version>
        <name>client2</name>
        <description>Demo project for Spring Boot</description>

        <properties>
            <java.version>1.8</java.version>
            <spring-cloud.version>Hoxton.SR3</spring-cloud.version>
        </properties>

        <dependencies>
            <dependency>
                <groupId>org.springframework.boot</groupId>
                <artifactId>spring-boot-starter-web</artifactId>
            </dependency>
            <dependency>
                <groupId>org.springframework.cloud</groupId>
                <artifactId>spring-cloud-starter-oauth2</artifactId>
            </dependency>
            <dependency>
                <groupId>org.springframework.cloud</groupId>
                <artifactId>spring-cloud-starter-security</artifactId>
            </dependency>

            <dependency>
                <groupId>org.springframework.boot</groupId>
                <artifactId>spring-boot-starter-test</artifactId>
                <scope>test</scope>
                <exclusions>
                    <exclusion>
                        <groupId>org.junit.vintage</groupId>
                        <artifactId>junit-vintage-engine</artifactId>
                    </exclusion>
                </exclusions>
            </dependency>
        </dependencies>

        <dependencyManagement>
            <dependencies>
                <dependency>
                    <groupId>org.springframework.cloud</groupId>
                    <artifactId>spring-cloud-dependencies</artifactId>
                    <version>${spring-cloud.version}</version>
                    <type>pom</type>
                    <scope>import</scope>
                </dependency>
            </dependencies>
        </dependencyManagement>

        <build>
            <plugins>
                <plugin>
                    <groupId>org.springframework.boot</groupId>
                    <artifactId>spring-boot-maven-plugin</artifactId>
                </plugin>
            </plugins>
        </build>

    </project>
- application.yml或者application.properties配置参数
    security.oauth2.client.client-secret=fbe04a07d39e4fxxxxxxxxx //应用密钥
    security.oauth2.client.client-id=AFCenter/881                //clientId
    security.oauth2.client.client-authentication-scheme=query    //security需要设置query模式,否则调用接口时不去添加secret参数
    security.oauth2.client.grant-type=authorization_code         //代表授权码模式
    security.oauth2.client.user-authorization-uri=http://10.15.15.xxx:13083/api/afc/oauth2/authorize	   //获取授权码接口地址
    security.oauth2.client.access-token-uri=http://10.15.15.xxx:13083/api/afc/oauth2/token           //使用授权码Code获取Access-Token接口地址
    security.oauth2.resource.user-info-uri=http://10.15.15.xxx:13083/api/afc/oauth2/user-info      //使用Access-Token获取用户信息接口地址
    server.port=3048											//应用端口

    server.servlet.session.cookie.name=s2						//设置cookie名称
- 主要配置类说明
主要涉及3个类的配置,Security配置类,应用启动类,测试接口类
    //Security配置类
    @Configuration
    @EnableOAuth2Sso //启用SSO客户端模式
    public class SecurityConfig extends WebSecurityConfigurerAdapter {
        @Override
        protected void configure(HttpSecurity http) throws Exception {       										      http.authorizeRequests().anyRequest().authenticated().and().csrf().disable();
     //设置所有接口都需要拦截
        }
    }

    //应用启动类
    @SpringBootApplication
    public class Client2Application {

        public static void main(String[] args) {
            SpringApplication.run(Client2Application.class, args);
        }

    }

    //测试接口类
    @RestController
    public class HelloController {
        @GetMapping("/hello")
        public String hello() {
            Authentication authentication = SecurityContextHolder.getContext().getAuthentication();
            return authentication.getName() + Arrays.toString(authentication.getAuthorities().toArray());
            //从凭证中获取username
        }
    }
🚩注意:
因为AFCenter提供的是RESTFull接口,所以不论后端是什么架构,都可以很方便的实现集成认证中心的功能,基于授权码协议,按照步骤去调用相关接口即可。这里不提供其他方式的Demo,实现时可根据需要确定技术选型,不是只能跟Security集成!