
# 无网关的部署模式
本文档介绍如何在无网关的模式下部署应用
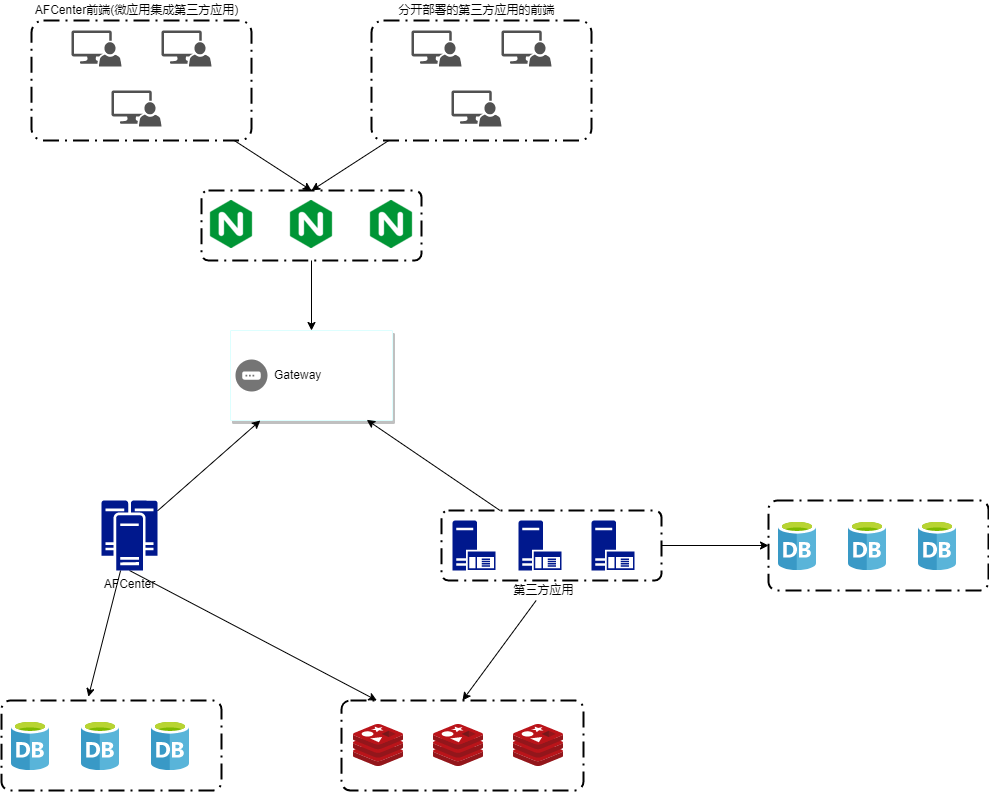
部署图
前端部署说明
集成方案可参考前端集成
微前端的部署
三方应用使用微前端的模式开发后,只需要跟AFCenter的前端部署在一起即可
前端分离的部署
三方应用的前端可独立部署,独立配置单独的Nginx即可
无论是微前端的部署模式,还是独立部署的模式,第三方应用在调用AFCenter的接口时,通过Nginx代理到AFCenter,同时认证也是AFCenter去做(认证成功后,每次请求需要前端携带Authorization请求头)
后端部署说明
集成方案可参考后端集成
- 三方应用的后端首先需要集成AFCenter的sdk
- 与AFCenter连接同一个Redis(单节点或者集群)
- 数据库可以与AFCenter使用同一个,也可以分开使用
- application.yml中配置统一认证参数,afc.login-party.login_uri、afc.login-party.redirect_uri,其中login_uri为AFCenter的登录地址,redirect_uri为本应用的首页
- AFCenter认证成功后,会跳转到redirect_uri对应的应用首页,同时响应头中携带Authorization参数,前端需要缓存此参数,后续调用AFCenter或者自己的应用时都需要带上
后端在访问AFCenter的时候,通过sdk接口进行通信即可
相关中间件安装及配置
Nginx离线安装可参考Nginx离线安装指南
Nginx配置指南
    #user  nobody;
    worker_processes  1;

    #error_log  logs/error.log;
    #error_log  logs/error.log  notice;
    #error_log  logs/error.log  info;

    #pid        logs/nginx.pid;


    events {
        worker_connections  1024;
    }


    http {
        include       mime.types;
        default_type  application/octet-stream;

        #access_log  logs/access.log  main;

        sendfile        on;
        #tcp_nopush     on;

        #keepalive_timeout  0;
        #keepalive_timeout  65;

        #gzip  on;

        server {
            listen       2558; # 代理服务的端口号需要修改
            server_name  localhost; # 代理服务的地址需要修改

            #charset koi8-r;

            #access_log  logs/host.access.log  main;

            location / {
              proxy_http_version 1.1;
              proxy_set_header Host $host;
              proxy_set_header X-Real-IP $remote_addr;
              proxy_set_header X-Forwarded-For $proxy_add_x_forwarded_for;
              root F:/PY/oacenter/afcenter-ui-8.2.1-20220413.065102-12;  #需要替换前端资源dist目录在服务器的完整路径
              index index.html index.htm;
            }

    		# 后端服务反向代理配置
           location /afc {
              proxy_http_version 1.1;
              proxy_set_header Host $host;
              proxy_set_header X-Real-IP $remote_addr;
              proxy_set_header X-Forwarded-For $proxy_add_x_forwarded_for;
              proxy_pass http://localhost:8081/;  #需要替换后端服务所部署的服务器地址以及端口号
           }
        }

    }
修改的内容主要是:
- nginx代理服务器的地址和端口
- 前端dist资源的具体路径
- 后端服务的地址和端口
Redis安装
Redis的安装可以参考Redis安装指南,Redis无特殊配置需要更改,可根据项目需要自行调整具体参数
配置相关(redis/redis.conf)
注释bind 127.0.0.1
    说明:
    bind属性为:绑定的IP。
    与protected-mode属性关联使用,此处暂且取消IP绑定,可根据实际情况而定!
- 将notify-keyspace-events属性的值改为K$g
    说明:
    notify-keyspace-events属性为:事件通知。
 5. 将protected-mode属性的值由yes改为no
    说明:
    protected-mode属性为:是否开启保护模式。
    如关闭,则外部网络可直接访问;
    如开启,则需配置bind ip或者设置访问密码。此处暂且关闭,可根据实际情况而定!

- 将daemonize属性的值由no改为yes
    说明:
    daemonize属性为:是否开启后台启动。
    开启后可确保控制台关闭后,进程在后台继续正常运行!

- 将logfile属性的值改为本机日志存放路径
此路径需要先创建,只需创建到log即可

- 将dir属性的值改为本机rdb/AOF文件的存放路径
此路径需要先创建

- 常用命令(redis目录下使用)
        bin/redis-server redis.conf 根据配置文件启动
        bin/redis-cli shutdown 停止
- 启动并验证(默认端口6379)
AFCenter安装说明
1.  获取AFCenter的安装介质

2.  上传到指定服务器

3.  使用tar -zxvf 8.2LA2/EOS_Platform_8.2LA2_AFCenter.tar.gz 解压tar包

4.  使用db-scripts目录下对应的数据库脚本初始化数据库

5.  AFCenter配置文件参数说明
server.port=8081 #端口号
# pas start
#The context root needs to be the same as that in the appserver-web. XML application deployment
# pas end
server.servlet.context-path=/afc #应用上下文路径
spring.application.name=AFCENTER #应用名称
#spring.profiles.active=eureka
spring.profiles.active=nacos #指定配置文件
#afc.third-party.ding.enable=true #钉钉认证开关
#afc.third-party.ding.app-key=dingiaxxx #钉钉认证app-key
#afc.third-party.ding.secret=uj9FN74Vxxx #钉钉认证secret
#afc.third-party.ding.redirect-uri=http://test.primeton.com:13082/#/login #钉钉认证成功的重定向地址,一般只需要修改域名和端口
#afc.third-party.wechat.enable=true #企业微信认证开关
#afc.third-party.wechat.crop-id=ww9d3xxx #企业微信crop-id
#afc.third-party.wechat.agent-id=10xxx #企业微信agent-id
#afc.third-party.wechat.secret=UjKrD0GUxxx #企业微信secret
#afc.third-party.wechat.redirect-uri=http://test.primeton.com:13082/#/login #企业微信认证成功重定向地址,一般只需要修改域名和端口
#钉钉和企业微信两者默认是互斥的,只能存在一种第三方认证方式
#afc.oauth2.login-url=http://localhost:13082/#/auth #认证中心的前端页面地址,一般只需要更改地址和端口号即可
eos.application.sys-code=EOS-DEMO-SYS #eos应用编码
eos.application.sys-key=dc6baaexxxx #eos应用key
eos.admin.port=7888
# cache config
eos.cache.mode=redis
#sessionRedis
#spring.session.store-type=redis
#spring.session.redis.namespace=afcSession
spring.redis.host=10.15.15.80
spring.redis.port=6379
spring.redis.password=primeton
#spring.session.store-type=redis
#spring.session.redis.namespace=ZZ,DEMO-PROVIDER01,default
#spring.main.allow-bean-definition-overriding=true
spring.redis.lettuce.pool.max-active=100
spring.redis.lettuce.pool.max-idle=100
spring.redis.lettuce.pool.max-wait=5000
hystrix.command.default.execution.isolation.thread.timeoutInMilliseconds=10000
hystrix.threadpool.default.coreSize=100
hystrix.threadpool.default.maximumSize=100
hystrix.threadpool.default.maxQueueSize=100000
hystrix.threadpool.default.queueSizeRejectionThreshold=100000
#iam.enabled=false
#cas.redirect-after-validation=false
#cas.server-login-url=http://127.0.0.1:8080/cas/login
#cas.server-url-prefix=http://127.0.0.1:8080/cas
#cas.client-host-url=http://127.0.0.1:28082
#iam.client.client-id=ebe82b97-3fa0-497e-a2e5-89c7a356dcea
#iam.client.callback-url=http://127.0.0.1:28082
spring.mvc.date-format: yyyy-MM-dd HH:mm:ss
# mode: local,db,nexus
afc.attachments.persistence-mode=local
afc.attachments.local.dir=
afc.attachments.nexus.repository-url=
afc.attachments.nexus.username=
afc.attachments.nexus.password=
# afc environmentï¼devã
afc.environment.active=dev
# operation-logs to history
afc.schedule.logs-to-history.cron=0 0 4 1 1/1 ?
afc.schedule.logs-to-history.stay-month-number=2
afc.encrypt.type=SM2 #前后端密码加密方式RSA和SM2,默认不配置则是RSA加密
server.servlet.session.timeout=PT24H #session失效时间
关键配置都加了说明,可按照需要去修改对应参数
- 配置数据库连接
        在安装目录的config/AFCENTER/config/user-config.xml文件中找到如下节点:
        <module name="DataSource">

                <group name="default">
                    <configValue key="Database-Type">MySql</configValue>
                    <configValue key="Jdbc-Type"/>
                    <configValue key="C3p0-DriverClass">com.mysql.jdbc.Driver</configValue>
                    <configValue key="C3p0-Url">jdbc:mysql://localhost:3306/afcenter</configValue>
                    <configValue key="C3p0-UserName">xxx</configValue>
                    <configValue key="C3p0-Password">xxx</configValue>
                    <configValue key="C3p0-PoolSize">10</configValue>
                    <configValue key="C3p0-MaxPoolSize">50</configValue>
                    <configValue key="C3p0-MinPoolSize">10</configValue>
                    <!-- //seconds, 0 means connections never expire -->
                    <configValue key="C3p0-MaxIdleTime">600</configValue>
                    <!-- //idle connections never tested -->
                    <configValue key="C3p0-IdleConnectionTestPeriod">900</configValue>
                    <configValue key="C3p0-MaxStatements">0</configValue>
                    <configValue key="C3p0-NumHelperThreads">1</configValue>

                    <configValue key="Transaction-Isolation">ISOLATION_DEFAULT</configValue>
                    <configValue key="Test-Connect-Sql">SELECT count(*) from EOS_UNIQUE_TABLE</configValue>
                    <configValue key="Retry-Connect-Count">-1</configValue>
                </group>
            </module>

        修改其中的Database-Type(数据库类型)、C3p0-Url(数据库连接)、C3p0-UserName(用户名)、C3p0-Password(密码)即可
sdk集成模式下还需修改user-confog.xml文件中的CacheForUserObject参数
<group name="CacheForUserObject">
    <configValue key="IsSystemCache">true</configValue>
    <configValue key="CacheMode">REPL_ASYNC</configValue>
    <configValue key="IsSystemShare">true</configValue>
</group>
增加IsSystemShare参数为true
集成sdk的应用还需要在yml中配置eos.application.sys-code、eos.application.sys-key参数,值与afcenter中的属性值一致即可
启动应用
进入安装目录的bin目录下,使用nohup ./startup.sh &命令后台启动应用
停止应用
进入安装目录的bin目录下,使用./shutdown.sh命令停止应用
← 有网关的模式 OAuth2认证中心 →