
# DWS 安装(Standalone 版)
DWS 独立版(Standalone)安装无需像微服务版(MicroApp)那样进行各种环境准备,只要准备好可以连通使用的数据库即可。
具体步骤如下:
# 1. 介质目录结构说明
Primeton_DWS_Standalone_7.1.0.tar.gz 目录结构说明:
   ├── server
   │   ├── dws                  # ~ dws server 所在目录
   │   └── pubresmng_ext_lib    # ~ 公共资源数据库驱动外置目录
   ├── service
   │   ├── dolphin              # ~ DolphinScheduler 调度引擎
   │   ├── primeton-di          # ~ 数据加工作业执行引擎
   │   └── seatunnel            # ~ 数据同步作业执行引擎
   ├── web                      # ~ 前端资源和nginx配置文件
   │   ├── afcenter             # ~ 前端文件
   │   └── conf                 # ~ dws server 所在目录
   │       └── dws.conf         # ~ nginx配置文件示例
   ├── install-cluster.sh       # ~ 一键集群安装脚本
   ├── start-standalone.sh      # ~ 一键启动脚本
   ├── stop-standalone.sh       # ~ 一键停止脚本
   ├── start-cluster.sh         # ~ 一键集群启动脚本
   └── stop-cluster.sh          # ~ 一键集群停止脚本
# 2. 安装前准备
# 2.1 请确保机器已配置 JDK 1.8.0_251 及以上
# 2.2 创建免密用户、配置用户免密及权限
创建用户 dws,并且一定要配置 sudo 免密,产品默认用 dws 用户来运行。
# 创建用户需使用 root 登录
useradd dws

# 添加密码
echo "dws" | passwd --stdin dws

# 配置 sudo 免密
sed -i '$adws  ALL=(ALL)  NOPASSWD: NOPASSWD: ALL' /etc/sudoers
sed -i 's/Defaults    requirett/#Defaults    requirett/g' /etc/sudoers
因为任务执行服务是以
sudo -u {linux-user} 切换不同 linux 用户的方式来实现多租户运行作业,所以部署用户需要有 sudo 权限。
# 2.3 配置机器SSH免密登陆
由于安装的时候需要向不同机器发送资源,所以要求各台机器间能实现SSH免密登陆。配置免密登陆的步骤如下:
su dws

ssh-keygen -t rsa -P '' -f ~/.ssh/id_rsa
cat ~/.ssh/id_rsa.pub >> ~/.ssh/authorized_keys
chmod 600 ~/.ssh/authorized_keys
配置完成后,可以通过运行命令
ssh localhost 判断是否成功,如果不需要输入密码就能 ssh 登陆则证明成功。
# 3. 解压介质
#切换 root 用户
su root
mkdir -p /home/dws/Primeton_DWS_Standalone
#将DWS Standalone介质解压到/home/dws目录下
tar -zxvf Primeton_DWS_Standalone_7.1.0.tar.gz  -C  /home/dws/Primeton_DWS_Standalone
#将目录权限赋予 dws 用户
chown -R dws:dws /home/dws
chmod  -R 755 /home/dws
# 4. 初始化数据库脚本
MySQL 数据库需要设置为大小写不敏感,即: lower_case_table_names=1。
本说明以 MySQL 数据库为例:
# 4.1 创建 DWS 数据库:dws,执行数据库初始化脚本
使用all脚本执行:
server/dws/db-scripts/all/Mysql/all.sql若使用分开的脚本,则需要依次执行以下脚本:
server/dws/db-scripts/single/eos/Mysql/all.sql
server/dws/db-scripts/single/afcenter/Mysql/all.sql
server/dws/db-scripts/single/pubres/Mysql/all.sql
server/dws/db-scripts/single/dws/Mysql/all.sql
server/dws/db-scripts/single/dwsStandalone/Mysql/04-afc-disable-features.sql
# 4.2 创建 dolphin 数据库:dolphinscheduler,执行数据库初始化脚本
service/dolphin/sql-scripts/init/dolphinscheduler_mysql.sql
# 5. 修改配置文件,包括数据库连接、nginx配置
# 5.1 修改DWS数据库连接
修改 server/dws/config/DWS/config/user-config.xml 文件
MySQL:
<group name="default">
<configValue key="Database-Type">MySql</configValue>
<configValue key="Jdbc-Type"/>
<configValue key="C3p0-DriverClass">com.mysql.jdbc.Driver</configValue>
<configValue key="C3p0-Url">jdbc:mysql://127.0.0.1:3306/dws?characterEncoding=utf-8&serverTimezone=Asia/Shanghai</configValue>
<configValue key="C3p0-UserName">root</configValue>
<configValue key="C3p0-Password">primeton</configValue>
<configValue key="C3p0-PoolSize">10</configValue>
<configValue key="C3p0-MaxPoolSize">50</configValue>
<configValue key="C3p0-MinPoolSize">10</configValue>
<!-- //seconds, 0 means connections never expire -->
<configValue key="C3p0-MaxIdleTime">600</configValue>
<!-- //idle connections never tested -->
<configValue key="C3p0-IdleConnectionTestPeriod">900</configValue>
<configValue key="C3p0-MaxStatements">0</configValue>
<configValue key="C3p0-NumHelperThreads">1</configValue>
<configValue key="Transaction-Isolation">ISOLATION_DEFAULT</configValue>
<configValue key="Test-Connect-Sql">SELECT count(*) from EOS_UNIQUE_TABLE</configValue>
<configValue key="Retry-Connect-Count">-1</configValue>
</group>
# 5.2 修改dolphinscheduler_env.sh配置文件
编辑 service/dolphin/bin/env/dolphinscheduler_env.sh文件,修改dolphinscheduler数据源信息,并指定JAVA_HOME、PDI_HOME和SEATUNNEL_HOME环境信息,在本示例中配置如下
(略)
# JAVA_HOME, will use it to start DolphinScheduler server
export JAVA_HOME=${JAVA_HOME:-/opt/java/openjdk}

# Database related configuration, set database type, username and password
#DATABASE目前支持 mysql,DM,postgresql,gaussDB,oracle,SqlServer
export DATABASE=${DATABASE:-mysql}
export SPRING_PROFILES_ACTIVE=${DATABASE}
export SPRING_DATASOURCE_URL="jdbc:mysql://127.0.0.1:3306/dolphinscheduler?serverTimezone=Asia/Shanghai&useSSL=false"
export SPRING_DATASOURCE_USERNAME="root"
export SPRING_DATASOURCE_PASSWORD="primeton"
(略)
export SEATUNNEL_HOME=${SEATUNNEL_HOME:-/home/dws/Primeton_DWS_Standalone/service/seatunnel}
export CHUNJUN_HOME=${CHUNJUN_HOME:-/opt/soft/chunjun}
export PDI_HOME=${PDI_HOME:-/home/dws/Primeton_DWS_Standalone/service/primeton-di/diclient}
(略)
若使用PostgreSQL数据库,SPRING_DATASOURCE_URL参数中的url需要配置参数:stringtype=unspecified。否则运行作业时会报错,参考如下配置:
#数据库使用PostgreSQL时的配置
export SPRING_DATASOURCE_URL="jdbc:postgresql://127.0.0.1:5432/dolphin_dev?stringtype=unspecified"
# 5.3 修改 nginx.conf 配置
Nginx安装请参考Nginx安装指南
修改 web/conf/dws.conf 文件,
location /的地址指向web/afcenter目录cd /home/dws/Primeton_DWS_Standalone vim web/conf/dws.conf# a part of nginx configuration e.g. # nginx.conf should include the file # DWS/AFCenter standalone servers upstream afcenter { server 127.0.0.1:28085; } server { listen 80; charset utf-8; client_max_body_size 200M; # 超时设置 proxy_connect_timeout 600s;#设置连接超时时间 proxy_send_timeout 600s; #设置发送超时时间 proxy_read_timeout 600s;#设置读取超时时间 proxy_http_version 1.1; # 请求头转发设置 proxy_set_header Host $host; proxy_set_header X-Real-IP $remote_addr; proxy_set_header X-Real-Port $remote_port; proxy_set_header REMOTE-HOST $remote_addr; proxy_set_header X-Forwarded-For $proxy_add_x_forwarded_for; proxy_set_header Upgrade $http_upgrade; proxy_set_header Connection "Upgrade"; # 安全响应头设置 add_header X-Content-Type-Options nosniff; add_header X-XSS-Protection "1"; add_header X-Frame-Options "SAMEORIGIN"; add_header Content-Security-Policy "script-src * 'unsafe-inline' 'unsafe-eval'"; add_header Strict-Transport-Security "max-age=SECONDS"; add_header X-Permitted-Cross-Domain-Policies "master-only"; add_header X-Download-Options noopen; add_header Referrer-Policy "no-referrer" always; # 静态文件服务 location / { # change to your web resource folder ${DWS_SERVER_HOME}/web/afcenter, or copy to here: /usr/share/nginx/afcenter root /home/dws/Primeton_DWS_Standalone/web/afcenter; index index.html index.htm; try_files $uri /index.html; } # API反向代理 # if afcenter web-ui express mode enabled, route by path prefix /api/ # all API request forward to one server (only one API route) # else use path rewrite (multi-routes required, remove path suffix e.g. /afc/api* => /api/*; /DWS/api/* => /api/*, ...) location ^~/api/ { proxy_pass http://afcenter; } #location ~ \.biz\.ext$ { # proxy_pass http://afcenter; # } # ... }修改 nginx.conf 文件,引用 dws.conf 配置文件
vim nginx.confhttp { # 其他全局配置... include /home/dws/Primeton_DWS_Standalone/web/conf/dws.conf; # 使用绝对路径引入dws.conf }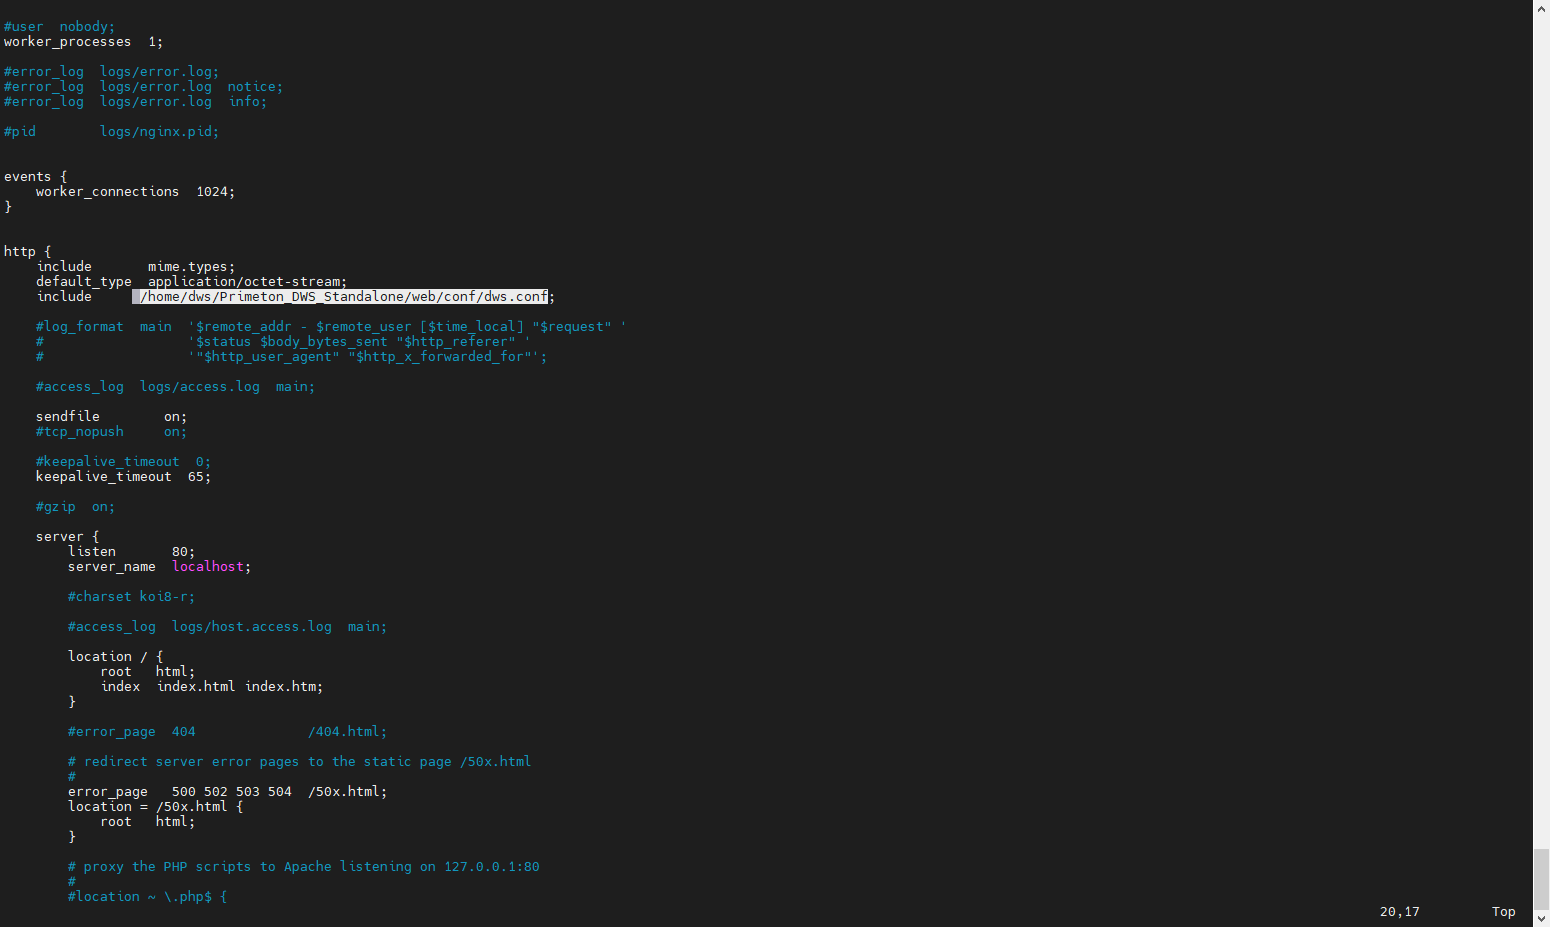
配置完成后重新启动 nginx 服务
cd nginx安装目录
./sbin/nginx      # 启动服务
./nginx -s reload # 重新加载
./nginx -s stop   # 停止服务
# 5.4 开启 DWS 血缘分析(可选配置)
具体配置参见血缘地图中的配置说明。
# 5.5 Standalone Server 相关配置(可选配置)
service/dolphin/standalone-server/conf/application.yaml 文件中包含了master和worker的相关配置参数。
application.yaml 配置项说明:
| 配置项 | 默认值 | 描述 |
|---|---|---|
| max-system-cpu-usage-percentage-thresholds | 0.8 | worker最大系统cpu使用值,只有当前系统cpu使用值低于最大系统cpu使用值,worker服务才能接收任务. 默认值为0.8: 会使用80%的操作系统CPU |
| max-jvm-cpu-usage-percentage-thresholds | 0.8 | worker最大JVM cpu使用值,只有当前JVM cpu使用值低于最大JVM cpu使用值,worker服务才能接收任务. 默认值为0.8: 会使用80%的JVM CPU。 |
| max-system-memory-usage-percentage-thresholds | 0.8 | worker最大系统 内存使用值,只有当前系统内存使用值低于最大系统内存使用值,worker服务才能接收任务. 默认值为0.8: 会使用80%的操作系统内存。 |
| max-disk-usage-percentage-thresholds | 0.8 | worker最大系统磁盘使用值,只有当前系统磁盘使用值低于最大系统磁盘使用值,worker服务才能接收任务. 默认值为0.8: 会使用80%的操作系统磁盘空间。 |
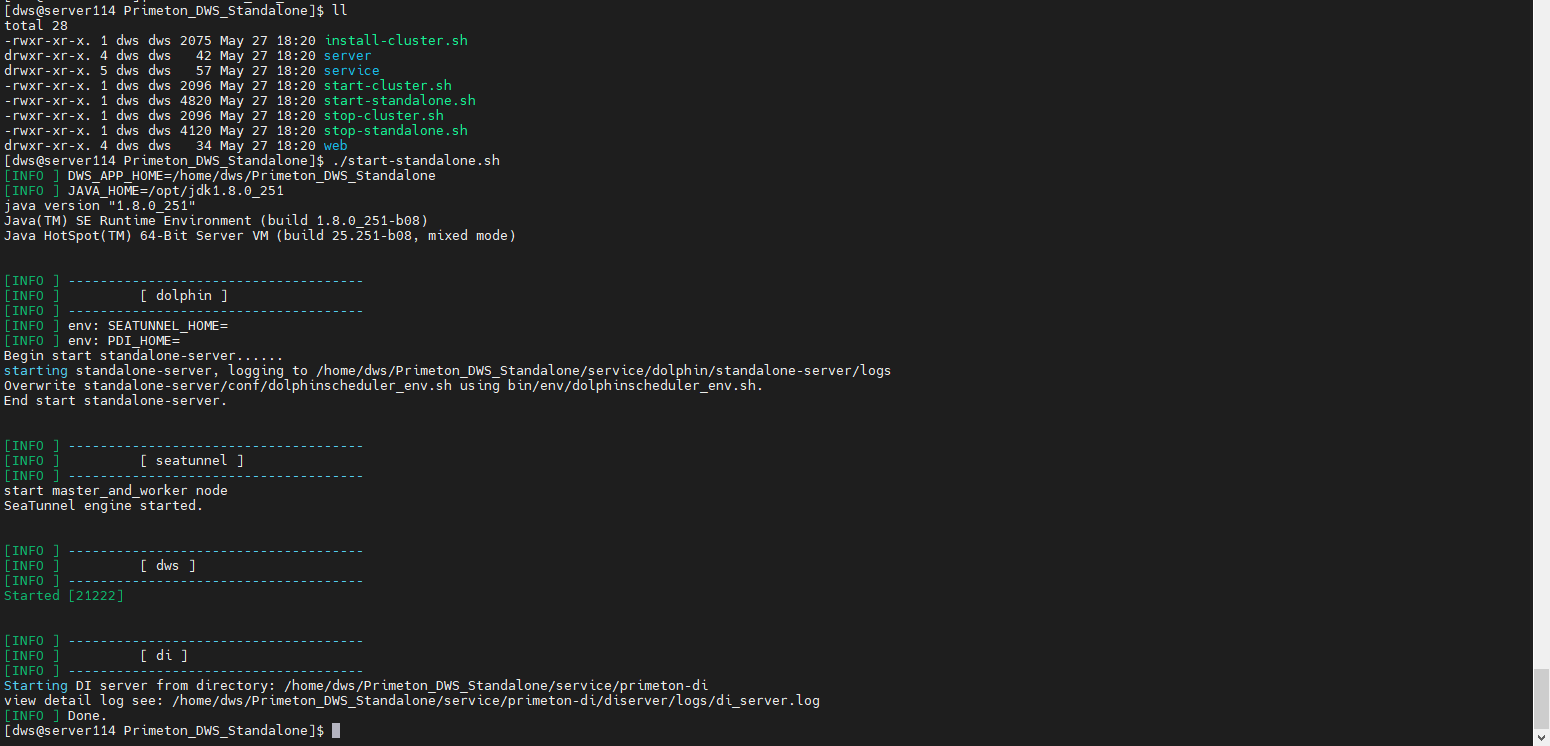
# 6. 一键启动/停止服务
一键启动/停止会将所有服务启动/停止。
 #切换 dws 用户
 su dws
 cd /home/dws/Primeton_DWS_Standalone
 #启动服务
 ./start-standalone.sh
 #切换 dws 用户
 su dws
 cd /home/dws/Primeton_DWS_Standalone

 #停止服务
 ./stop-standalone.sh

如果需要单独启动某个服务,参考如下命名:
- 启动/停止 dolphin 服务
 #启动服务
 ./start-standalone.sh dolphin
 #停止服务
 ./stop-standalone.sh dolphin
- 启动/停止 seatunnel 服务
 #启动服务
 ./start-standalone.sh seatunnel
 #停止服务
 ./stop-standalone.sh seatunnel
- 启动/停止 DI 服务
 #启动服务
 ./start-standalone.sh di
 #停止服务
 ./stop-standalone.sh di
- 启动/停止 dws 服务
 #启动服务
 ./start-standalone.sh dws
 #停止服务
 ./stop-standalone.sh dws
# 7. 集群部署 dolphin、primeton-di、seatunnel(可选步骤)
当需要将dolphin、primeton-di、seatunnel 部署为集群时,可参考此步骤。此时 service 目录下的dolphin、primeton-di和seatunnel可当做解压介质目录,集群安装时实际的安装路径在install_env.sh文件中配置。
集群部署的服务器需要配置 dws 用户免密。
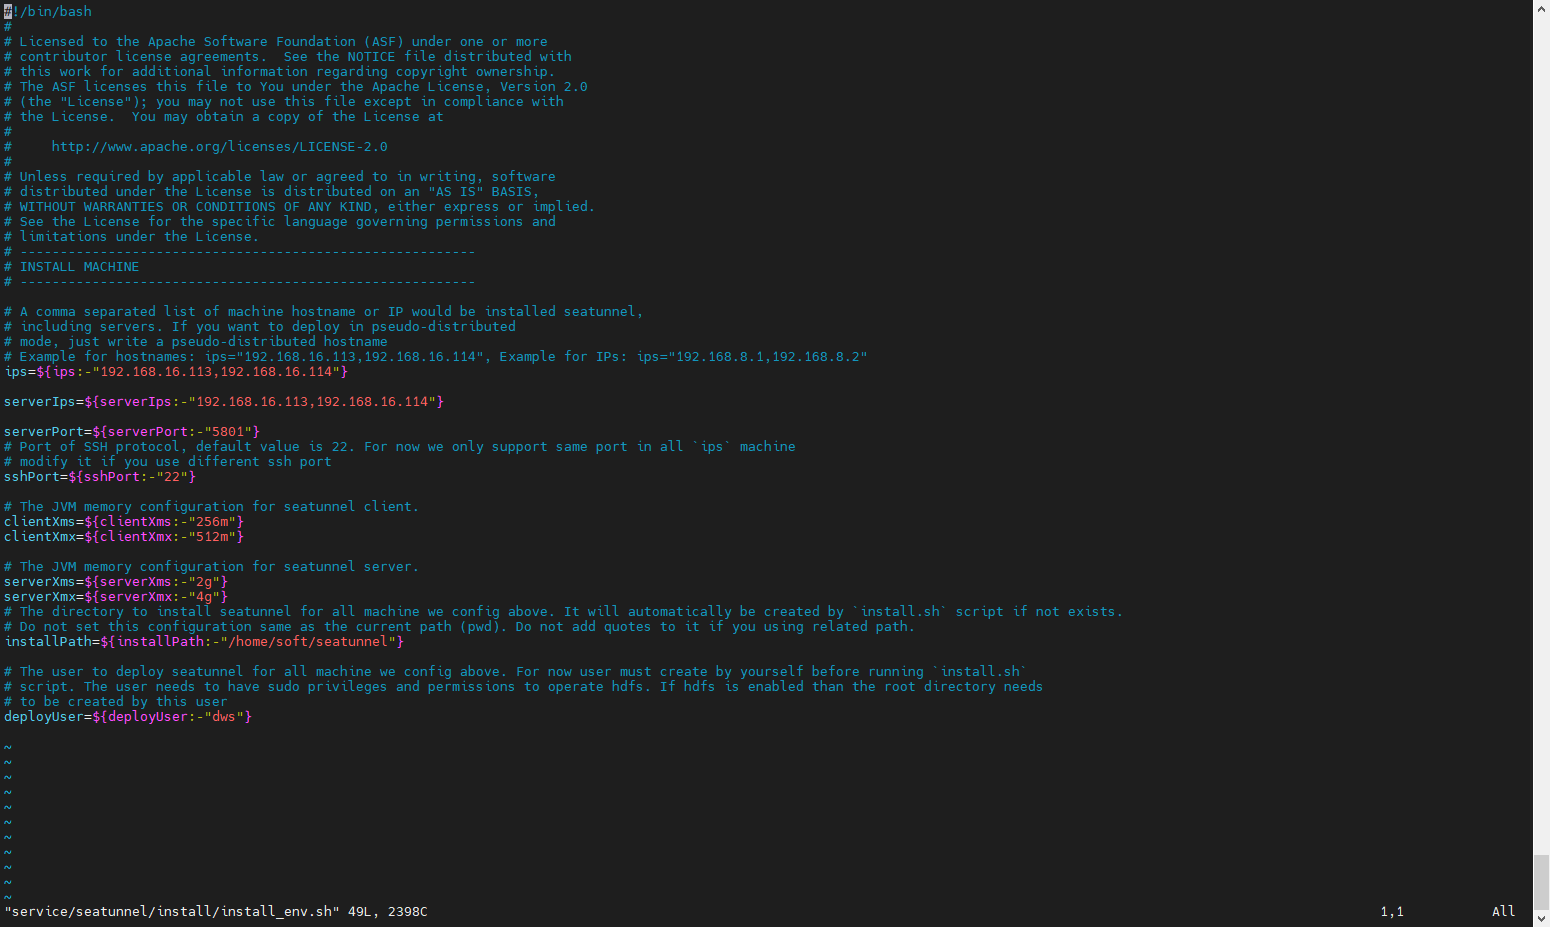
# 7.1 修改 service/seatunnel/install/install_env.sh 文件
修改service/seatunnel/install/install_env.sh脚本中的ips和installPath参数值为需要集群部署的机器地址和安装路径。
vim service/seatunnel/install/install_env.sh
ips=${ips:-"192.168.16.113,192.168.16.114"}

serverIps=${serverIps:-"192.168.16.113,192.168.16.114"}

serverPort=${serverPort:-"5801"}

sshPort=${sshPort:-"22"}

clientXms=${clientXms:-"256m"}
clientXmx=${clientXmx:-"512m"}

serverXms=${serverXms:-"2g"}
serverXmx=${serverXmx:-"4g"}

installPath=${installPath:-"/home/soft/seatunnel"}

deployUser=${deployUser:-"dws"}
# 7.2 修改service/primeton-di/install/install_env.sh文件
修改service/primeton-di/install/install_env.sh脚本中的ips和installPath参数值为需要集群部署的机器地址和安装路径。
vim service/primeton-di/install/install_env.sh
ips=${ips:-"192.168.16.113,192.168.16.114"}

serverIps=${serverIps:-"192.168.16.113,192.168.16.114"}

serverPort=${serverPort:-"6000"}

sshPort=${sshPort:-"22"}

clientXms=${clientXms:-"256m"}
clientXmx=${clientXmx:-"512m"}

serverXms=${serverXms:-"2g"}
serverXmx=${serverXmx:-"4g"}

installPath=${installPath:-"/home/soft/primeton-di"}

deployUser=${deployUser:-"dws"}

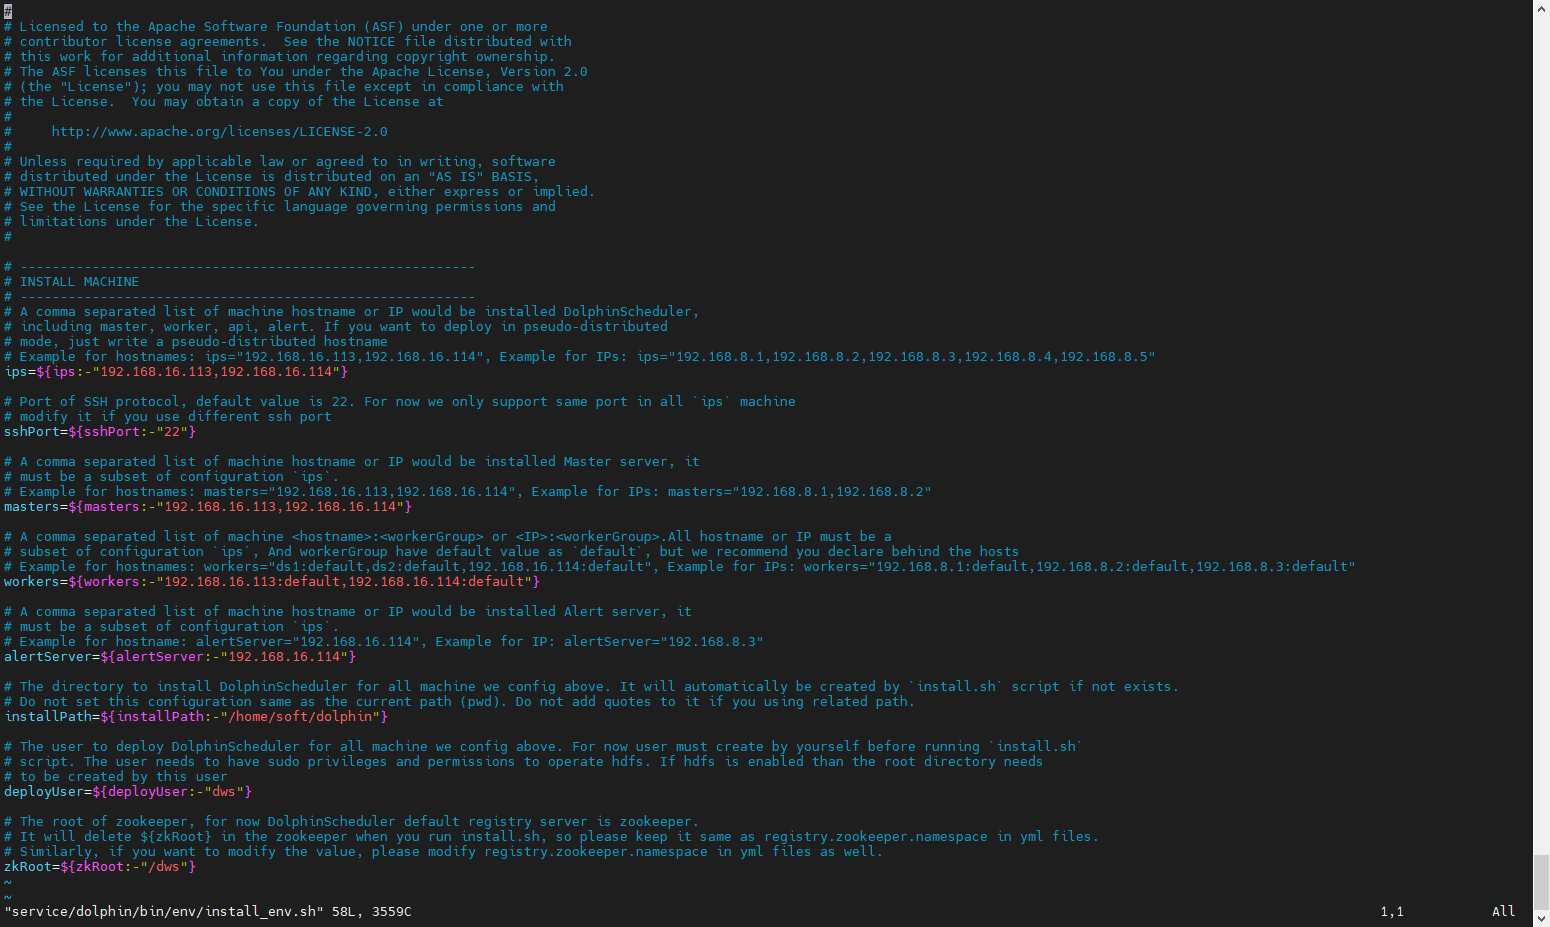
# 7.3 修改service/dolphin/bin/env/install_env.sh文件
install_env.sh 描述了哪些机器将被安装 DolphinScheduler 以及每台机器对应安装哪些服务。
vim service/dolphin/bin/env/install_env.sh
ips=${ips:-"192.168.16.113,192.168.16.114"}
sshPort=${sshPort:-"22"}
masters=${masters:-"192.168.16.113,192.168.16.114"}
workers=${workers:-"192.168.16.113:default,192.168.16.114:default"}
alertServer=${alertServer:-"192.168.16.114"}

#配置dolphinscheduler安装路径,在bin/install.sh运行后会安装dolphinscheduler到该目录下
installPath=${installPath:-"/home/soft/dolphin"}

#部署用户,即配置的免密用户
deployUser=${deployUser:-"dws"}
#与application.yaml中的namespace一致
zkRoot=${zkRoot:-"/dws"}
# 7.4 修改 service/dolphin/bin/env/dolphinscheduler_env.sh 文件
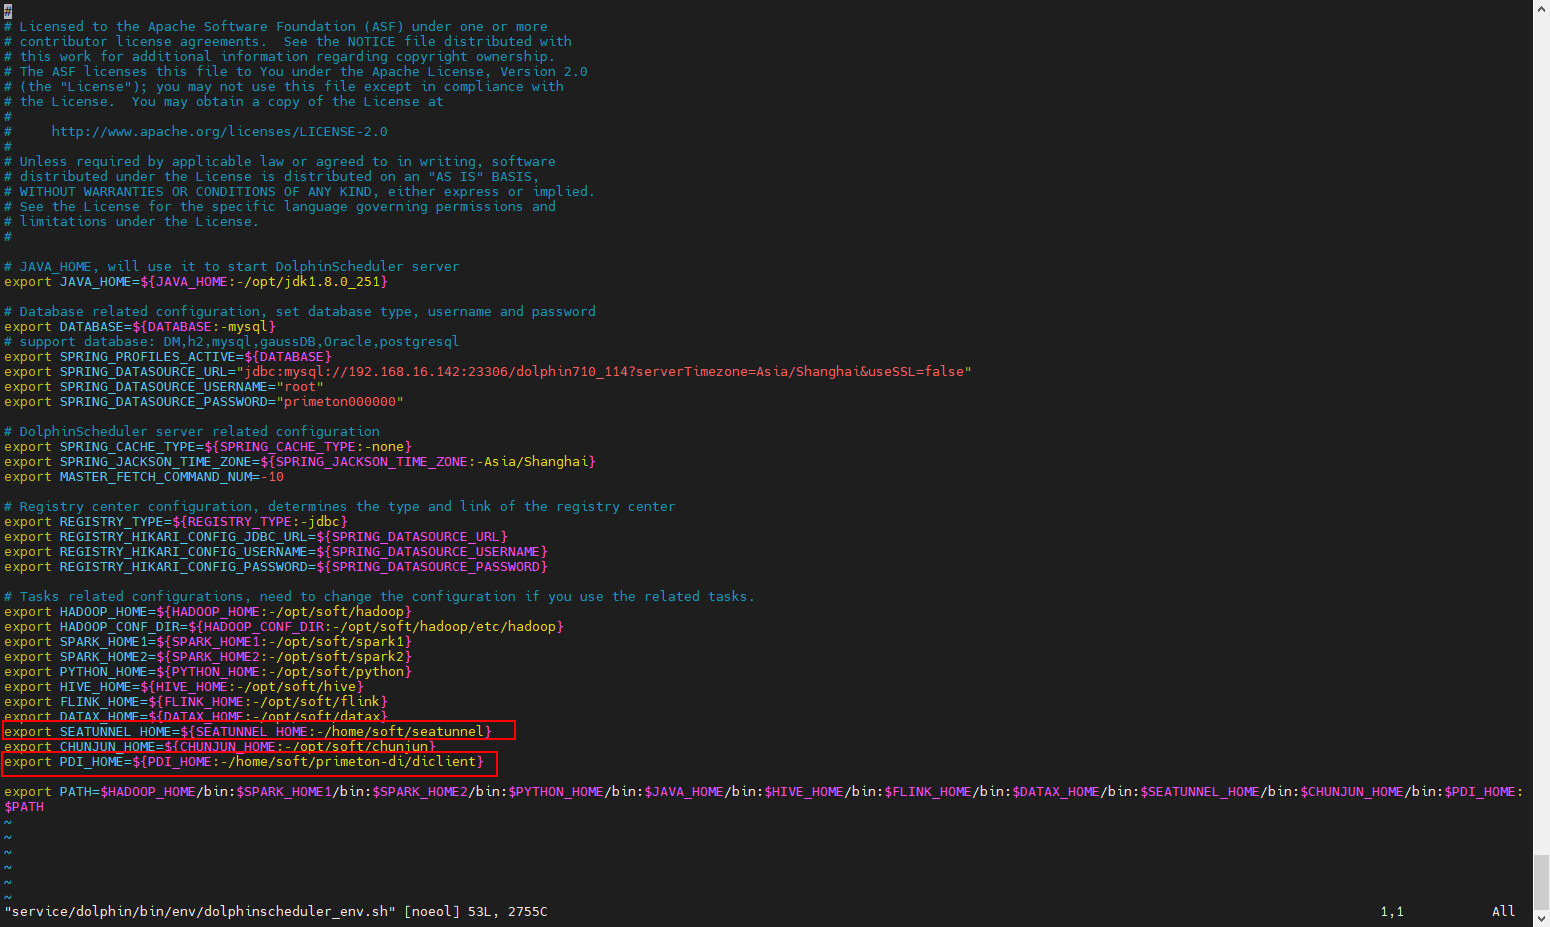
编辑 service/dolphin/bin/env/dolphinscheduler_env.sh文件,修改dolphinscheduler数据源信息,并指定JAVA_HOME、PDI_HOME和SEATUNNEL_HOME环境信息,这里的PDI_HOME和SEATUNNEL_HOME环境变量值应是7.1和7.2步骤中设置的installPath,在本示例中配置如下
vim service/dolphin/bin/env/dolphinscheduler_env.sh
(略)
# JAVA_HOME, will use it to start DolphinScheduler server
export JAVA_HOME=${JAVA_HOME:-/opt/jdk1.8.0_251}

# Database related configuration, set database type, username and password
#DATABASE目前支持 mysql,DM,postgresql,gaussDB,oracle,SqlServer
export DATABASE=${DATABASE:-mysql}
export SPRING_PROFILES_ACTIVE=${DATABASE}
export SPRING_DATASOURCE_URL="jdbc:mysql://127.0.0.1:3306/dolphinscheduler?serverTimezone=Asia/Shanghai&useSSL=false"
export SPRING_DATASOURCE_USERNAME="root"
export SPRING_DATASOURCE_PASSWORD="primeton"
(略)
export SEATUNNEL_HOME=${SEATUNNEL_HOME:-/home/soft/seatunnel}
export CHUNJUN_HOME=${CHUNJUN_HOME:-/opt/soft/chunjun}
export PDI_HOME=${PDI_HOME:-/home/soft/primeton-di/diclient}
(略)
# 7.5 Master|Worker Server相关配置(可选)
位置:service/dolphin/master-server/conf/application.yaml和service/dolphin/worker-server/conf/application.yaml
application.yaml配置项说明:
| 配置项 | 默认值 | 描述 |
|---|---|---|
| max-system-cpu-usage-percentage-thresholds | 0.8 | worker最大系统cpu使用值,只有当前系统cpu使用值低于最大系统cpu使用值,worker服务才能接收任务. 默认值为0.8: 会使用80%的操作系统CPU |
| max-jvm-cpu-usage-percentage-thresholds | 0.8 | worker最大JVM cpu使用值,只有当前JVM cpu使用值低于最大JVM cpu使用值,worker服务才能接收任务. 默认值为0.8: 会使用80%的JVM CPU。 |
| max-system-memory-usage-percentage-thresholds | 0.8 | worker最大系统 内存使用值,只有当前系统内存使用值低于最大系统内存使用值,worker服务才能接收任务. 默认值为0.8: 会使用80%的操作系统内存。 |
| max-disk-usage-percentage-thresholds | 0.8 | worker最大系统磁盘使用值,只有当前系统磁盘使用值低于最大系统磁盘使用值,worker服务才能接收任务. 默认值为0.8: 会使用80%的操作系统磁盘空间。 |
# 7.6 安装集群
运行安装脚本install-cluster.sh
su dws
cd /home/dws/Primeton_DWS_Standalone
./install-cluster.sh
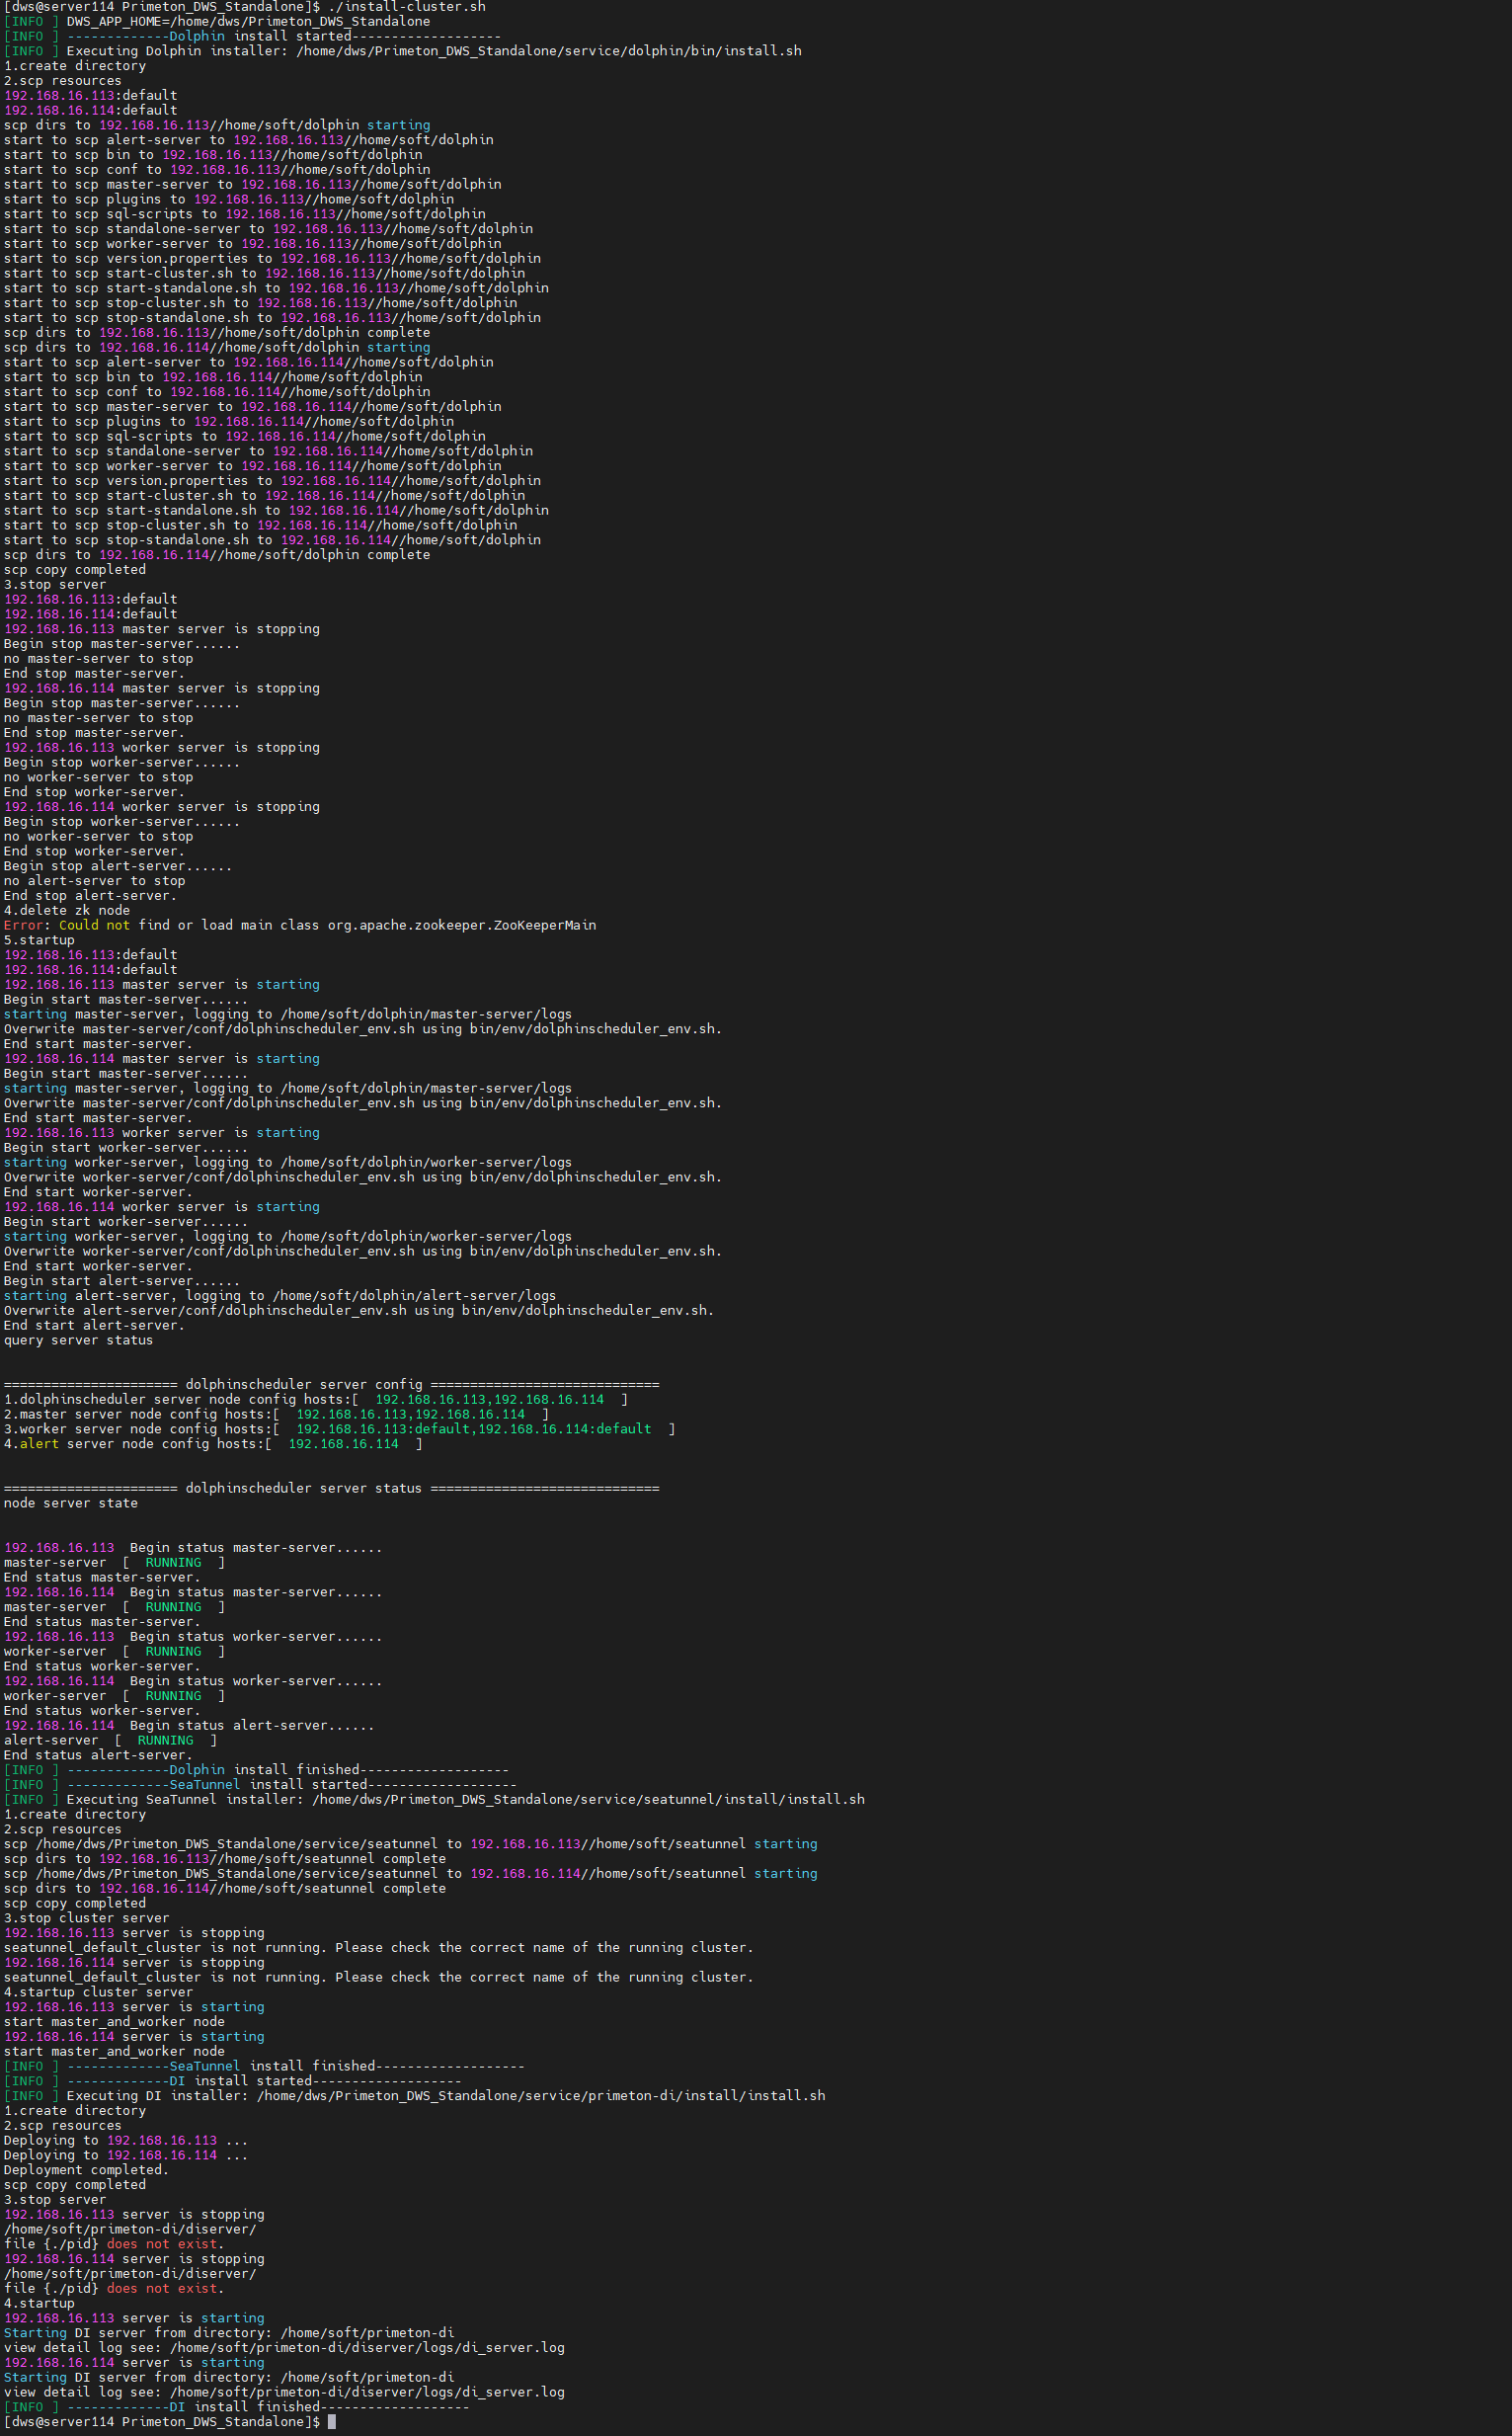
安装完成后,会自动启动dolphin、primeton-di、seatunnel集群。
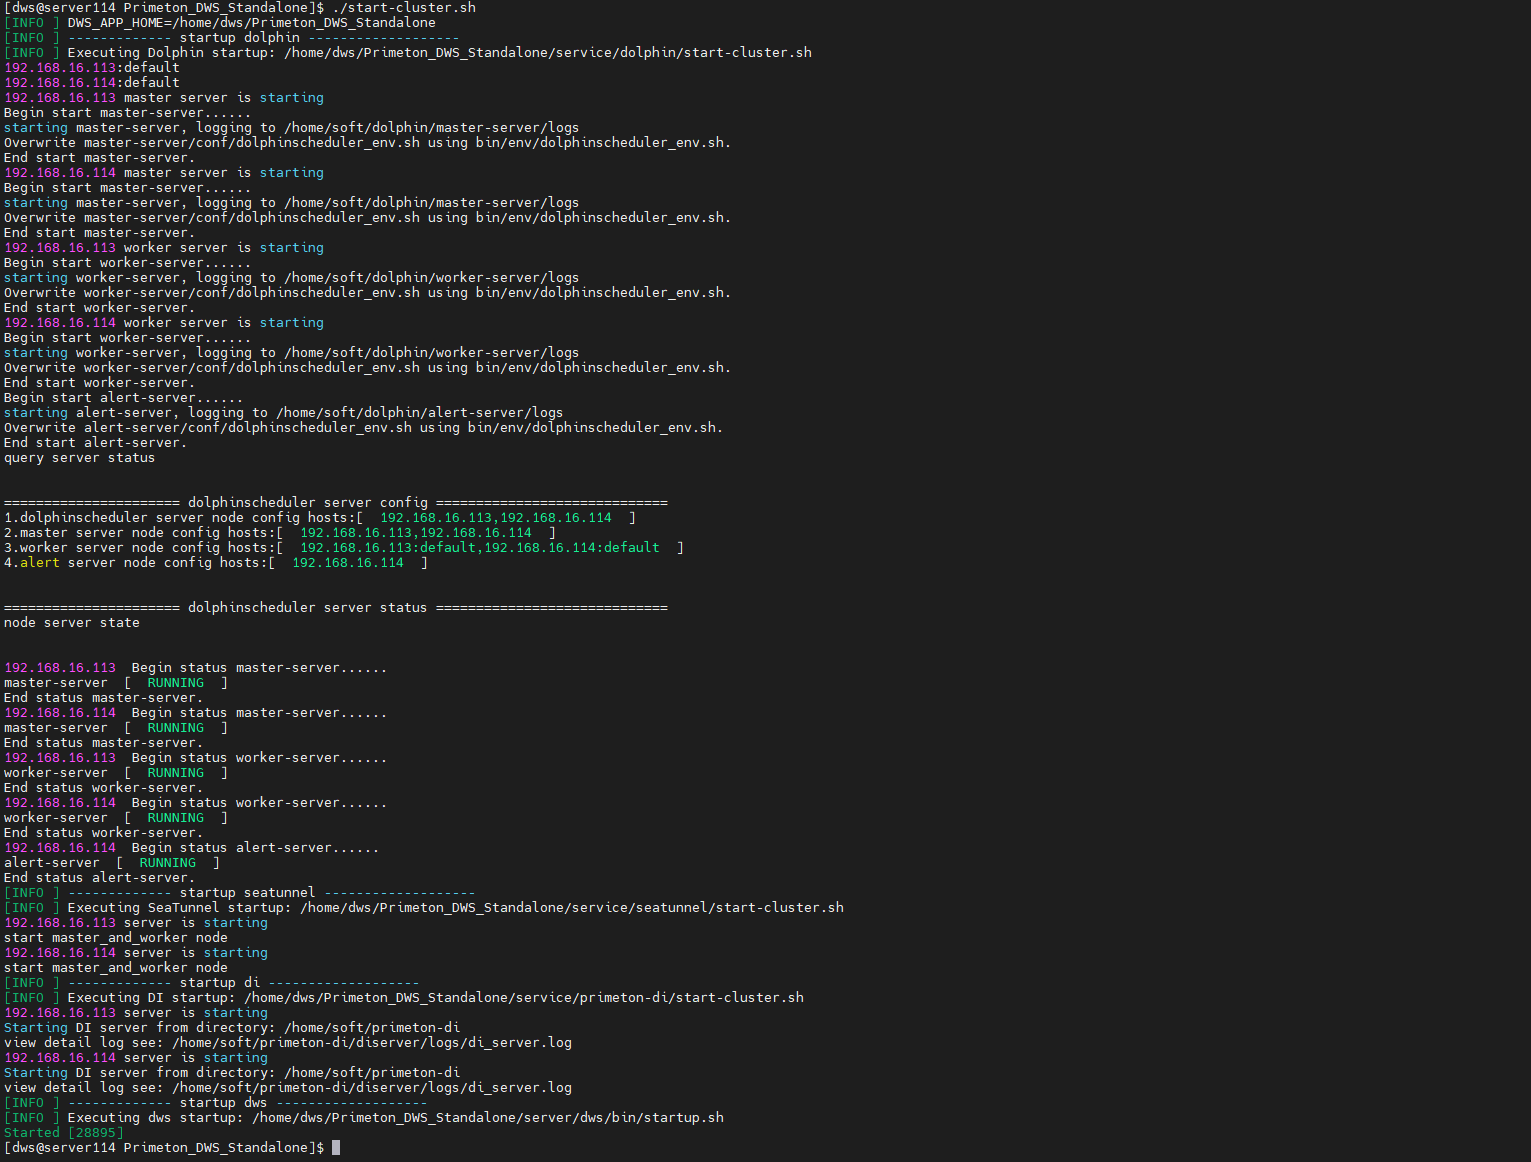
# 7.7 集群服务启停
 #切换 dws 用户
 su dws
 cd /home/dws/Primeton_DWS_Standalone

#启动服务
./start-cluster.sh
#停止服务
./stop-cluster.sh

# 8. 访问地址
 http://localhost:80
 默认账号/密码:admin/000000
# 9. 其他参考
如果用户需要修改介质中默认的配置值,可以参考如下章节内容进行修改。
# 9.1 端口号
| dolphin master | dolphin worker | dolphin alert | dws | nginx |
|---|---|---|---|---|
| 5678 | 1234 | 50052 | 28085 | 80 |
# 9.2 修改数据库的连接配置、服务的 IP 地址
- 修改 server/dws/config/DWS/config/user-config.xml
MySQL:
<group name="default">
<configValue key="Database-Type">MySql</configValue>
<configValue key="Jdbc-Type"/>
<configValue key="C3p0-DriverClass">com.mysql.jdbc.Driver</configValue>
<configValue key="C3p0-Url">jdbc:mysql://127.0.0.1:3306/dws?characterEncoding=utf-8&serverTimezone=Asia/Shanghai</configValue>
<configValue key="C3p0-UserName">root</configValue>
<configValue key="C3p0-Password">primeton</configValue>
<configValue key="C3p0-PoolSize">10</configValue>
<configValue key="C3p0-MaxPoolSize">50</configValue>
<configValue key="C3p0-MinPoolSize">10</configValue>
<!-- //seconds, 0 means connections never expire -->
<configValue key="C3p0-MaxIdleTime">600</configValue>
<!-- //idle connections never tested -->
<configValue key="C3p0-IdleConnectionTestPeriod">900</configValue>
<configValue key="C3p0-MaxStatements">0</configValue>
<configValue key="C3p0-NumHelperThreads">1</configValue>
<configValue key="Transaction-Isolation">ISOLATION_DEFAULT</configValue>
<configValue key="Test-Connect-Sql">SELECT count(*) from EOS_UNIQUE_TABLE</configValue>
<configValue key="Retry-Connect-Count">-1</configValue>
</group>
Oracle:
<group name="default">
            <configValue key="Database-Type">Oracle</configValue>
            <configValue key="Jdbc-Type"/>
            <configValue key="C3p0-DriverClass">oracle.jdbc.OracleDriver</configValue>
            <configValue key="C3p0-Url">jdbc:oracle:thin:@127.0.0.1:1521:orcl</configValue>
            <configValue key="C3p0-UserName">C##DWS_INIT</configValue>
            <configValue key="C3p0-Password">primeton</configValue>
            <configValue key="C3p0-PoolSize">10</configValue>
            <configValue key="C3p0-MaxPoolSize">50</configValue>
            <configValue key="C3p0-MinPoolSize">10</configValue>
            <!-- //seconds, 0 means connections never expire -->
            <configValue key="C3p0-MaxIdleTime">600</configValue>
            <!-- //idle connections never tested -->
            <configValue key="C3p0-IdleConnectionTestPeriod">900</configValue>
            <configValue key="C3p0-MaxStatements">0</configValue>
            <configValue key="C3p0-NumHelperThreads">1</configValue>
            <configValue key="Transaction-Isolation">ISOLATION_DEFAULT</configValue>
            <configValue key="Test-Connect-Sql">SELECT count(*) from EOS_UNIQUE_TABLE</configValue>
            <configValue key="Retry-Connect-Count">-1</configValue>
  </group>
PostgreSQL: url连接中必须增加参数 ?stringtype=unspecified
 <group name="default">
            <configValue key="Database-Type">postgresql</configValue>
            <configValue key="Jdbc-Type"/>
            <configValue key="C3p0-DriverClass">org.postgresql.Driver</configValue>
            <configValue key="C3p0-Url">jdbc:postgresql://127.0.0.1:5432/dws7la_test?stringtype=unspecified</configValue>
            <configValue key="C3p0-UserName">dws7la_test</configValue>
            <configValue key="C3p0-Password">primeton</configValue>
            <configValue key="C3p0-PoolSize">10</configValue>
            <configValue key="C3p0-MaxPoolSize">50</configValue>
            <configValue key="C3p0-MinPoolSize">10</configValue>
            <!-- //seconds, 0 means connections never expire -->
            <configValue key="C3p0-MaxIdleTime">600</configValue>
            <!-- //idle connections never tested -->
            <configValue key="C3p0-IdleConnectionTestPeriod">900</configValue>
            <configValue key="C3p0-MaxStatements">0</configValue>
            <configValue key="C3p0-NumHelperThreads">1</configValue>
            <configValue key="Transaction-Isolation">ISOLATION_DEFAULT</configValue>
            <configValue key="Test-Connect-Sql">SELECT count(*) from EOS_UNIQUE_TABLE</configValue>
            <configValue key="Retry-Connect-Count">-1</configValue>
  </group>
DM:
 <group name="default">
            <configValue key="Database-Type">DM</configValue>
            <configValue key="Jdbc-Type"/>
            <configValue key="C3p0-DriverClass">dm.jdbc.driver.DmDriver</configValue>
            <configValue key="C3p0-Url">jdbc:dm://127.0.0.1:5236/DWSV7LA</configValue>
            <configValue key="C3p0-UserName">DWSV7LA</configValue>
            <configValue key="C3p0-Password">primeton</configValue>
            <configValue key="C3p0-PoolSize">10</configValue>
            <configValue key="C3p0-MaxPoolSize">50</configValue>
            <configValue key="C3p0-MinPoolSize">10</configValue>
            <!-- //seconds, 0 means connections never expire -->
            <configValue key="C3p0-MaxIdleTime">600</configValue>
            <!-- //idle connections never tested -->
            <configValue key="C3p0-IdleConnectionTestPeriod">900</configValue>
            <configValue key="C3p0-MaxStatements">0</configValue>
            <configValue key="C3p0-NumHelperThreads">1</configValue>
            <configValue key="Transaction-Isolation">ISOLATION_DEFAULT</configValue>
            <configValue key="Test-Connect-Sql">SELECT count(*) from EOS_UNIQUE_TABLE</configValue>
            <configValue key="Retry-Connect-Count">-1</configValue>
  </group>
openGauss:
 <group name="default">
            <configValue key="Database-Type">gaussDB</configValue>
            <configValue key="Jdbc-Type"/>
            <configValue key="C3p0-DriverClass">org.opengauss.Driver</configValue>
            <configValue key="C3p0-Url">jdbc:opengauss://127.0.0.1:15432/dws7_test</configValue>
            <configValue key="C3p0-UserName">gaussdb</configValue>
            <configValue key="C3p0-Password">primeton</configValue>
            <configValue key="C3p0-PoolSize">10</configValue>
            <configValue key="C3p0-MaxPoolSize">50</configValue>
            <configValue key="C3p0-MinPoolSize">10</configValue>
            <!-- //seconds, 0 means connections never expire -->
            <configValue key="C3p0-MaxIdleTime">600</configValue>
            <!-- //idle connections never tested -->
            <configValue key="C3p0-IdleConnectionTestPeriod">900</configValue>
            <configValue key="C3p0-MaxStatements">0</configValue>
            <configValue key="C3p0-NumHelperThreads">1</configValue>
            <configValue key="Transaction-Isolation">ISOLATION_DEFAULT</configValue>
            <configValue key="Test-Connect-Sql">SELECT count(*) from EOS_UNIQUE_TABLE</configValue>
            <configValue key="Retry-Connect-Count">-1</configValue>
  </group>
Sqlserver:
<group name="default">
            <configValue key="Database-Type">SqlServer</configValue>
            <configValue key="Jdbc-Type"/>
            <configValue key="C3p0-DriverClass">com.microsoft.sqlserver.jdbc.SQLServerDriver</configValue>
            <configValue key="C3p0-Url">jdbc:sqlserver://127.0.0.1:1433;databaseName=dws7;trustServerCertificate=true</configValue>
            <configValue key="C3p0-UserName">dws7</configValue>
            <configValue key="C3p0-Password">primeton</configValue>
            <configValue key="C3p0-PoolSize">10</configValue>
            <configValue key="C3p0-MaxPoolSize">50</configValue>
            <configValue key="C3p0-MinPoolSize">10</configValue>
            <!-- //seconds, 0 means connections never expire -->
            <configValue key="C3p0-MaxIdleTime">600</configValue>
            <!-- //idle connections never tested -->
            <configValue key="C3p0-IdleConnectionTestPeriod">900</configValue>
            <configValue key="C3p0-MaxStatements">0</configValue>
            <configValue key="C3p0-NumHelperThreads">1</configValue>
            <configValue key="Transaction-Isolation">ISOLATION_DEFAULT</configValue>
            <configValue key="Test-Connect-Sql">SELECT count(*) from EOS_UNIQUE_TABLE</configValue>
            <configValue key="Retry-Connect-Count">-1</configValue>
        </group>
- 修改 DWS 服务 IP 及端口:server/dws/config/application.properties
(略)
server.port=28085
(略)
- 修改 dolphin 服务 IP 及端口:service/dolphin/standalone-server/conf/application.yaml
(略)
master:
  listen-port: 5678

worker:
  # worker listener port
  listen-port: 1234

alert:
  port: 50052

(略)
# 9.3 dolphin 对接分布式或远端对象存储(可选配置)
如果用户需要使用大数据环境进行文件管理(DWS的数据开发->项目配置->文件管理),则需进行以下配置。
参考 DolphinScheduler 的对接分布式或远端对象存储
- 修改 service/dolphin/standalone-server/conf/common.properties 文件
- 将对应大数据环境的配置文件 core-site.xml 和 hdfs-site.xml 拷贝至 service/dolphin/standalone-server/conf/ 目录下。
- 当使用集群部署 dolphin 后,则需要将大数据环境的配置文件 core-site.xml 和 hdfs-site.xml 拷贝至安装目录的 master-server 和 worker-server 的 conf 目录下。