
# DolphinScheduler安装指南
DolphinScheduler 介质说明
apache-dolphinscheduler-7.1.0-bin.tar.gz
  ├── alert-server	 #告警服务
  ├── bin			 #配置相关环境变量信息、数据库连接信息等
  ├── master-server	 #master server负责作业定时调度以及任务下发,可横向扩容
  ├── plugins        #插件
  ├── sql-scripts    #初始化脚本
  ├── standalone-server #单机服务
  └── worker-server  #worker server任务执⾏节点资源,可横向扩容
1、请确保机器已配置 JDK 1.8.0_251 及以上。
2、已创建免密用户、配置用户免密及权限,参考 DWS安装必读
3、安装进程树分析命令,不同操作系统的安装方式不同。
pstreepsmisc,如:yum install psmiscsudo -u {linux-user} 切换不同 linux 用户的方式来实现多租户运行作业,所以部署用户需要有 sudo 权限。# 1. 解压介质
约定当前目录为 /home/dws
tar -zxvf apache-dolphinscheduler-7.1.0-bin.tar.gz -C /home/dws
# 2.修改目录权限
使用户对二进制包解压后的apache-dolphinscheduler-*-bin 目录有操作权限
chown -R dws:dws apache-dolphinscheduler-7.1.0-bin
mv  apache-dolphinscheduler-7.1.0-bin  apache-dolphinscheduler
# 3. 初始化数据库
使用sql-scripts/init目录下对应的数据库脚本执行初始化。目前支持以下类型数据库:
达梦数据库脚本:dolphinscheduler_dm.sql
MySQL数据库脚本:dolphinscheduler_mysql.sql
openGauss数据库脚本:dolphinscheduler_openguass.sql
Oracle数据库脚本:dolphinscheduler_oracle.sql
PostgreSQL数据库脚本:dolphinscheduler_postgresql.sql
SQL Server数据库脚本: dolphinscheduler_SqlServer.sql
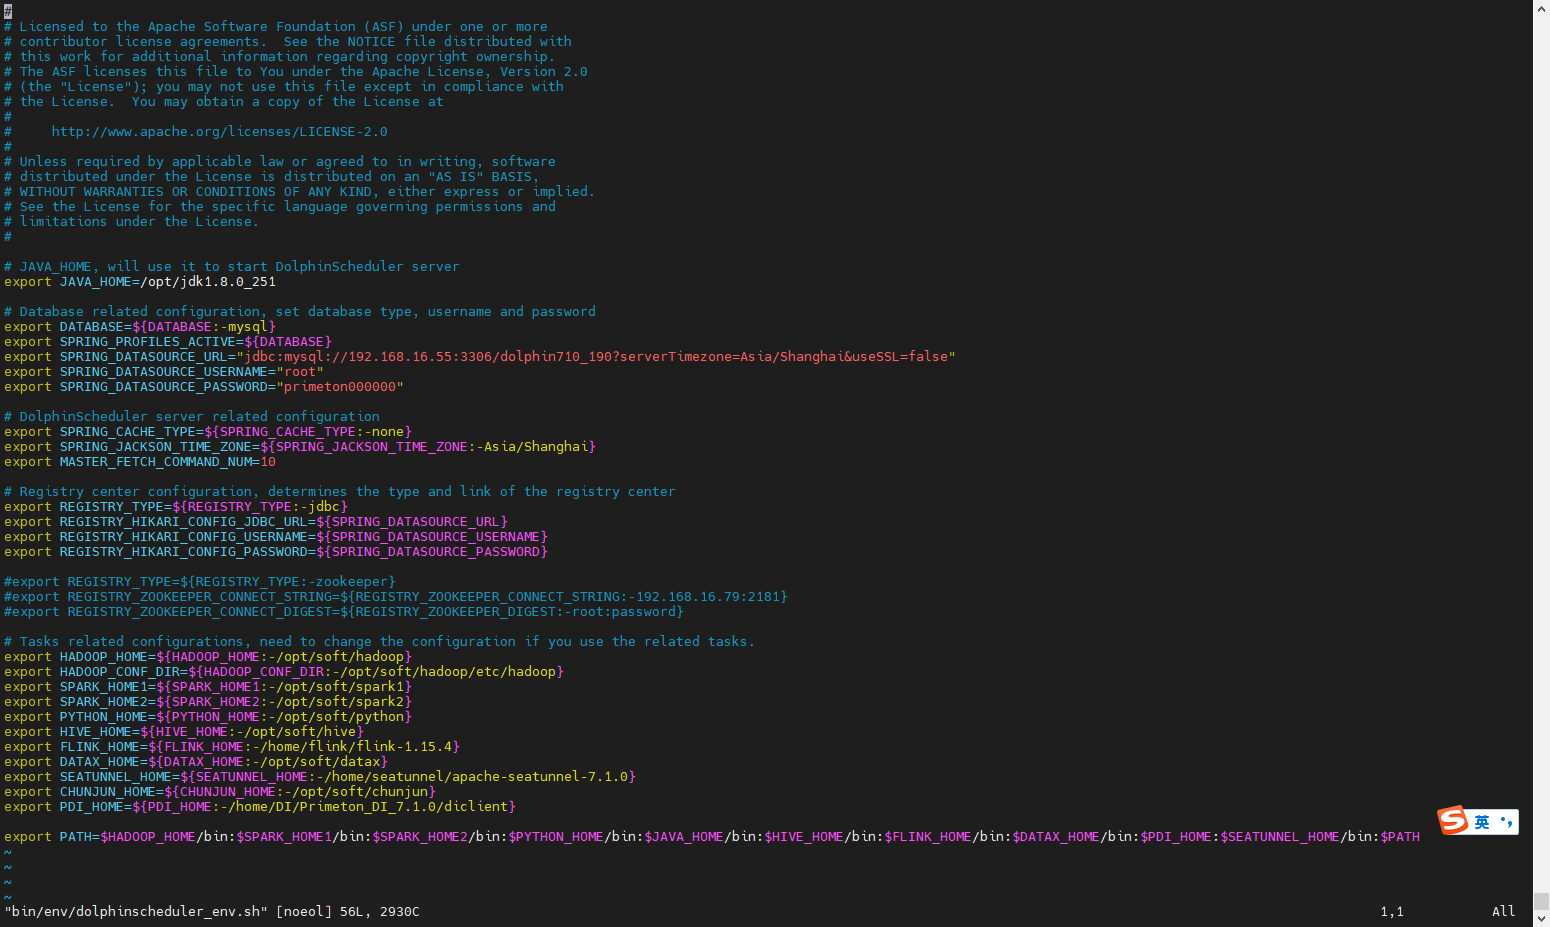
# 4. 修改dolphinscheduler_env.sh配置文件
修改 bin/env/dolphinscheduler_env.sh 文件,dolphinscheduler_env.sh 描述了下列配置:
- DolphinScheduler 的数据库配置,详细配置方法见初始化数据库
- 一些任务类型外部依赖路径或库文件,如
JAVA_HOME和SPARK_HOME都是在这里定义的 - 注册中心
jdbc - 服务端相关配置,比如缓存,时区设置等
#修改JAVA_HOME、DATABASE
export JAVA_HOME=${JAVA_HOME:-/opt/jdk1.8.0_251}

#参数值使用对应的数据库: DM,mysql,gaussDB,Oracle,postgresql,SqlServer
export DATABASE=${DATABASE:-mysql}
export SPRING_PROFILES_ACTIVE=${DATABASE}

# 配置数据库信息
export SPRING_DATASOURCE_URL="jdbc:mysql://192.168.16.142:23306/dolphin_80?serverTimezone=Asia/Shanghai&useSSL=false"
export SPRING_DATASOURCE_USERNAME="root"
export SPRING_DATASOURCE_PASSWORD="primeton"

#默认使用jdbc方式注册dolphin,且注册相关表也初始化在${SPRING_DATASOURCE_URL}参数指向的数据库中
# Registry center configuration, determines the type and link of the registry center
export REGISTRY_TYPE=${REGISTRY_TYPE:-jdbc}
export REGISTRY_HIKARI_CONFIG_JDBC_URL=${SPRING_DATASOURCE_URL}
export REGISTRY_HIKARI_CONFIG_USERNAME=${SPRING_DATASOURCE_USERNAME}
export REGISTRY_HIKARI_CONFIG_PASSWORD=${SPRING_DATASOURCE_PASSWORD}
#export REGISTRY_TYPE=${REGISTRY_TYPE:-zookeeper}
#export REGISTRY_ZOOKEEPER_CONNECT_STRING=${REGISTRY_ZOOKEEPER_CONNECT_STRING:-192.168.16.79:2181}
#export REGISTRY_ZOOKEEPER_CONNECT_DIGEST=${REGISTRY_ZOOKEEPER_DIGEST:-root:password}

#修改FLINK_HOME路径
export FLINK_HOME=${FLINK_HOME:-/home/flink/flink-1.15.4}
#修改SEATUNNEL_HOME路径
export SEATUNNEL_HOME=${SEATUNNEL_HOME:-/home/seatunnel/apache-seatunnel-7.1.0}
#修改Primeton DI部署路径
export PDI_HOME=${PDI_HOME:-/home/DI/Primeton_DI_7.1.0/diclient}

export PATH=$HADOOP_HOME/bin:$SPARK_HOME1/bin:$SPARK_HOME2/bin:$PYTHON_HOME/bin:$JAVA_HOME/bin:$HIVE_HOME/bin:$FLINK_HOME/bin:$DATAX_HOME/bin:$PDI_HOME:$PATH
若使用PostgreSQL数据库,SPRING_DATASOURCE_URL参数中的url需要配置参数:stringtype=unspecified。否则运行作业时会报错,参考如下配置
#数据库使用PostgreSQL时的配置
export SPRING_DATASOURCE_URL="jdbc:postgresql://192.168.16.86:5432/dolphin_dev?stringtype=unspecified"
若未使用到 flink,FLINK_HOME 路径可不用修改,使用默认即可。若使用到 flink,请自行下载 flink 程序,并根据实际配置 FLINK_HOME 路径。
# 5. 安装部署及启停说明
DolphinScheduler 介质提供多种安装部署方式:
- 单机部署(单节点单服务)
- 伪集群部署(单节点多服务)
- 集群部署(多节点多服务)
# 5.1 单机部署及启停
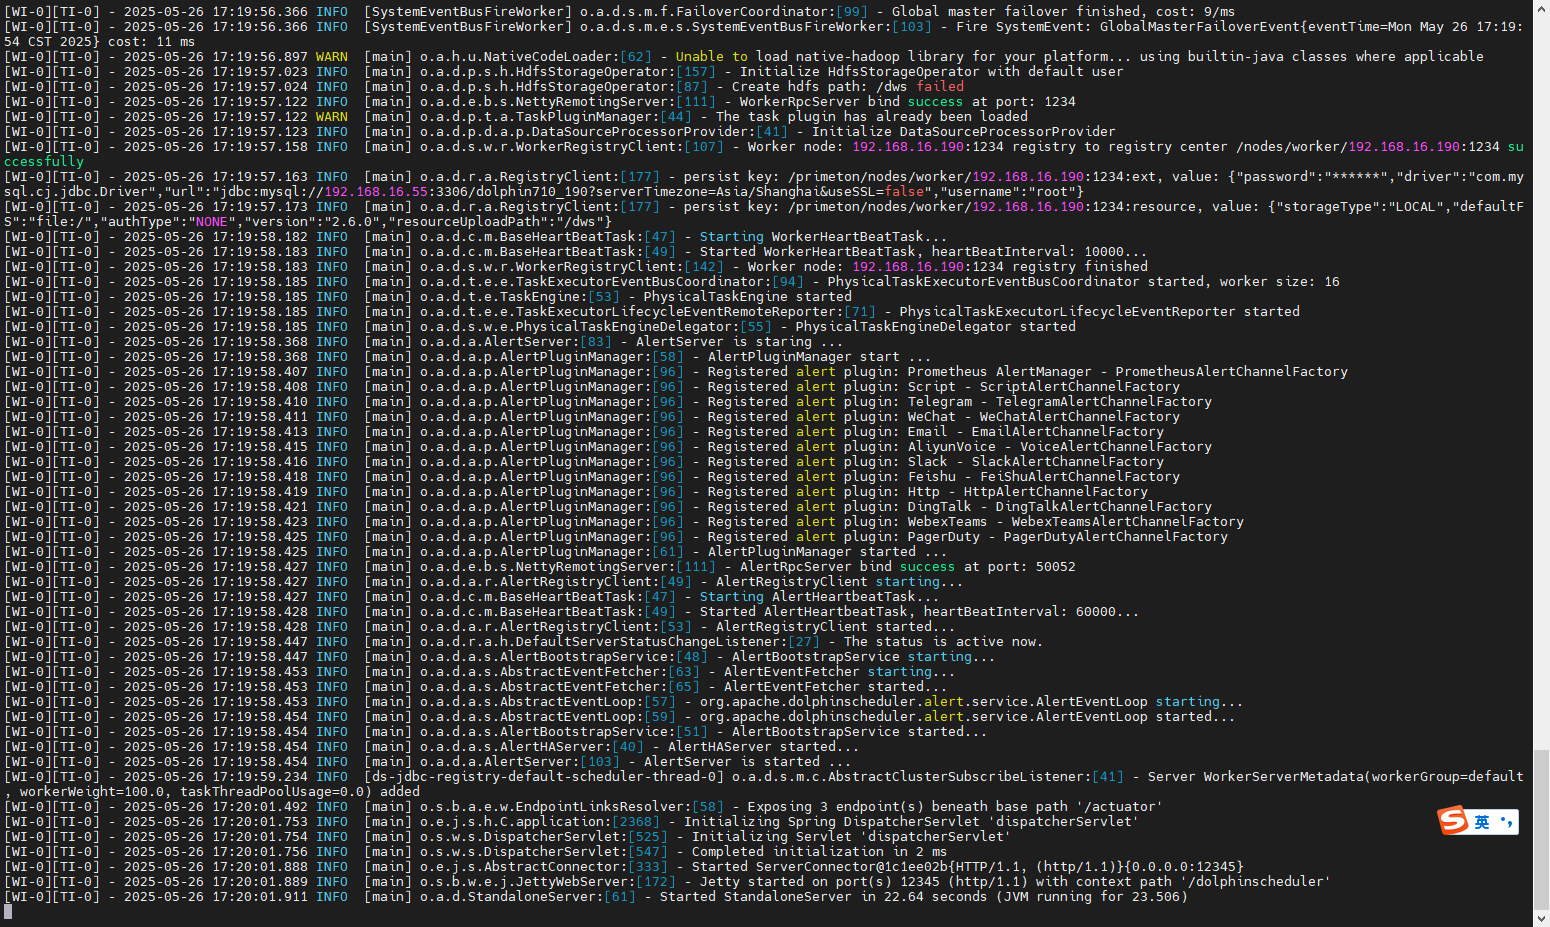
单机部署只需要启动standalone-server服务即可。
su dws
cd /home/dws/apache-dolphinscheduler
./start-standalone.sh
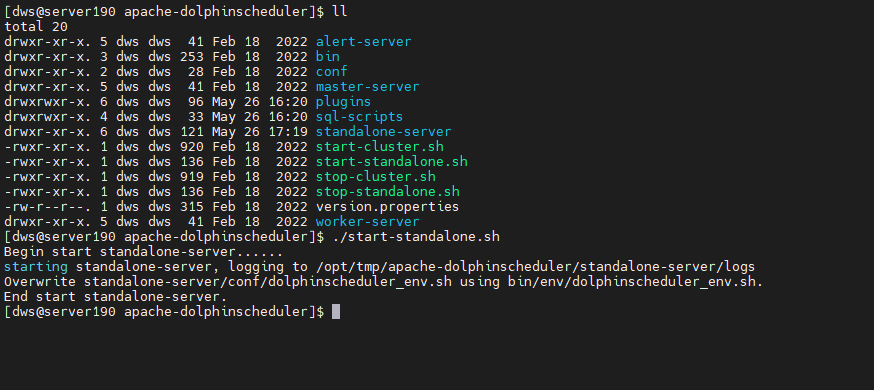
tail -200f standalone-server/logs/dolphinscheduler-standalone.log
停止standalone-server:
su dws
cd /home/dws/apache-dolphinscheduler
./stop-standalone.sh
# 5.2 伪集群部署及启停
伪集群部署是在单台机器部署 DolphinScheduler 服务,该模式下 master、worker、alert server 都在同一台机器上
修改bin/env/install_env.sh文件
ips=${ips:-"192.168.16.80"}
sshPort=${sshPort:-"22"}
masters=${masters:-"192.168.16.80"}
workers=${workers:-"192.168.16.80:default"}
alertServer=${alertServer:-"192.168.16.80"}
apiServers=${apiServers:-"192.168.16.80"}
#配置dolphinscheduler安装路径,在bin/install.sh运行后会安装dolphinscheduler到该目录下
installPath=${installPath:-"/home/dws/install_home"}
#部署用户,即配置的免密用户
deployUser=${deployUser:-"dws"}
#与application.yaml中的namespace一致
zkRoot=${zkRoot:-"/dws"}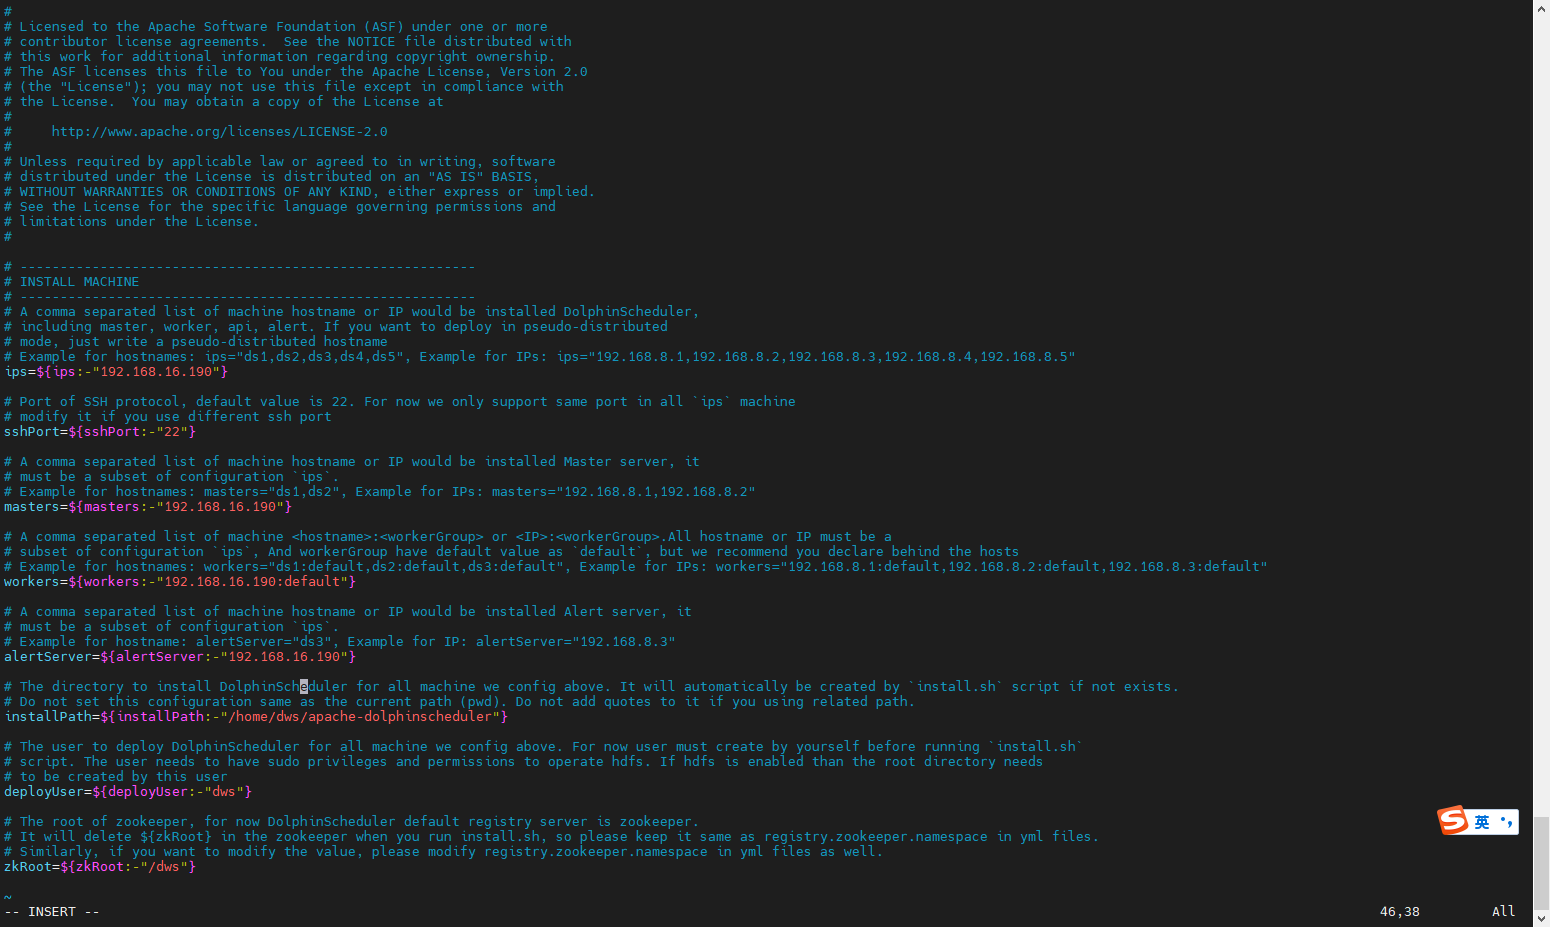
使用脚本一键启动所有服务
su dws
cd /home/dws/apache-dolphinscheduler
./start-cluster.sh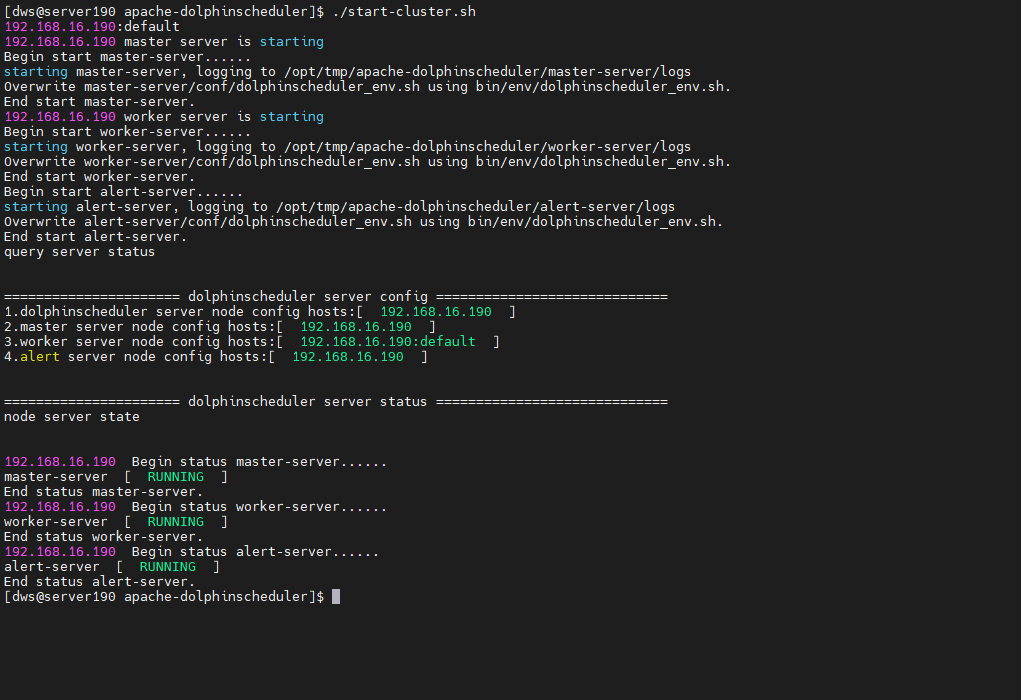
启停服务
su dws
cd /home/dws/apache-dolphinscheduler
# 一键停止集群所有服务
./start-cluster.sh

# 一键开启集群所有服务
./stop-cluster.sh

# 单独启停 Master
./bin/dolphinscheduler-daemon.sh stop master-server
./bin/dolphinscheduler-daemon.sh start master-server

# 单独启停 Worker
./bin/dolphinscheduler-daemon.sh start worker-server
./bin/dolphinscheduler-daemon.sh stop worker-server

# 单独启停 Alert
./bin/dolphinscheduler-daemon.sh start alert-server
./bin/dolphinscheduler-daemon.sh stop alert-server
# 5.3 集群部署及启停
集群部署目的是在多台机器部署 DolphinScheduler 服务,用于运行大量作业的场景,多用于生产环境。
集群部署的服务器需要配置免密。
修改bin/env/install_env.sh文件
install_env.sh描述了哪些机器将被安装 DolphinScheduler 以及每台机器对应安装哪些服务。vim bin/env/install_env.ships=${ips:-"192.168.16.190,192.168.16.191"} sshPort=${sshPort:-"22"} masters=${masters:-"192.168.16.190,192.168.16.191"} workers=${workers:-"192.168.16.190:default,192.168.16.191:default"} alertServer=${alertServer:-"192.168.16.191"} #配置dolphinscheduler安装路径,在bin/install.sh运行后会安装dolphinscheduler到该目录下 installPath=${installPath:-"/home/dws/install_home"} #部署用户,即配置的免密用户 deployUser=${deployUser:-"dws"} #与application.yaml中的namespace一致 zkRoot=${zkRoot:-"/dws"}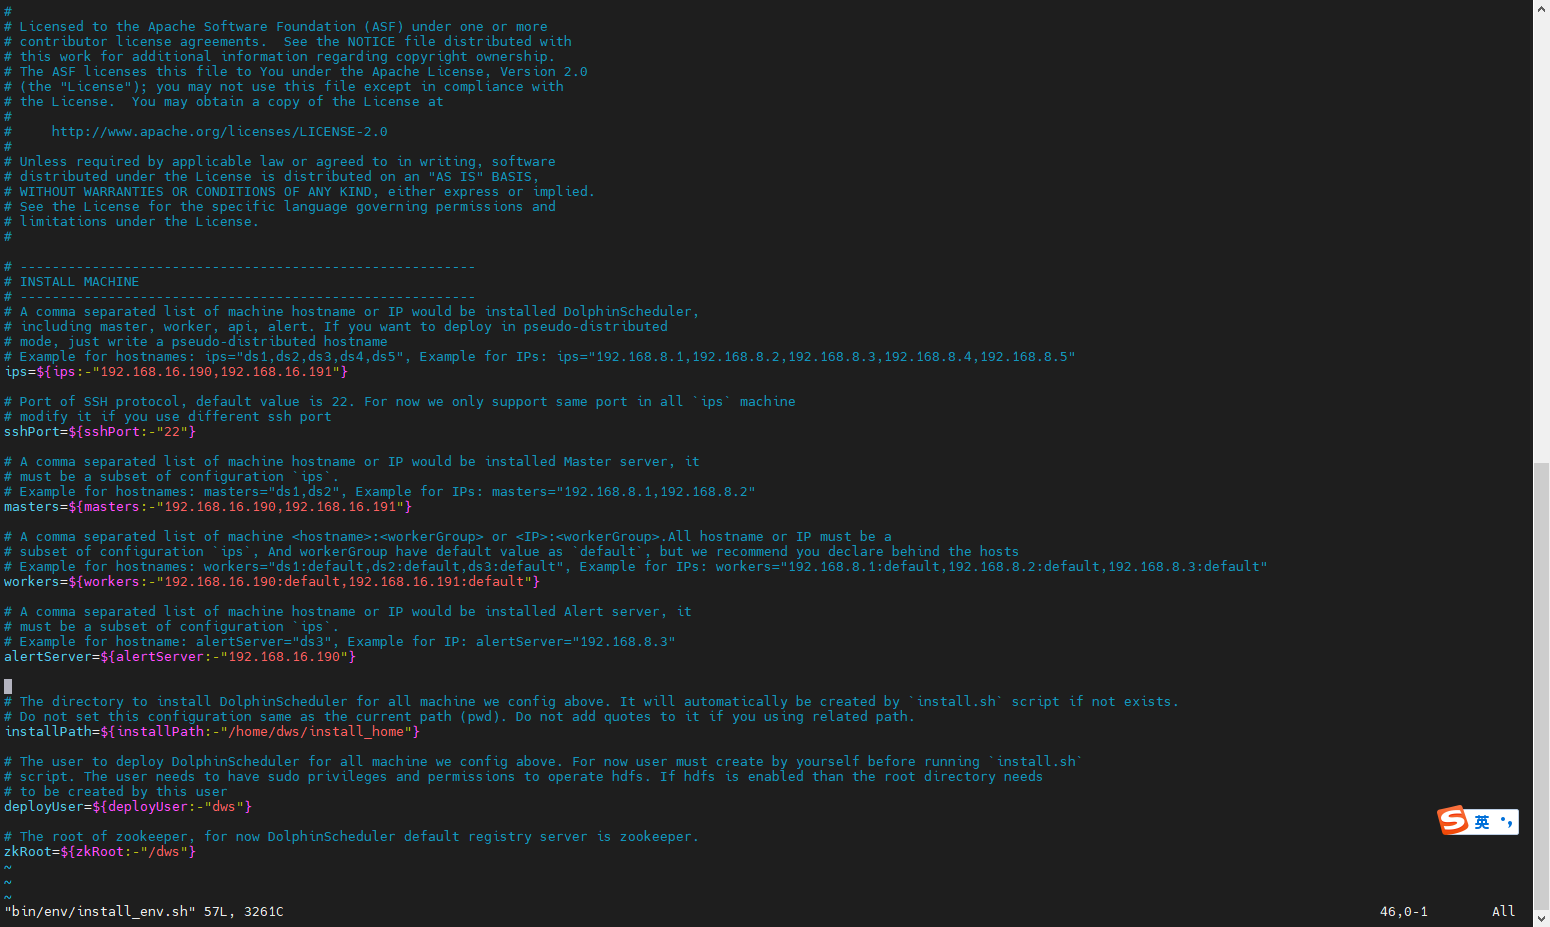
集群安装并自动启动服务
./bin/install.sh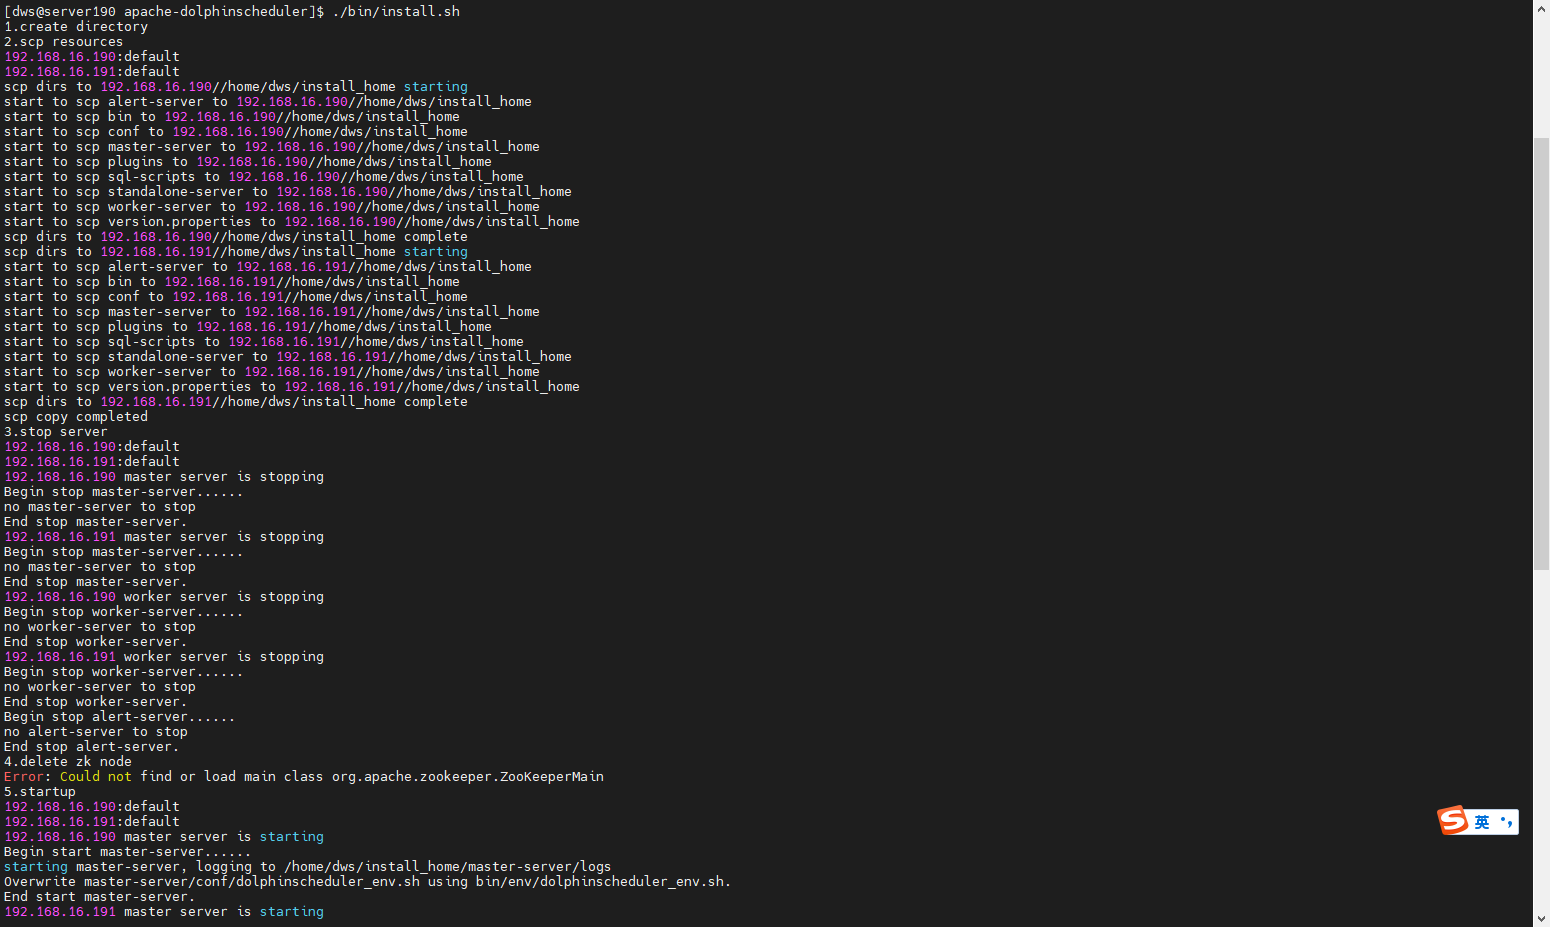
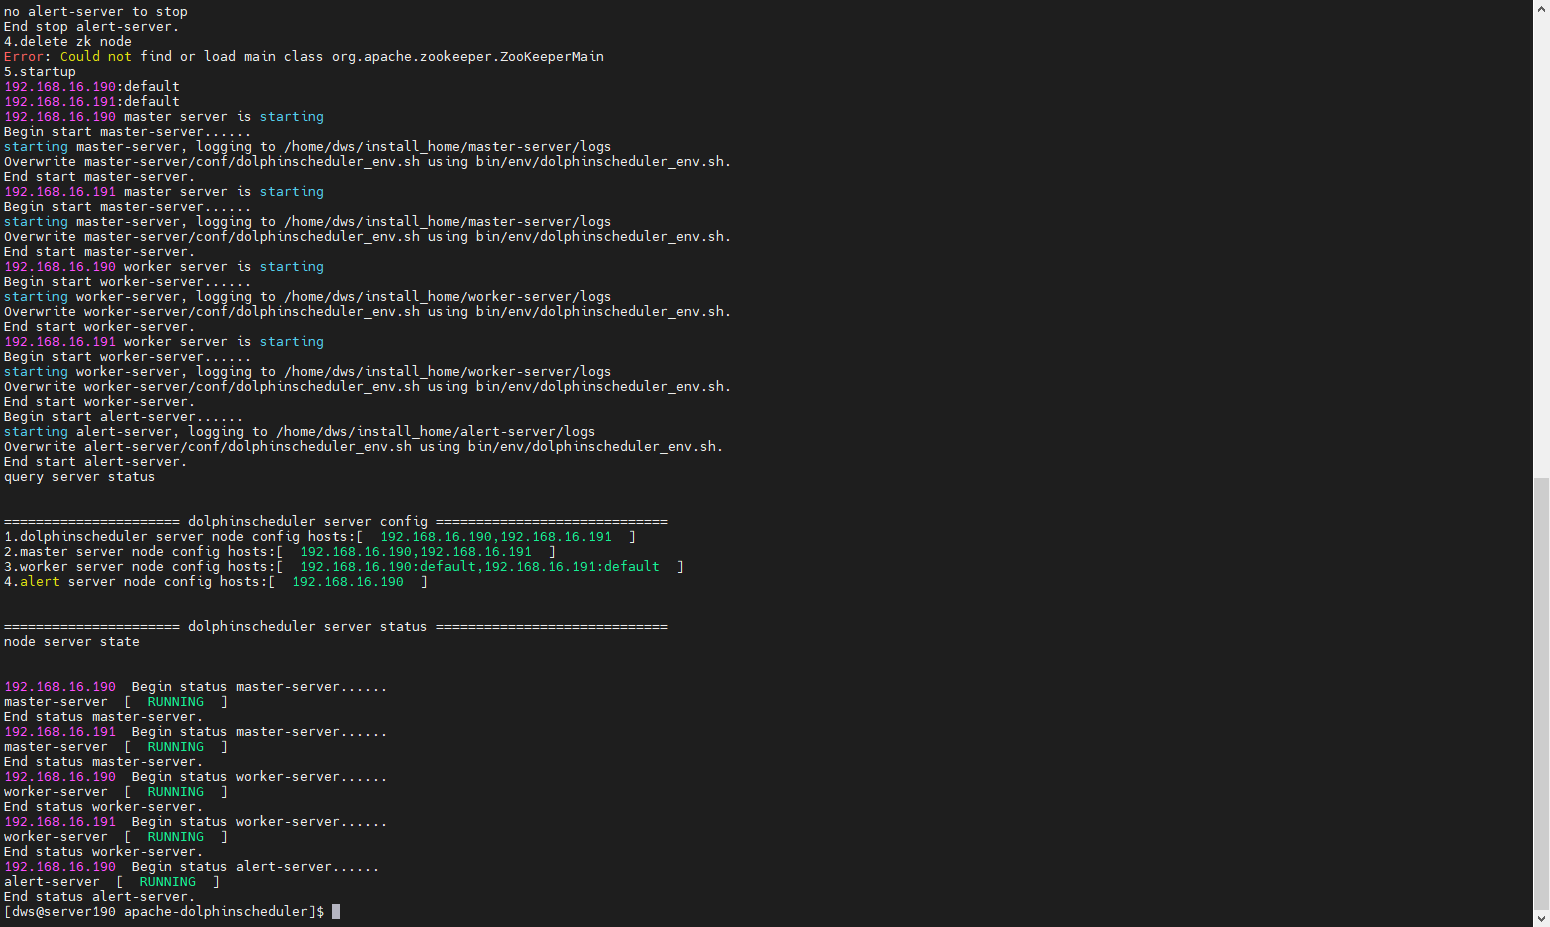
启停服务
su dws
cd /home/dws/install_home
# 一键停止集群所有服务
./start-cluster.sh

# 一键开启集群所有服务
./stop-cluster.sh

# 单独启停某个服务器上的 Master
./bin/dolphinscheduler-daemon.sh stop master-server
./bin/dolphinscheduler-daemon.sh start master-server

# 单独启停某个服务器上的 Worker
./bin/dolphinscheduler-daemon.sh start worker-server
./bin/dolphinscheduler-daemon.sh stop worker-server

# 单独启停某个服务器上的 Alert
./bin/dolphinscheduler-daemon.sh start alert-server
./bin/dolphinscheduler-daemon.sh stop alert-server
以上即为DolphinScheduler安装部署说明;以下是部分可选配置项说明。
下面的配置如果修改后,若使用集群部署方式,则需要重新执行./bin/install.sh。或者需要将修改的配置项依次在所有集群节点上都手动修改。
# 6.Master Server相关配置(可选)
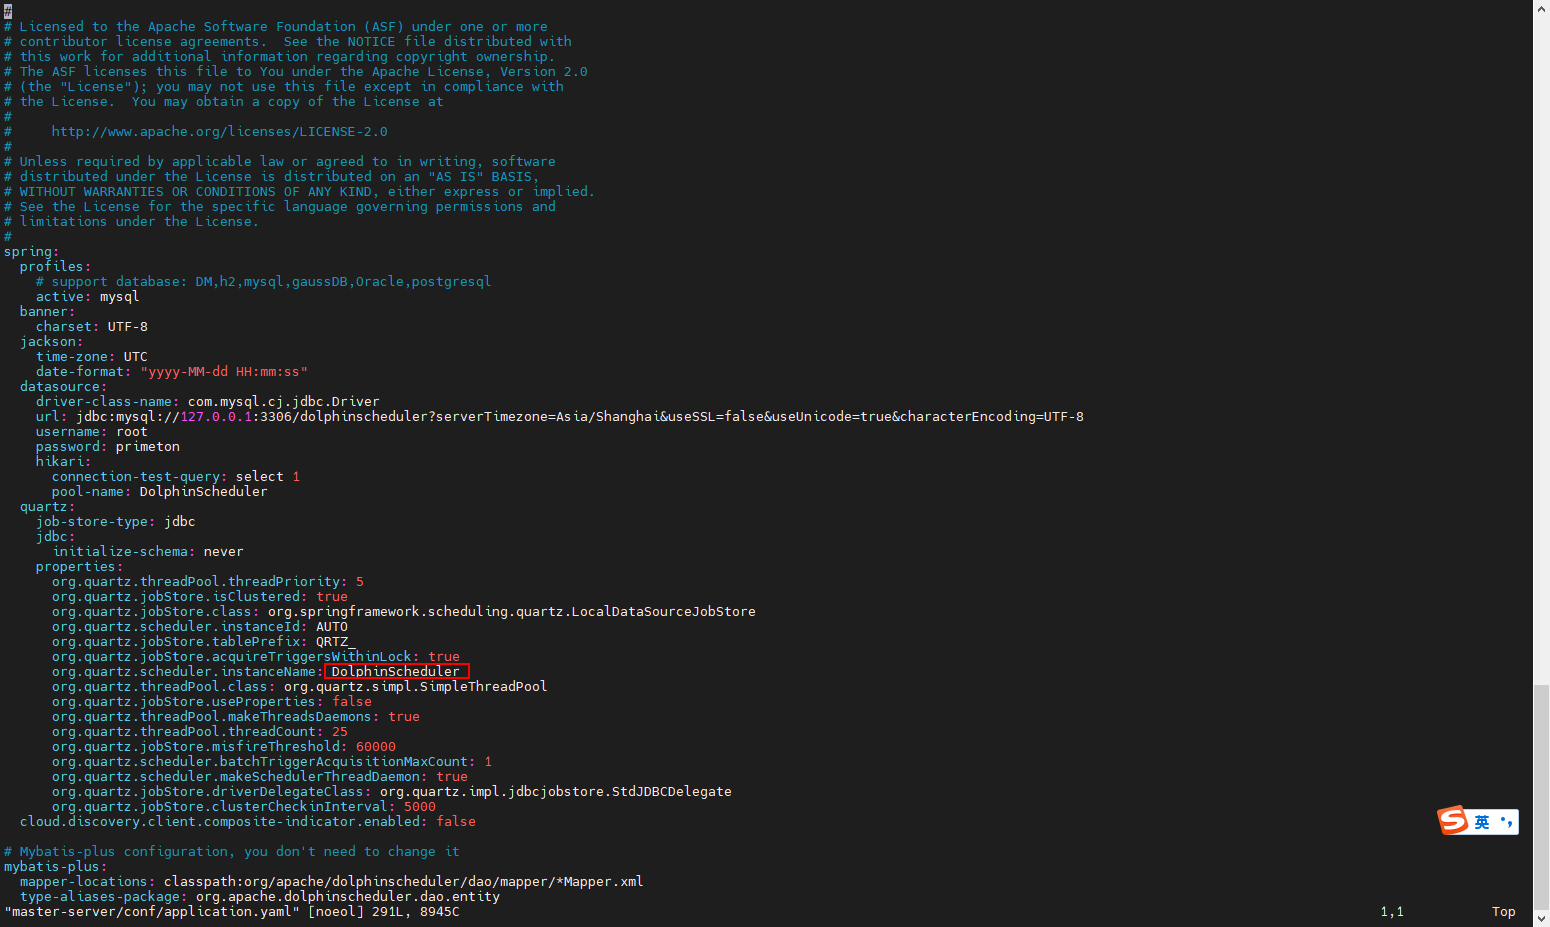
application.yaml文件,位于master-server/conf/目录下。
org.quartz.scheduler.instanceName参数值
spring:
  quartz:
    properties:
      org.quartz.scheduler.instanceName: DolphinScheduler
同一套集群内,instanceName 需保持一致。
注册调度引擎时,引擎编码需同 instanceName 配置的属性值保持一致
若使用的数据库是Oracle ,需要修改master-server、worker-server、alert-server安装目录下conf/application.yaml,将
connection-test-query的值修改为select 1 from dual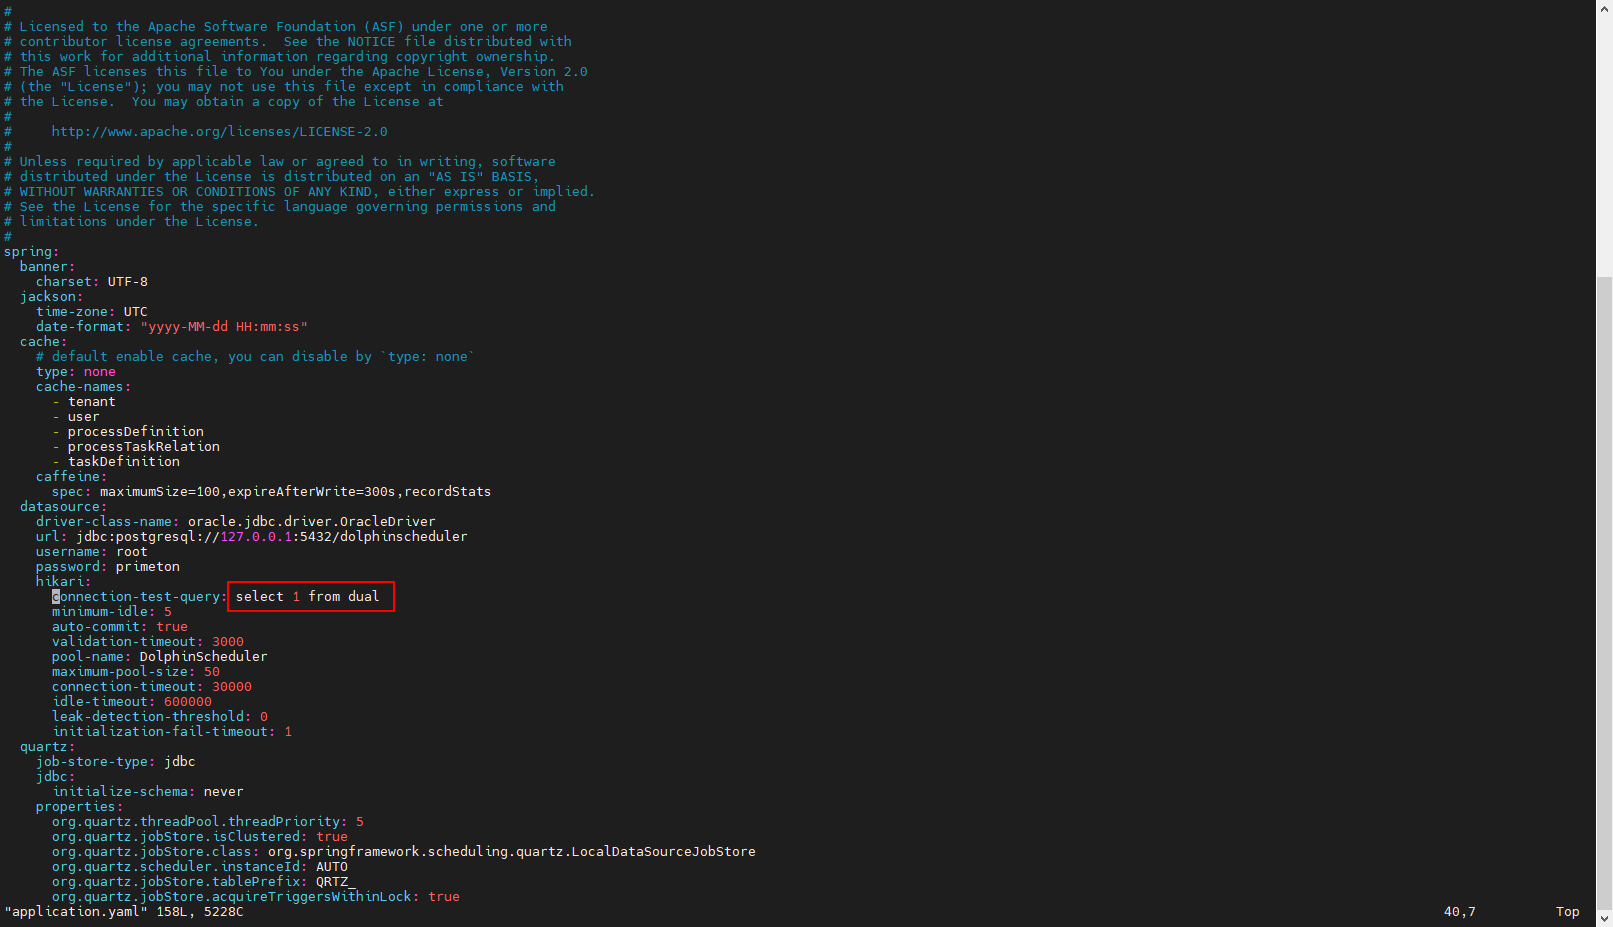
application.yaml配置项说明
配置项 默认值 描述 max-system-cpu-usage-percentage-thresholds 0.8 master最大系统cpu使用值,只有当前系统cpu使用值低于最大系统cpu使用值,master服务才能调度任务. 默认值为0.8: 会使用80%的操作系统CPU。 max-jvm-cpu-usage-percentage-thresholds 0.8 master最大JVM cpu使用值,只有当前JVM cpu使用值低于最大JVM cpu使用值,master服务才能调度任务. 默认值为0.8: 会使用80%的JVM CPU。 max-system-memory-usage-percentage-thresholds 0.8 master最大系统 内存使用值,只有当前系统内存使用值低于最大系统内存使用值,master服务才能调度任务. 默认值为0.8: 会使用80%的操作系统内存。 max-disk-usage-percentage-thresholds 0.8 master最大系统磁盘使用值,只有当前系统磁盘使用值低于最大系统磁盘使用值,master服务才能调度任务. 默认值为0.8: 会使用80%的操作系统磁盘空间。
# 7. Worker Server相关配置(可选)
位置:worker-server/conf/application.yaml
application.yaml配置项说明:
| 配置项 | 默认值 | 描述 |
|---|---|---|
| max-system-cpu-usage-percentage-thresholds | 0.8 | worker最大系统cpu使用值,只有当前系统cpu使用值低于最大系统cpu使用值,worker服务才能接收任务. 默认值为0.8: 会使用80%的操作系统CPU |
| max-jvm-cpu-usage-percentage-thresholds | 0.8 | worker最大JVM cpu使用值,只有当前JVM cpu使用值低于最大JVM cpu使用值,worker服务才能接收任务. 默认值为0.8: 会使用80%的JVM CPU。 |
| max-system-memory-usage-percentage-thresholds | 0.8 | worker最大系统 内存使用值,只有当前系统内存使用值低于最大系统内存使用值,worker服务才能接收任务. 默认值为0.8: 会使用80%的操作系统内存。 |
| max-disk-usage-percentage-thresholds | 0.8 | worker最大系统磁盘使用值,只有当前系统磁盘使用值低于最大系统磁盘使用值,worker服务才能接收任务. 默认值为0.8: 会使用80%的操作系统磁盘空间。 |
若 dolphin 后端有 the SystemMemoryUsedPercentage: 0.8257388374471095 is over then。异常提示,则需分别调整 master 与 worker 的 conf 下 application.yaml 中上面四个参数。若调整后仍有此提示,则是资源不足,需要对服务器扩容。
# 8. 对接分布式或远端对象存储(可选配置)
如果用户需要使用大数据环境进行文件管理(DWS的数据开发->项目配置->文件管理),则需进行此配置。
8.1. 在worker-server的配置文件中设置远端对象存储环境,如HDFS
使用单机版修改standalone-server/conf/common.properties文件
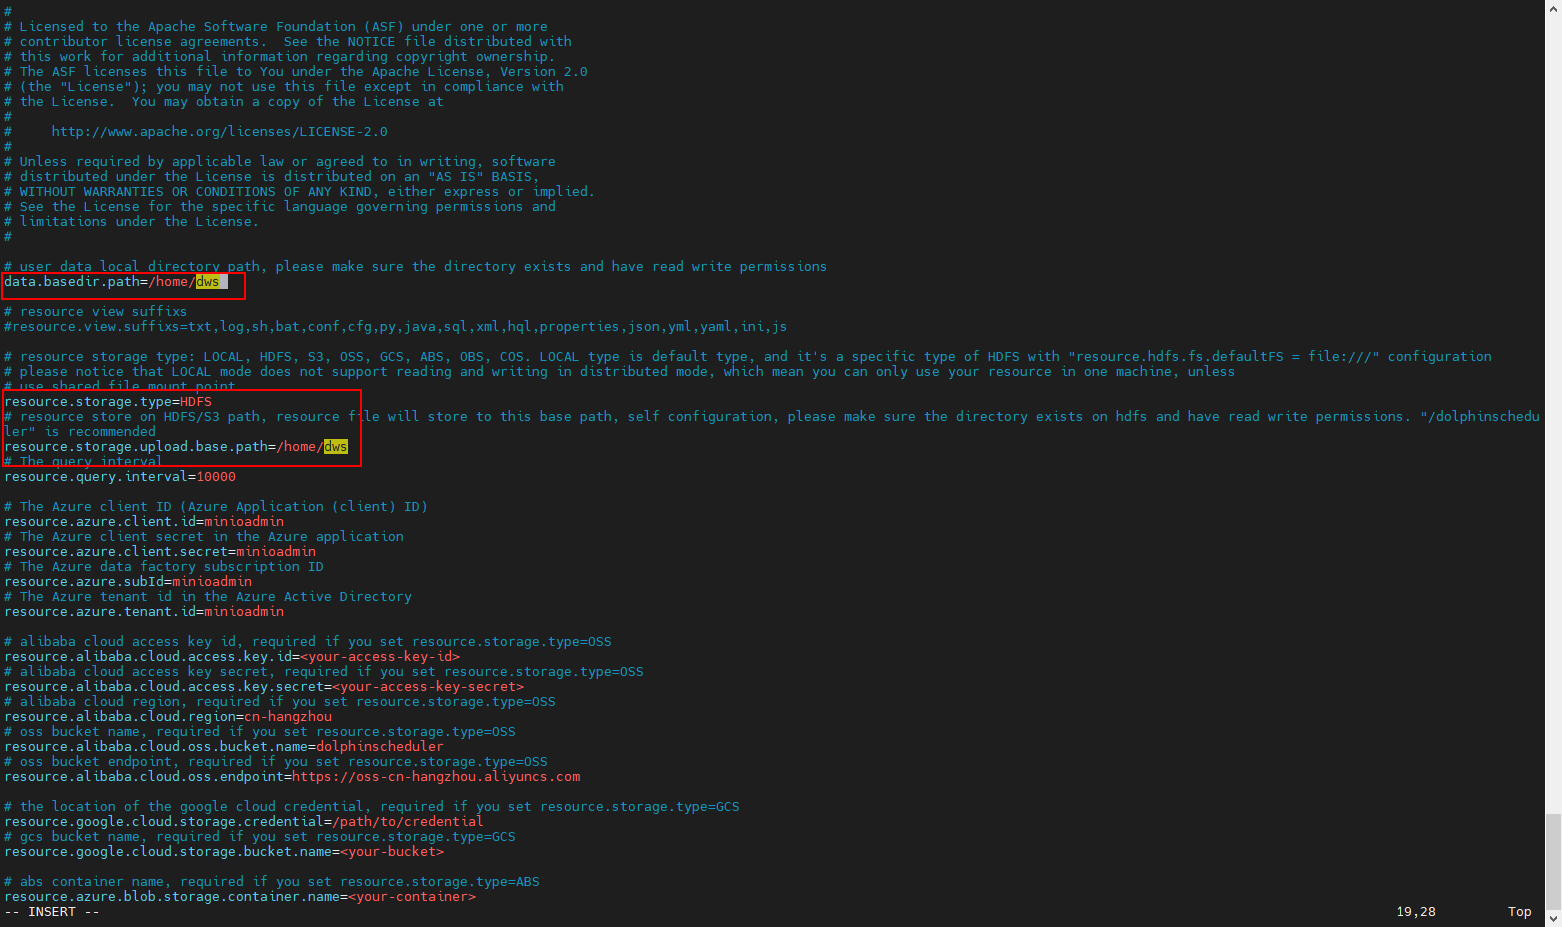
vi worker-server/conf/common.properties
# user data local directory path, please make sure the directory exists and have read write permissions
data.basedir.path=/home/dws

# resource view suffixs
#resource.view.suffixs=txt,log,sh,bat,conf,cfg,py,java,sql,xml,hql,properties,json,yml,yaml,ini,js

# resource storage type: LOCAL, HDFS, S3, OSS, GCS, ABS, OBS, COS. LOCAL type is default type, and it's a specific type of HDFS with "resource.hdfs.fs.defaultFS = file:///" configuration
# please notice that LOCAL mode does not support reading and writing in distributed mode, which mean you can only use your resource in one machine, unless
# use shared file mount point
resource.storage.type=HDFS
# resource store on HDFS/S3 path, resource file will store to this base path, self configuration, please make sure the directory exists on hdfs and have read write permissions. "/dolphinscheduler" is recommended
resource.storage.upload.base.path=/home/dws


# if resource.storage.type=HDFS, the user must have the permission to create directories under the HDFS root path
resource.hdfs.root.user=hdfs
# if resource.storage.type=S3, the value like: s3a://dolphinscheduler; if resource.storage.type=HDFS and namenode HA is enabled, you need to copy core-site.xml and hdfs-site.xml to conf dir
resource.hdfs.fs.defaultFS=hdfs://mycluster:8020

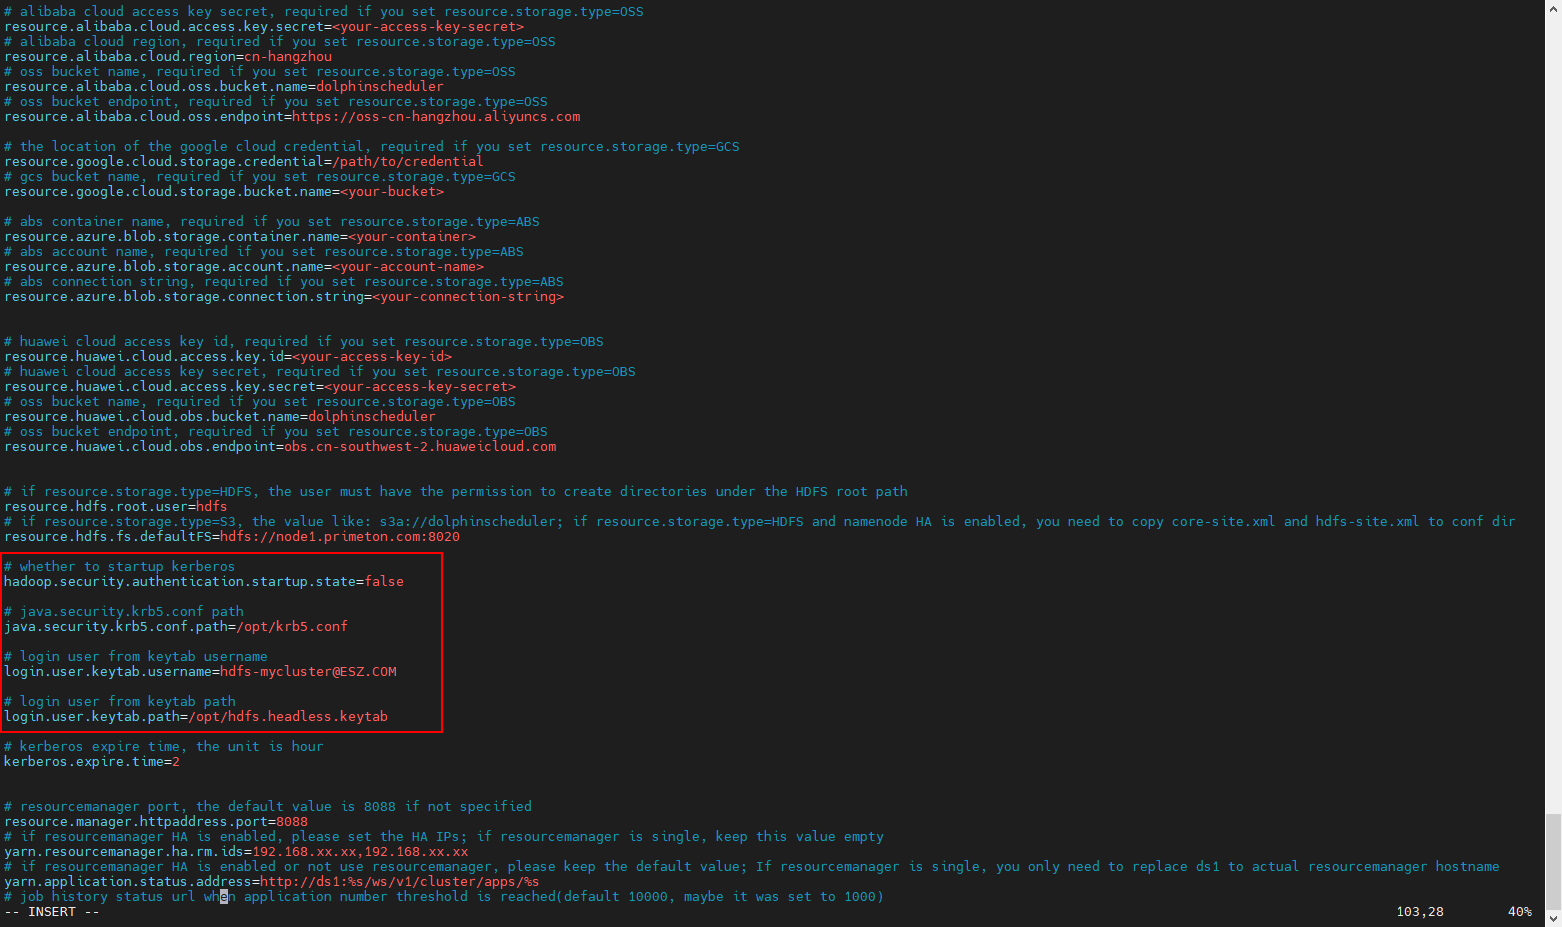
如果需要使用kerberos认证,还需要配置如下信息:
# whether to startup kerberos
hadoop.security.authentication.startup.state=true

# java.security.krb5.conf path
java.security.krb5.conf.path=/opt/krb5.conf

# login user from keytab username
login.user.keytab.username=hdfs-mycluster@ESZ.COM

# login user from keytab path
login.user.keytab.path=/opt/hdfs.headless.keytab
8.2. 将对应大数据环境的配置文件core-site.xml和hdfs-site.xml拷贝至worker-server/conf/目录下。
单机版将对应大数据环境的配置文件 core-site.xml 和 hdfs-site.xml 拷贝至 standalone-server/conf 目录下
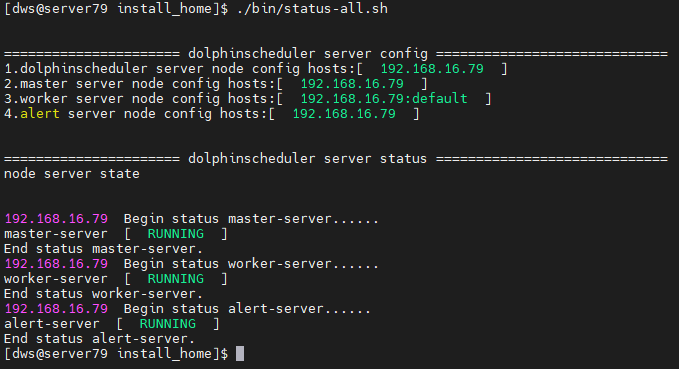
# 9. 查看状态
su - dws
cd  /home/dws/install_home/
./bin/status-all.sh
# 10. zk注册方式说明
apache-dolphinscheduler-7.1.0介质中默认使用的注册方式是jdbc方式,同时也支持zookeeper方式。
若需要使用 zookeeper 方式注册,则需要修改以下文件:
修改 bin/env/dolphinscheduler_env.sh 文件,使用 zookeeper 并且禁用 jdbc 方式,如下
# Registry center configuration, determines the type and link of the registry center
#export REGISTRY_TYPE=${REGISTRY_TYPE:-jdbc}
#export REGISTRY_HIKARI_CONFIG_JDBC_URL=${SPRING_DATASOURCE_URL}
#export REGISTRY_HIKARI_CONFIG_USERNAME=${SPRING_DATASOURCE_USERNAME}
#export REGISTRY_HIKARI_CONFIG_PASSWORD=${SPRING_DATASOURCE_PASSWORD}

export REGISTRY_TYPE=${REGISTRY_TYPE:-zookeeper}
export REGISTRY_ZOOKEEPER_CONNECT_STRING=${REGISTRY_ZOOKEEPER_CONNECT_STRING:-192.168.16.79:2181}
export REGISTRY_ZOOKEEPER_CONNECT_DIGEST=${REGISTRY_ZOOKEEPER_DIGEST:-root:password}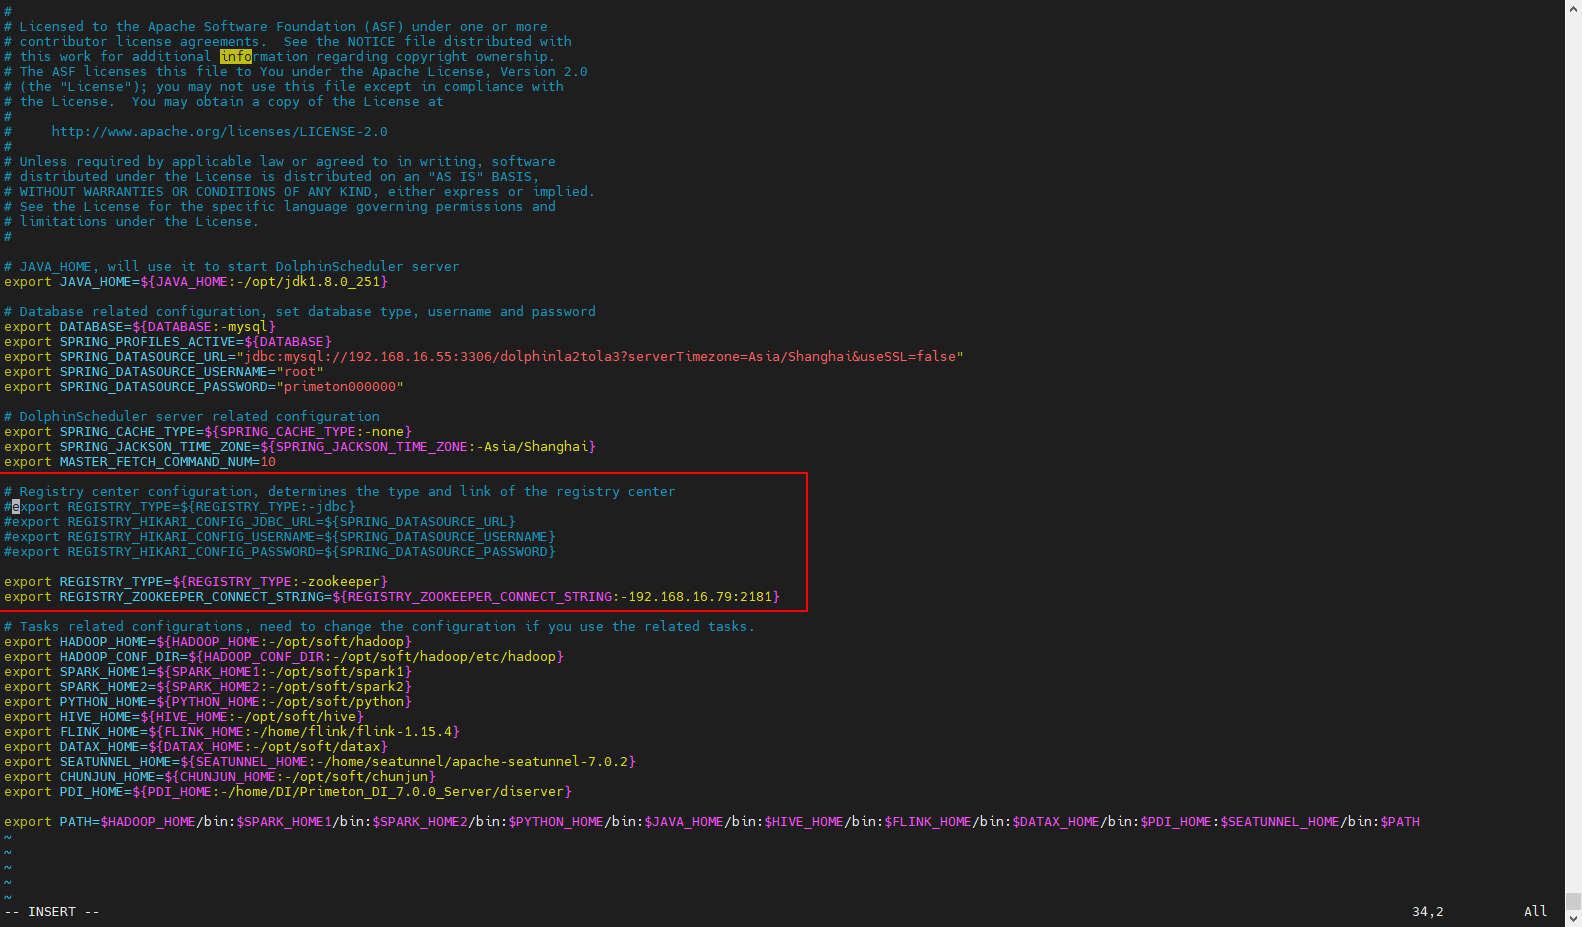
若需要配置zookeeper集群地址,则多个地址使用,分隔。例如
export REGISTRY_TYPE=${REGISTRY_TYPE:-zookeeper}
export REGISTRY_ZOOKEEPER_CONNECT_STRING=${REGISTRY_ZOOKEEPER_CONNECT_STRING:-zk1:2181,zk2:2181,zk3:2181}
export REGISTRY_ZOOKEEPER_CONNECT_DIGEST=${REGISTRY_ZOOKEEPER_DIGEST:-root:password}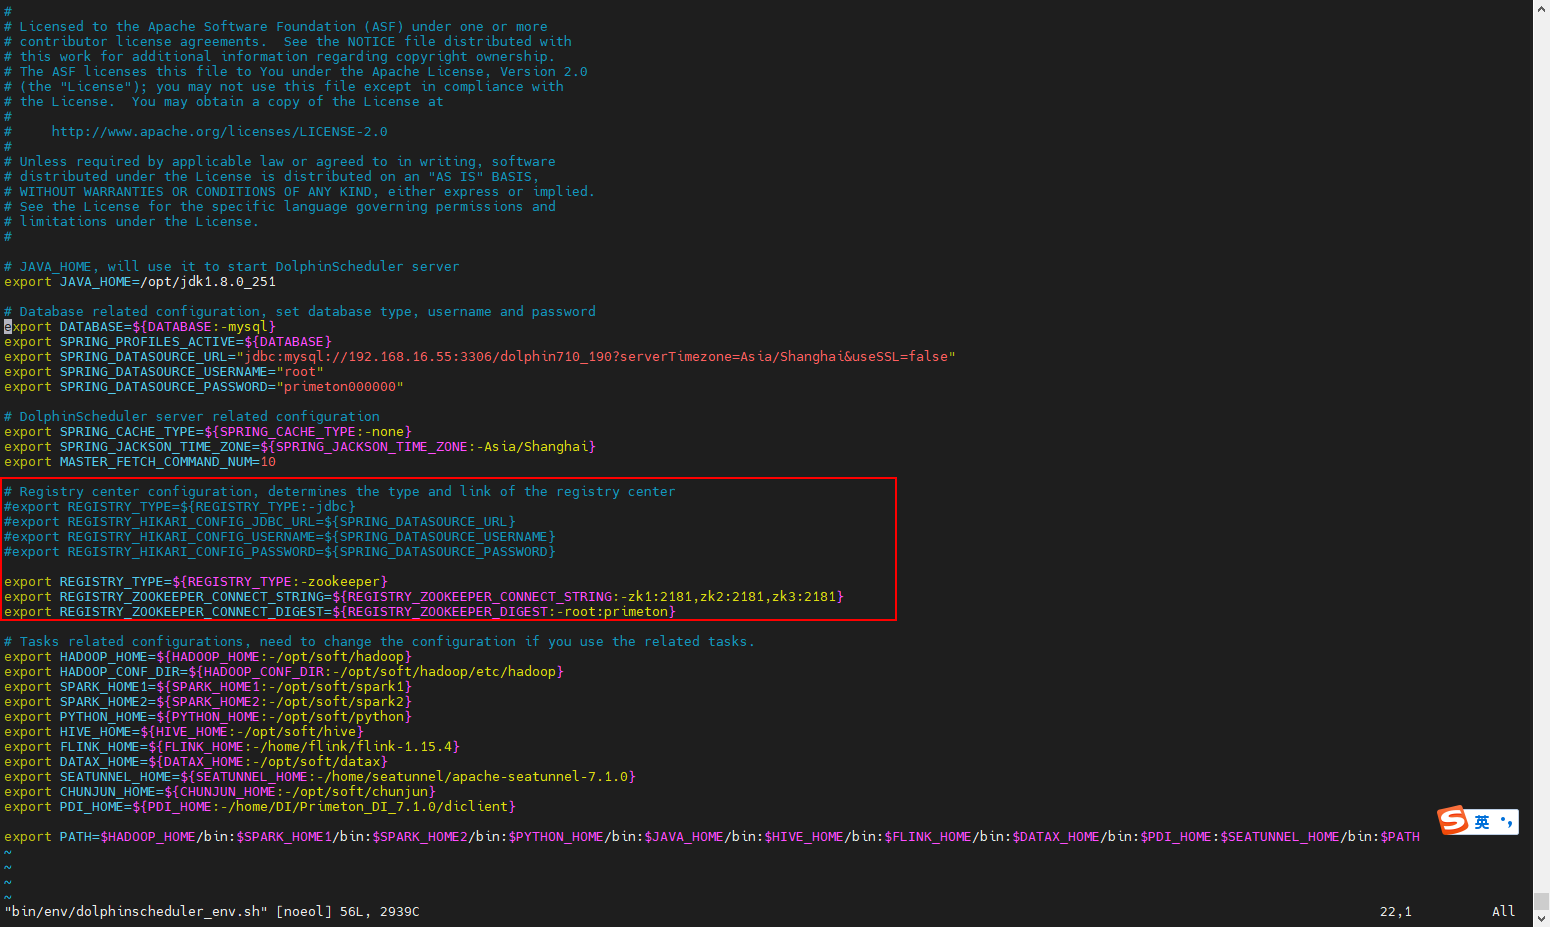
分别修改 master-server、worker-server、alert-server目录下的conf/application.yaml,修改registry相关配置禁用jdbc启用zookeeper如下:
registry:
  type: zookeeper
  term-refresh-interval: 2s
  term-expire-times: 3
  hikari-config:
    jdbc-url: jdbc:mysql://127.0.0.1:3306/dolphinscheduler?serverTimezone=Asia/Shanghai&useSSL=false
    username: root
    password: primeton
    maximum-pool-size: 5
    connection-timeout: 9000
    idle-timeout: 600000
  zookeeper:
    namespace: dws
    connect-string: localhost:2181
    retry-policy:
      base-sleep-time: 60ms
      max-sleep: 300ms
      max-retries: 5
    session-timeout: 30s
    connection-timeout: 9s
    block-until-connected: 600ms
    digest: ~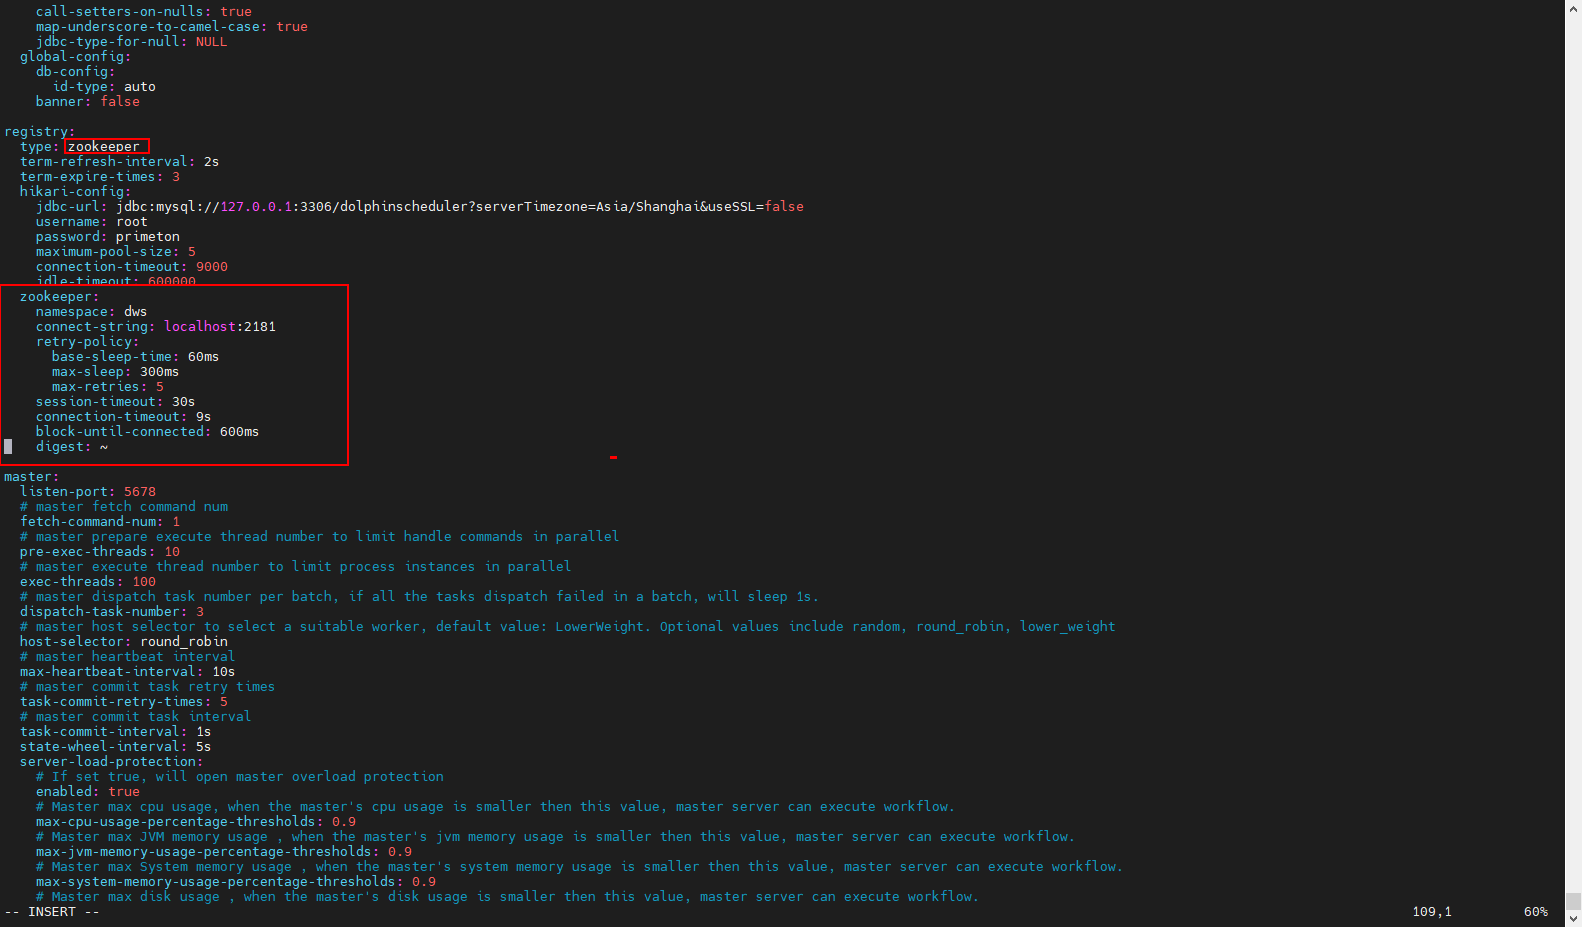
配置/etc/hosts
使用 zookeeper 注册方式时,此步骤必须执行,否则会导致zookeeper连接超时异常问题。
在 /etc/hosts 中增加一行,添加服务器ip及域名(若 zookeeper 和 dolphinscheduler 不在同一台服务器,则需要将 zookeeper 和 dolphinscheduler 所在服务器的 ip 及域名都配置到各自服务器的 /etc/hosts 中)
vim /etc/hosts
192.168.16.80 server80
# 附:端口号
| master | worker | alert | |||
| listen-port | server-port | listen-port | server-port | alert-port | server-port |
| 5678 | 5679 | 1234 | 1235 | 50052 | 50053 |