# DWS 安装(MicroApp 版)
具体步骤如下:
- 安装前准备
- 介质目录结构说明
- 解压介质
- 初始化数据库脚本
- 配置AFC外置驱动目录
- 修改DWS配置
- 修改Nginx配置
- 启动/停止服务
- 配置AFC权限(非必要步骤)
- 其他数据库连接配置说明
- DWS集群部署说明
# 1. DWS MicroApp 版介质部署前,要求:
1.1 已参考 微服务版(MicroApp)安装环境准备 完成基础环境部署;
1.2 已参照手册部署 AFCENTER 微服务版介质(V8.3.3)并初始化 AFCENTER 的数据库,此时不要启动AFCENTER程序,等DWS脚本初始化完成后,统一启动AFCENTER和DWS程序;
1.3 约定 AFCENTER 前端部署路径为:/opt/dws/afcenter_ui,后端路径为:/opt/dws/afcenter-base,数据库为:afc。
AFCENTER 前端部署结果如下:
afcenter_ui
├──assets
├──bfp
├──components
├──config
├──ext
├──formDesigner
├──ide
├──portal
├──static
├──widget
├──index.html
├──remoteEntry.js
└──version.properties
AFCENTER 后端部署结果如下:
afcenter-base
├──bin
├──config
├──db-scripts
├──lib
├──com.primeton.gocom.afcenterall.boot-8.3.3-exec.jar
└──version.properties
# 2. 介质说明
#DWS微服务版介质

Primeton_DWS_Server_7.1.0.tar.gz     #DWS后端
├── bin
├── config
├── db-scripts
├── fdm
├── lib
├── thymeleaf
├── Primeton_DWS_Server_7.1.0.jar
└── version.properties
Primeton_DWS_UI_7.1.0.tar.gz         #DWS前端
├── jobsch
├── prjdevide
├── prjdevui
└── version.properties
#公共资源组件介质

pubresmng_component_v8.3.3.0.zip
├── backend                           #backend,公共资源后端
│   ├── pubresmng_ext_lib
│   └── pubresmng_lib
├── config
│   └── application-comp-pubresmng.properties
├── frontend                          #frontend,公共资源前端
│   └── pubresmng_app.zip
│       ├── pubresmng                 #公共资源管理前端资源
│       └── sqlclient                 #SQL客户端前端资源
├── meta.json
├── script
└── version.properties
# 3. 解压介质
# 3.1 创建 dws 文件夹
#在 /opt 目录下创建 dws 文件夹
mkdir /opt/dws
# 3.2 解压 dws 后端介质到 dws_server 目录
#在 /opt/dws 目录下创建 dws_server 文件夹
cd /opt/dws
mkdir /opt/dws/dws_server
#解压微服务后端介质到对应的目录下
tar -zxvf Primeton_DWS_Server_7.1.0.tar.gz -C /opt/dws/dws_server
# 3.3 解压 dws 前端介质到AFCENTER 前端 UI 目录下
#解压 DWS 前端介质到 AFCENTER 前端 UI 目录下
tar -zxvf Primeton_DWS_UI_7.1.0.tar.gz -C /opt/dws/afcenter_ui
#解压后的目录结构如下,红色文件夹是 DWS 前端 UI 的资源:
afcenter_ui
├──assets
├──bfp
├──components
├──config
├──ext
├──formDesigner
├──ide
├──jobsch
├──portal
├──prjdevide
├──prjdevui
├──static
├──widget
├──index.html
├──remoteEntry.js
└──version.properties
# 3.4 解压公共资源组件介质到 pubresmng_component 目录下
#解压公共资源组件介质到 pubresmng_component 目录下
mkdir /opt/dws/pubresmng_component
unzip pubresmng_component_v8.3.3.0.zip -d /opt/dws/pubresmng_component
# 3.5 将公共资源组件 backend 中的驱动拷贝至AFCENTER的lib目录下
# 将公共资源组件 backend 中的驱动拷贝至 AFCENTER 的 lib目录下
cp -p /opt/dws/pubresmng_component/backend/pubresmng_lib/*.jar  /opt/dws/afcenter-base/lib
# 3.6 将公共资源组件 frontend 中的 pubresmng_app.zip 解压到AFCENTER前端部署路径
#将公共资源组件 frontend 中的 pubresmng_app.zip 解压到 AFCENTER 前端部署路径
unzip /opt/dws/pubresmng_component/frontend/pubresmng_app.zip -d /opt/dws/afcenter_ui
#解压后的目录结构如下,红色文件夹是公共资源的前端 UI 资源:
afcenter_ui
├──assets
├──bfp
├──components
├──config
├──ext
├──formDesigner
├──ide
├──jobsch
├──portal
├──prjdevide
├──prjdevui
├──pubresmng
├──sqlclient
├──static
├──widget
├──index.html
├──remoteEntry.js
└──version.properties
# 4. 初始化数据库脚本
目前 DWS 产品支持的数据库有:MySQL、PostgreSQL、Oracle、openGauss、达梦8、Sqlserver。介质中可以看到以数据库类型命名的文件夹。
MySQL 数据库需要设置为大小写不敏感,即: lower_case_table_names=1。
本说明以 MySQL 数据库为例:
场景1:AFCENTER和DWS分库(在不同名称的数据库),按照如下顺序执行 SQL 。
- 创建数据库
dws - 在
afc数据库执行公共资源脚本:/opt/dws/pubresmng_component/script/Mysql/all.sql - 在
afc数据库执行DWS脚本:/opt/dws/dws_server/db-scripts/dws/Mysql/00-afc-data.sql - 在
dws数据库执行DWS脚本:/opt/dws/dws_server/db-scripts/dws/Mysql/02-dws-table.sql - 在
dws数据库执行DWS脚本:/opt/dws/dws_server/db-scripts/dws/Mysql/03-dws-data.sql - 在
dws数据库执行DWS脚本:/opt/dws/dws_server/db-scripts/eos/Mysql/all.sql
场景2:AFCENTER和DWS不分库(在相同名称的数据库),按照如下顺序执行 SQL 。
- 在
afc数据库执行公共资源脚本:/opt/dws/pubresmng_component/script/Mysql/all.sql - 在
afc数据库执行DWS脚本:/opt/dws/dws_server/db-scripts/dws/Mysql/all.sql
# 5. 启用并配置 AFCENTER 数据库驱动外置目录
5.1 拷贝 /opt/dws/pubresmng_component/config/application-comp-pubresmng.properties 到 AFCENTER Server目录下:/opt/dws/afcenter-base/config,并更名为application-pubresmng.properties
cp /opt/dws/pubresmng_component/config/application-comp-pubresmng.properties /opt/dws/afcenter-base/config
mv /opt/dws/afcenter-base/config/application-comp-pubresmng.properties       /opt/dws/afcenter-base/config/application-pubresmng.properties
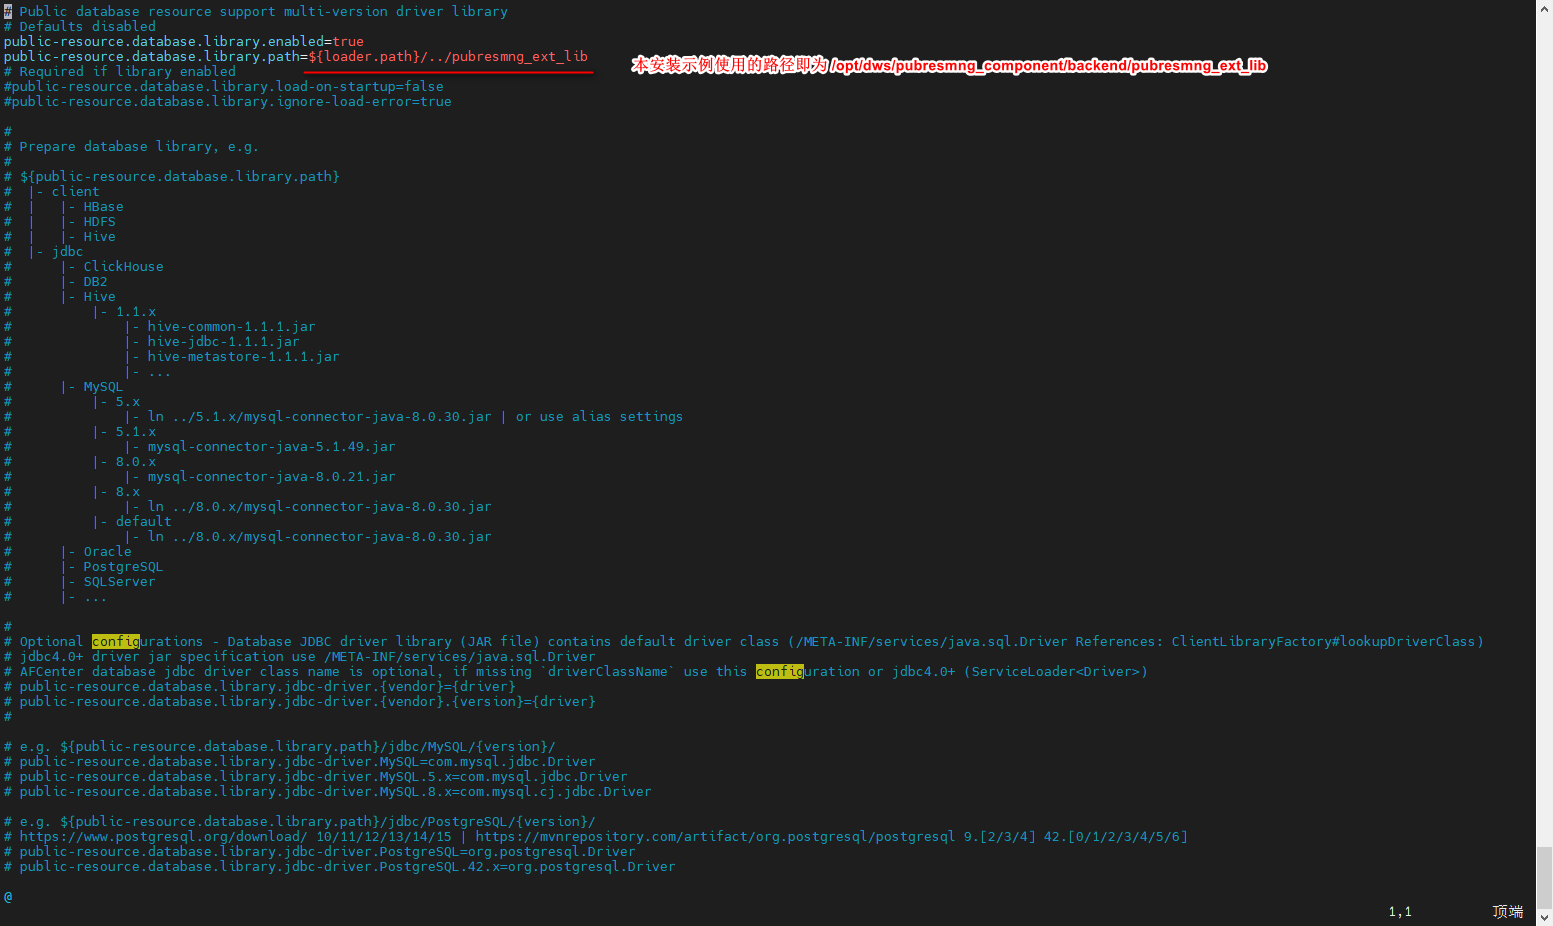
5.2 修改/opt/dws/afcenter-base/config/application-pubresmng.properties 文件内容,指定公共资源数据源外置驱动参数目录路径:public-resource.database.library.path
vim /opt/dws/afcenter-base/config/application-pubresmng.properties
public-resource.database.library.enabled=true
public-resource.database.library.path=/opt/dws/pubresmng_component/backend/pubresmng_ext_lib
⚠️ 注意: 默认外置驱动不包含星环 Inceptor 的驱动 jar 文件,使用星环 Inceptor 前需要将驱动包放到配置的目录下。
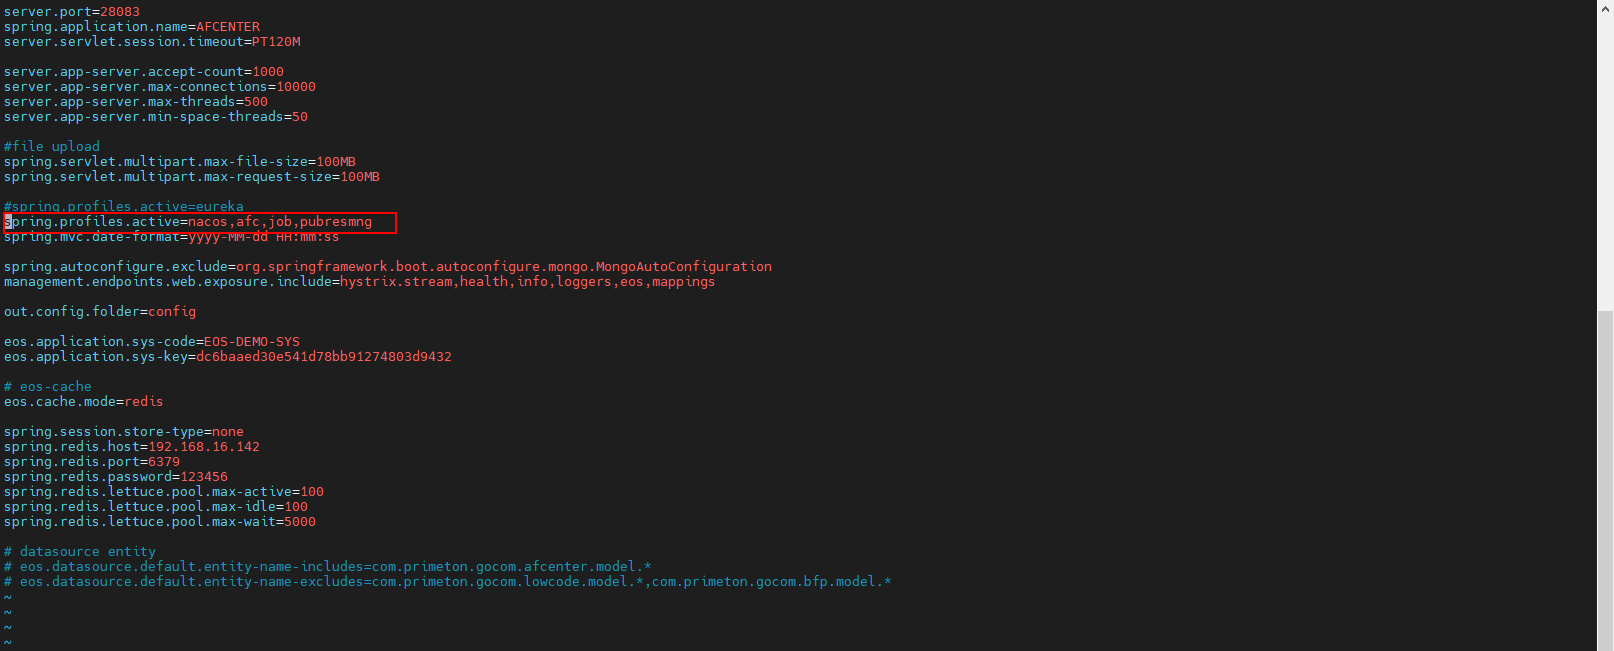
5.3 修改/opt/dws/afcenter-base/config/application.properties 文件内容,启用application-pubresmng.properties配置文件。
vim /opt/dws/afcenter-base/config/application.properties
5.4 修改以上配置需要重启AFCENTER。
cd /opt/dws/afcenter-base
./bin/shutdown.sh
./bin/startup.sh
# 6. 修改 DWS 配置文件,包括nacos、redis、外置驱动目录、血缘分析配置、数据库连接等。
6.1 修改 dws_server/config/bootstrap.properties,使用实际的nacos服务所在服务器ip:port
# nacos-addr
spring.cloud.nacos.config.enabled=true
spring.cloud.nacos.config.server-addr=127.0.0.1:8848  #修改为实际的nacos服务所在服务器ip:port
6.2 修改 dws_server/config/application-nacos.properties,使用实际的nacos服务所在服务器ip:port
spring.cloud.nacos.discovery.enabled=true
spring.cloud.nacos.discovery.server-addr=127.0.0.1:8848	#修改为实际的nacos服务所在服务器ip:port

eureka.client.enabled=false
6.3 修改dws_server/config/application.properties,修改redis配置参数
# eos cache config
eos.cache.mode=redis

spring.session.store-type=redis
#修改redis配置信息
spring.redis.host=192.168.30.142
spring.redis.port=6379
spring.redis.password=123456
spring.redis.lettuce.pool.max-active=100
spring.redis.lettuce.pool.max-idle=100
spring.redis.lettuce.pool.max-wait=5000
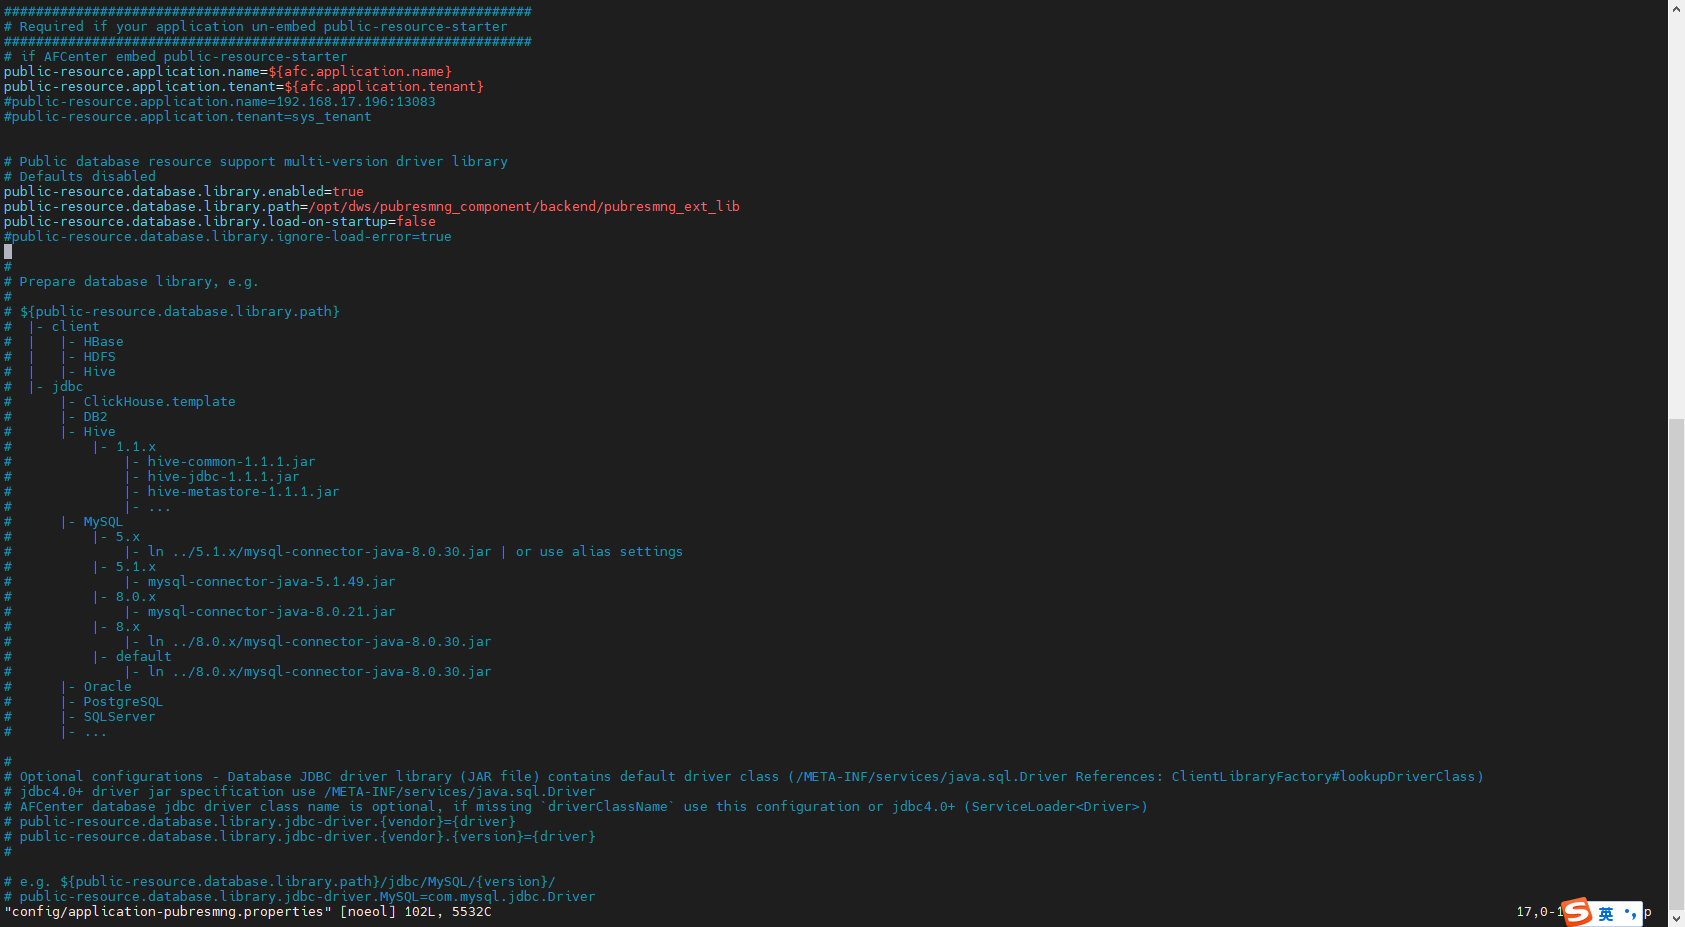
6.4 修改dws_server/config/application-pubresmng.properties 文件内容,开启外置驱动并指定外置驱动参数目录路径:public-resource.database.library.path
public-resource.database.library.enabled=true
public-resource.database.library.path=/opt/dws/pubresmng_component/backend/pubresmng_ext_lib
public-resource.database.library.load-on-startup=false
6.5 DWS 7.1.0可开启血缘分析(非必选操作),若要开启则需要先部署 Neo4j4.4.42(介质中不提供,请自行下载),并在 dws_server/config/application-dws.properties 修改配置开启neo4j 请参见 Neo4j安装指南
6.6 修改 dws_server/config/DWS/config/user-config.xml
修改文件中的数据库配置信息,即[初始化脚本](#3. 初始化数据库脚本)所用的数据库。
MySQL:
<group name="default">
<configValue key="Database-Type">MySql</configValue>
<configValue key="Jdbc-Type"/>
<configValue key="C3p0-DriverClass">com.mysql.jdbc.Driver</configValue>
<configValue key="C3p0-Url">jdbc:mysql://127.0.0.1:3306/dws?characterEncoding=utf-8&serverTimezone=Asia/Shanghai</configValue>
<configValue key="C3p0-UserName">root</configValue>
<configValue key="C3p0-Password">root</configValue>
<configValue key="C3p0-PoolSize">10</configValue>
<configValue key="C3p0-MaxPoolSize">50</configValue>
<configValue key="C3p0-MinPoolSize">10</configValue>
<!-- //seconds, 0 means connections never expire -->
<configValue key="C3p0-MaxIdleTime">600</configValue>
<!-- //idle connections never tested -->
<configValue key="C3p0-IdleConnectionTestPeriod">900</configValue>
<configValue key="C3p0-MaxStatements">0</configValue>
<configValue key="C3p0-NumHelperThreads">1</configValue>
<configValue key="Transaction-Isolation">ISOLATION_DEFAULT</configValue>
<configValue key="Test-Connect-Sql">SELECT count(*) from EOS_UNIQUE_TABLE</configValue>
<configValue key="Retry-Connect-Count">-1</configValue>
</group>
其他类型的数据库连接配置方式请参考文末:其他数据库连接配置
# 7. nginx.conf 配置
注意:配置网关、不配置网关的配置内容有区别。选择项目需要的一种配置方式即可。
# 配置网关,适用于服务调用都需要走网关的环境。
dws 与 afc 使用同一个 nginx,配置方式参考示例如下 (一般不用做修改,注意保证 X-EOS-SourceSysKey 的值与 application.properties 配置文件中 eos.application.sys-key 参数值一致即可)。
配置完成后重启 nginx。
# eos8.conf配置
upstream eosgateway {
    server 127.0.0.1:9090; # 配置成网关服务ip和端口
}

#EOS afcenter by gateway
server {
    listen 80;
    charset utf-8;
    client_max_body_size 200m;

    # 超时设置
    proxy_connect_timeout 600s;#设置连接超时时间
    proxy_send_timeout 600s; #设置发送超时时间
    proxy_read_timeout 600s;#设置读取超时时间
    proxy_http_version 1.1;

    # 请求头转发设置
    proxy_set_header Host $host;
    proxy_set_header X-Real-IP $remote_addr;
    proxy_set_header X-Real-Port $remote_port;
    proxy_set_header REMOTE-HOST $remote_addr;
    proxy_set_header X-Forwarded-For $proxy_add_x_forwarded_for;
    proxy_set_header X-EOS-SourceSysKey dc6baaed30e541d78bb91274803d9432;
    proxy_set_header Upgrade $http_upgrade;
    proxy_set_header Connection "Upgrade";

    # 安全响应头设置
    add_header X-Content-Type-Options nosniff;
    add_header X-XSS-Protection "1";
    add_header X-Frame-Options "SAMEORIGIN";
    add_header Content-Security-Policy "script-src * 'unsafe-inline' 'unsafe-eval'";
    add_header Strict-Transport-Security "max-age=SECONDS";
    add_header X-Permitted-Cross-Domain-Policies "master-only";
    add_header X-Download-Options noopen;
    add_header Referrer-Policy "no-referrer" always;

    #公共资源管理的请求跳过匹配
    location ~ /afc/api/public-resource/ {
		rewrite ^/afc/api/(.*) /api/$1 break;
		proxy_pass http://192.168.16.80:28083;
    }

    location ~ /(.*)/api/ {
        proxy_pass http://eosgateway;
    }

    location ~ \.biz\.ext$ {
        proxy_pass http://eosgateway;
    }

    location / {
        root "/opt/dws/dws_ui";
        index  index.html index.htm;
        try_files $uri /index.html;
    }
}
# 网关application.properties配置
    spring.cloud.gateway.routes[1].id=dws-route-1
    spring.cloud.gateway.routes[1].uri=lb://DWS/
    spring.cloud.gateway.routes[1].predicates[0]=Path=/DWS/api/**
    spring.cloud.gateway.routes[1].filters[0]=StripPrefix=1
# 不配置网关,dws 与 afc 使用同一个 nginx,提供以下两种配置方式,参考如下 :
# 方式一:
# 配置 {eos8安装路径}/apps/eos-app/web/conf/eos8.conf 文件,增加如下配置到 eos8.conf 中,配置完成后重启 nginx。
    location /DWS {
        proxy_set_header Host $host;
        proxy_set_header X-Real-IP $remote_addr;
        proxy_set_header X-Real-Port $remote_port;
        proxy_set_header REMOTE-HOST $remote_addr;
        proxy_set_header X-Forwarded-For $proxy_add_x_forwarded_for;

        charset utf-8;
        proxy_pass http://192.168.16.80:28082/;

        proxy_set_header Upgrade $http_upgrade;
        proxy_set_header Connection "Upgrade";
        proxy_http_version 1.1;
        proxy_read_timeout 600s;
    }
# 方式二: (推荐使用):
# {eos8安装路径}/apps/eos-app/web/conf 下新增加一个配置文件,例如:dws.conf,配置如下。修改nginx.conf文件,引用dws.conf配置文件。配置完成后重启 nginx。
server {
    listen       80;
    charset utf-8;
    client_max_body_size 200m;

    # 超时设置
    proxy_connect_timeout 600s;#设置连接超时时间
    proxy_send_timeout 600s; #设置发送超时时间
    proxy_read_timeout 600s;#设置读取超时时间
    proxy_http_version 1.1;

    # 请求头转发设置
    proxy_set_header Host $host;
    proxy_set_header X-Real-IP $remote_addr;
    proxy_set_header X-Real-Port $remote_port;
    proxy_set_header REMOTE-HOST $remote_addr;
    proxy_set_header X-Forwarded-For $proxy_add_x_forwarded_for;
    #proxy_set_header X-EOS-SourceSysKey dc6baaed30e541d78bb91274803d9432;
    proxy_set_header Upgrade $http_upgrade;
    proxy_set_header Connection "Upgrade";

    # 安全响应头设置
    add_header X-Content-Type-Options nosniff;
    add_header X-XSS-Protection "1";
    add_header X-Frame-Options "SAMEORIGIN";
    add_header Content-Security-Policy "script-src * 'unsafe-inline' 'unsafe-eval'";
    add_header Strict-Transport-Security "max-age=SECONDS";
    add_header X-Permitted-Cross-Domain-Policies "master-only";
    add_header X-Download-Options noopen;
    add_header Referrer-Policy "no-referrer" always;

    # AFCenter 前端资源文件,根据实际环境修改路经
    location / {
        root   /opt/dws/afcenter_ui;
        index  index.html index.htm;
        try_files $uri /index.html;
    }

    # AFcenter后端,根据实际环境修改ip和端口
    location /afc {
        proxy_pass http://192.168.16.80:28083/;
    }

    # dws后端,根据实际环境修改ip和端口
    location /DWS {
        proxy_pass http://192.168.16.80:28082/;
    }

    error_page   500 502 503 504  /50x.html;
    location = /50x.html {
        root   html;
    }
}
# 8. 启动/停止服务
- 启动/停止
DWS服务
 cd dws_server/
 #启动服务
 ./bin/startup.sh
 #停止服务
 ./bin/shutdown.sh
- 启动 Nginx 服务
cd /usr/local/nginx/sbin
./nginx                 #启动
./nginx -s reload       #重新加载
# 9.AFCENTER的权限配置(非必要步骤)
这种情况需要执行该步骤:
在初始化公共资源模块的sql语句前,如果AFCENTER已经完成了初次启动且初始化数据完成,则在完成公共资源相关部署(介质解压部署,sql脚本初始化,配置文件修改)并重启AFCENTER后,需要进行如下 9.1 和 9.2 的操作。
# 9.1放置AFCENTER补丁
AME+申请AFC8.3.3的补丁,补丁号【PLATFORM_8.3.3_AFCENTER_20250606_P1】,将补丁包中的jar放置在${AFC8.3.3部署目录}/lib下,重启AFCENTER。
# 9.2 同步租户资源,导入dws数据
登录
AFCENTER系统,点击【应用中心】,进入菜单 “通用管理”->”数据导入”,点击【同步租户资源】
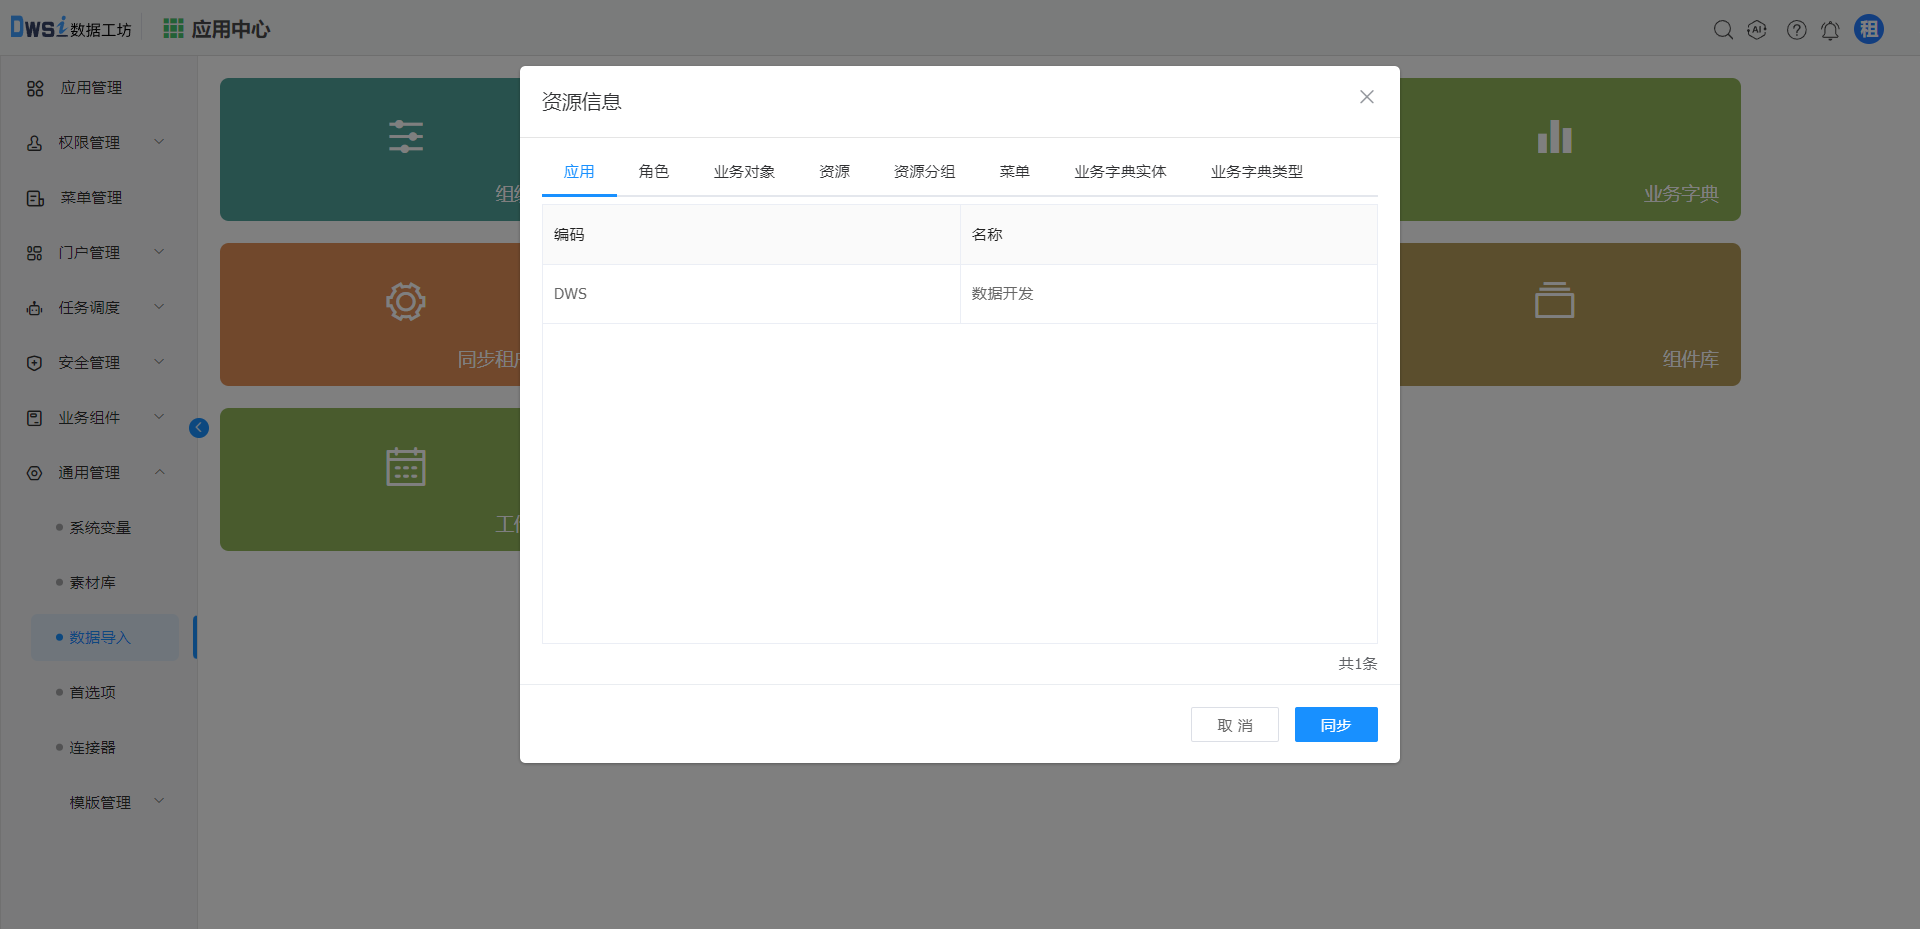
点击"同步"按钮,数据同步完成,刷新页面。
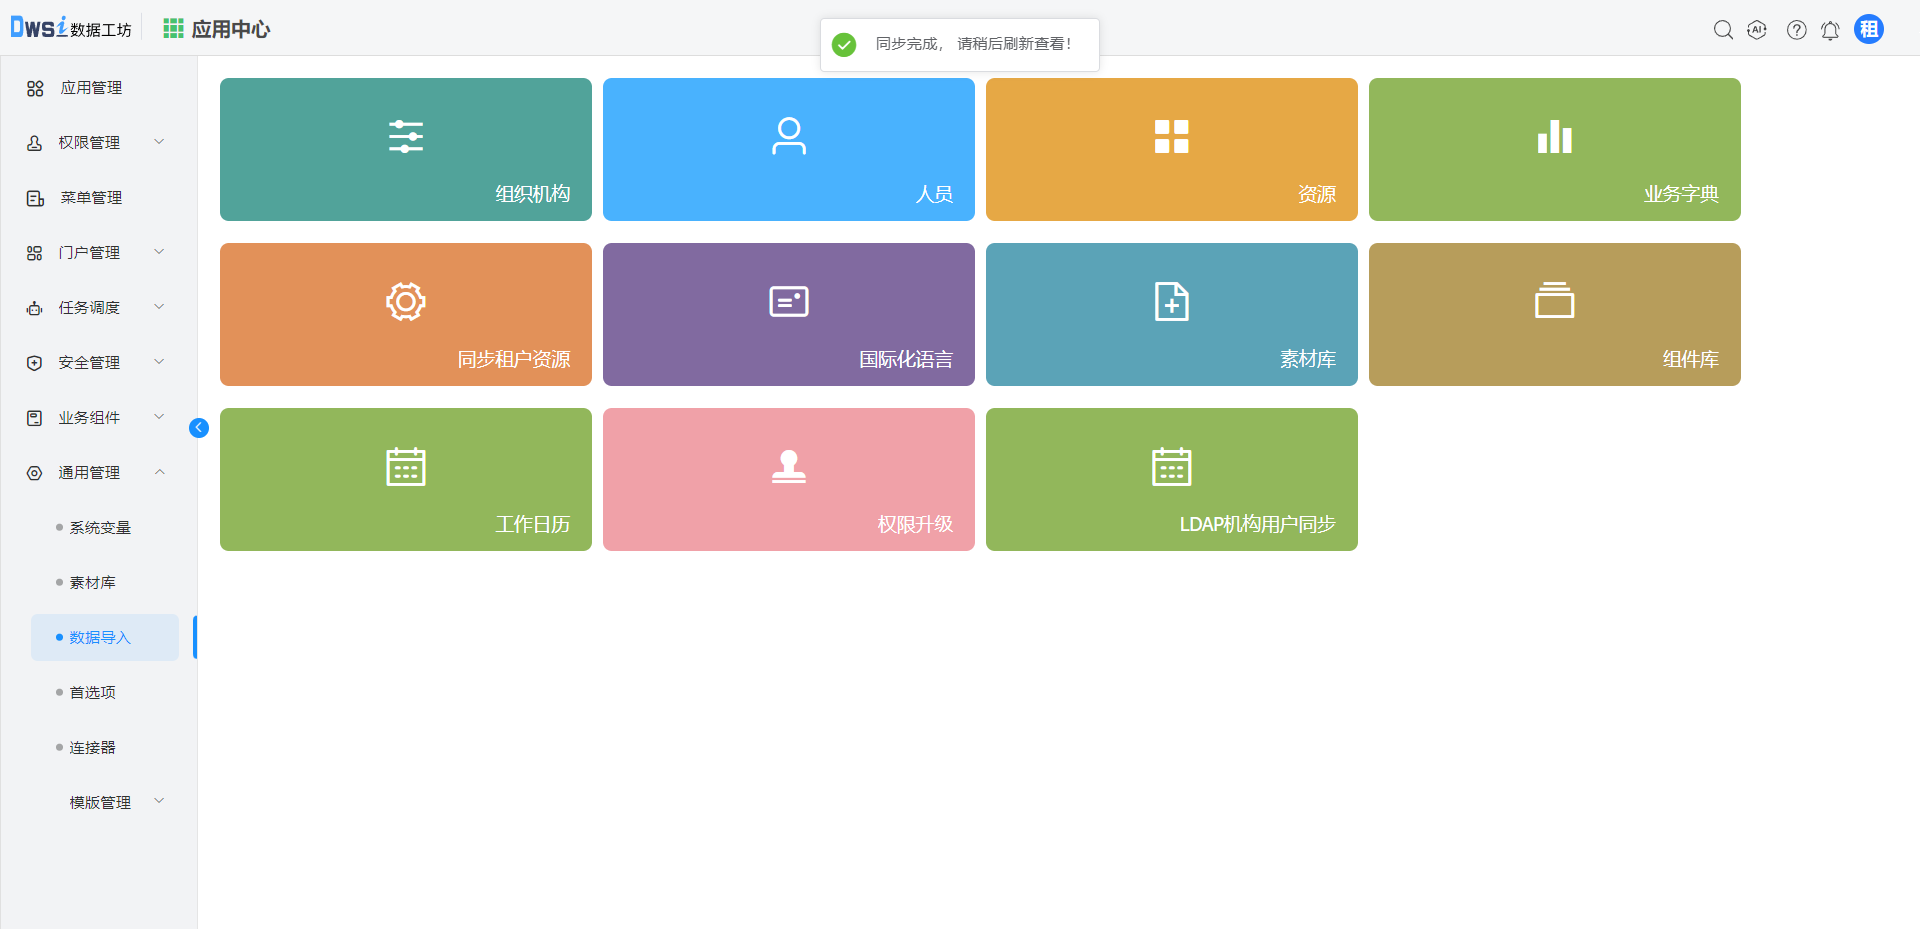
刷新页面后,权限配置正常。
# 10. 其他数据库连接配置
Oracle:
<group name="default">
            <configValue key="Database-Type">Oracle</configValue>
            <configValue key="Jdbc-Type"/>
            <configValue key="C3p0-DriverClass">oracle.jdbc.OracleDriver</configValue>
            <configValue key="C3p0-Url">jdbc:oracle:thin:@127.0.0.1:1521:orcl</configValue>
            <configValue key="C3p0-UserName">C##DWS_INIT</configValue>
            <configValue key="C3p0-Password">primeton</configValue>
            <configValue key="C3p0-PoolSize">10</configValue>
            <configValue key="C3p0-MaxPoolSize">50</configValue>
            <configValue key="C3p0-MinPoolSize">10</configValue>
            <!-- //seconds, 0 means connections never expire -->
            <configValue key="C3p0-MaxIdleTime">600</configValue>
            <!-- //idle connections never tested -->
            <configValue key="C3p0-IdleConnectionTestPeriod">900</configValue>
            <configValue key="C3p0-MaxStatements">0</configValue>
            <configValue key="C3p0-NumHelperThreads">1</configValue>
            <configValue key="Transaction-Isolation">ISOLATION_DEFAULT</configValue>
            <configValue key="Test-Connect-Sql">SELECT count(*) from EOS_UNIQUE_TABLE</configValue>
            <configValue key="Retry-Connect-Count">-1</configValue>
  </group>
PostgreSQL: url连接中必须增加参数 ?stringtype=unspecified
 <group name="default">
            <configValue key="Database-Type">postgresql</configValue>
            <configValue key="Jdbc-Type"/>
            <configValue key="C3p0-DriverClass">org.postgresql.Driver</configValue>
            <configValue key="C3p0-Url">jdbc:postgresql://127.0.0.1:5432/dws7la_test?stringtype=unspecified</configValue>
            <configValue key="C3p0-UserName">dws7la_test</configValue>
            <configValue key="C3p0-Password">primeton</configValue>
            <configValue key="C3p0-PoolSize">10</configValue>
            <configValue key="C3p0-MaxPoolSize">50</configValue>
            <configValue key="C3p0-MinPoolSize">10</configValue>
            <!-- //seconds, 0 means connections never expire -->
            <configValue key="C3p0-MaxIdleTime">600</configValue>
            <!-- //idle connections never tested -->
            <configValue key="C3p0-IdleConnectionTestPeriod">900</configValue>
            <configValue key="C3p0-MaxStatements">0</configValue>
            <configValue key="C3p0-NumHelperThreads">1</configValue>
            <configValue key="Transaction-Isolation">ISOLATION_DEFAULT</configValue>
            <configValue key="Test-Connect-Sql">SELECT count(*) from EOS_UNIQUE_TABLE</configValue>
            <configValue key="Retry-Connect-Count">-1</configValue>
  </group>
DM:
 <group name="default">
            <configValue key="Database-Type">DM</configValue>
            <configValue key="Jdbc-Type"/>
            <configValue key="C3p0-DriverClass">dm.jdbc.driver.DmDriver</configValue>
            <configValue key="C3p0-Url">jdbc:dm://127.0.0.1:5236/DWSV7LA</configValue>
            <configValue key="C3p0-UserName">DWSV7LA</configValue>
            <configValue key="C3p0-Password">primeton</configValue>
            <configValue key="C3p0-PoolSize">10</configValue>
            <configValue key="C3p0-MaxPoolSize">50</configValue>
            <configValue key="C3p0-MinPoolSize">10</configValue>
            <!-- //seconds, 0 means connections never expire -->
            <configValue key="C3p0-MaxIdleTime">600</configValue>
            <!-- //idle connections never tested -->
            <configValue key="C3p0-IdleConnectionTestPeriod">900</configValue>
            <configValue key="C3p0-MaxStatements">0</configValue>
            <configValue key="C3p0-NumHelperThreads">1</configValue>
            <configValue key="Transaction-Isolation">ISOLATION_DEFAULT</configValue>
            <configValue key="Test-Connect-Sql">SELECT count(*) from EOS_UNIQUE_TABLE</configValue>
            <configValue key="Retry-Connect-Count">-1</configValue>
  </group>
openGauss:
 <group name="default">
            <configValue key="Database-Type">gaussDB</configValue>
            <configValue key="Jdbc-Type"/>
            <configValue key="C3p0-DriverClass">org.opengauss.Driver</configValue>
            <configValue key="C3p0-Url">jdbc:opengauss://127.0.0.1:15432/dws7_test</configValue>
            <configValue key="C3p0-UserName">gaussdb</configValue>
            <configValue key="C3p0-Password">primeton</configValue>
            <configValue key="C3p0-PoolSize">10</configValue>
            <configValue key="C3p0-MaxPoolSize">50</configValue>
            <configValue key="C3p0-MinPoolSize">10</configValue>
            <!-- //seconds, 0 means connections never expire -->
            <configValue key="C3p0-MaxIdleTime">600</configValue>
            <!-- //idle connections never tested -->
            <configValue key="C3p0-IdleConnectionTestPeriod">900</configValue>
            <configValue key="C3p0-MaxStatements">0</configValue>
            <configValue key="C3p0-NumHelperThreads">1</configValue>
            <configValue key="Transaction-Isolation">ISOLATION_DEFAULT</configValue>
            <configValue key="Test-Connect-Sql">SELECT count(*) from EOS_UNIQUE_TABLE</configValue>
            <configValue key="Retry-Connect-Count">-1</configValue>
  </group>
Sqlserver:
<group name="default">
            <configValue key="Database-Type">SqlServer</configValue>
            <configValue key="Jdbc-Type"/>
            <configValue key="C3p0-DriverClass">com.microsoft.sqlserver.jdbc.SQLServerDriver</configValue>
            <configValue key="C3p0-Url">jdbc:sqlserver://127.0.0.1:1433;databaseName=dws7;trustServerCertificate=true</configValue>
            <configValue key="C3p0-UserName">dws7</configValue>
            <configValue key="C3p0-Password">primeton</configValue>
            <configValue key="C3p0-PoolSize">10</configValue>
            <configValue key="C3p0-MaxPoolSize">50</configValue>
            <configValue key="C3p0-MinPoolSize">10</configValue>
            <!-- //seconds, 0 means connections never expire -->
            <configValue key="C3p0-MaxIdleTime">600</configValue>
            <!-- //idle connections never tested -->
            <configValue key="C3p0-IdleConnectionTestPeriod">900</configValue>
            <configValue key="C3p0-MaxStatements">0</configValue>
            <configValue key="C3p0-NumHelperThreads">1</configValue>
            <configValue key="Transaction-Isolation">ISOLATION_DEFAULT</configValue>
            <configValue key="Test-Connect-Sql">SELECT count(*) from EOS_UNIQUE_TABLE</configValue>
            <configValue key="Retry-Connect-Count">-1</configValue>
        </group>
# 11. DWS集群部署说明
DWS Server服务默认单节点部署即可,作业运行的压力主要在 dolphinscheduler 调度、Primeton DI 及 seatunnel 节点上。
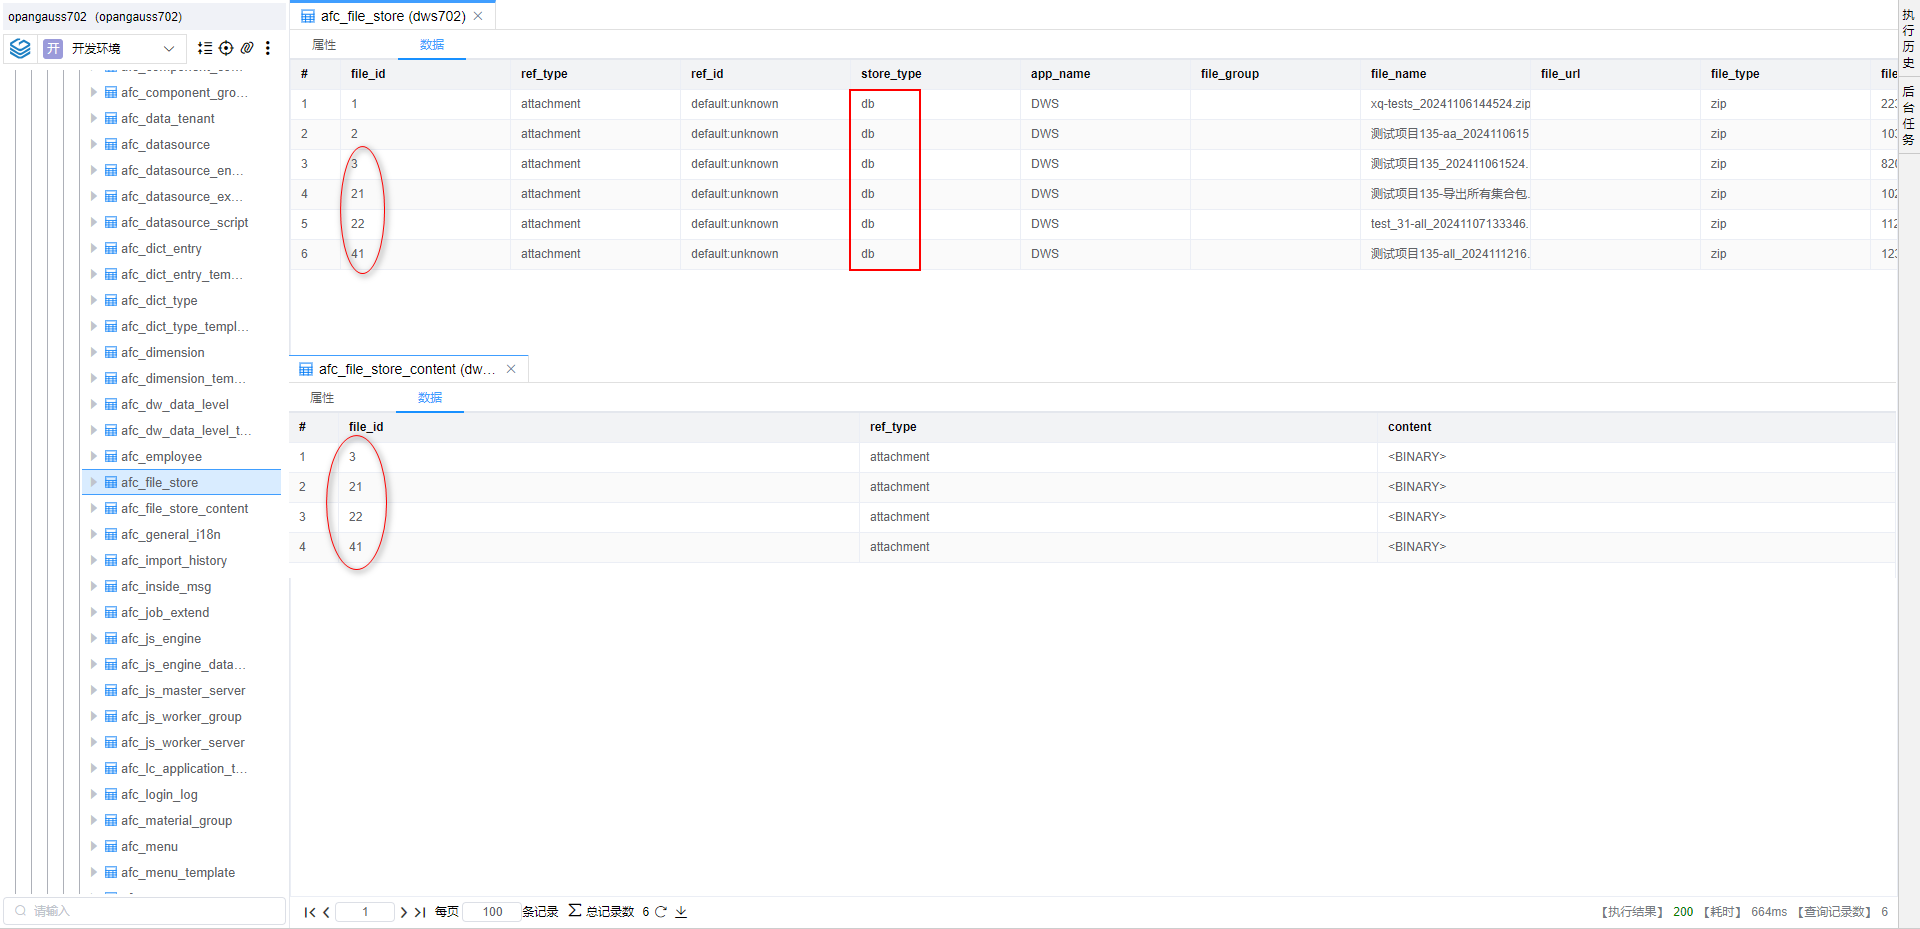
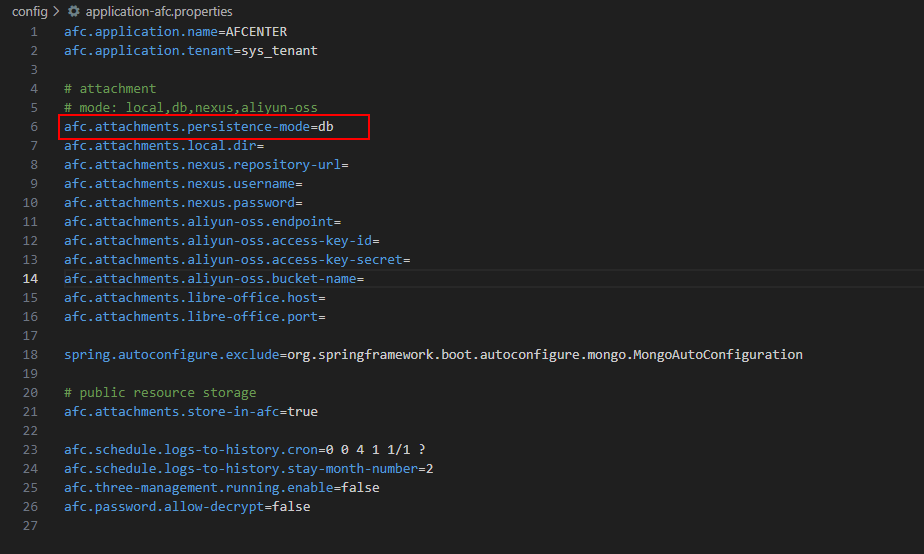
若项目中需要将DWS部署为集群模式,则需要修改dws_server/config/application-afc.properties文件,附件资源使用共享存储db方式。(默认的local模式会导致开发项目导出的资源包投产到生产项目时,找不到资源包)
   vim dws_server/config/application-afc.properties

   # mode: local,db,nexus,aliyun-oss
   afc.attachments.persistence-mode=db
以上设置成功后,开发项目导出资源包中包含附件时,数据存储在数据库afc_file_store_content表中;afc_file_store表中开发项目导出资源包记录store_type为db。