# 资产套件版本后端高开定制开发与部署指南
# 一、文档说明
本文档旨在为开发者提供资产套件版本后端高开定制的完整流程指导,包括从示例项目获取、开发环境配置,到定制化开发、项目打包及部署的全流程操作说明,助力开发者高效完成资产后端的定制开发工作。
# 二、下载示例项目
# (一)目的
获取初始代码框架,为后续的自定义开发提供基础支撑,减少从零搭建项目的工作量。
# (二)操作步骤
点击下方链接下载项目压缩包: 下载示例项目
# (三)项目结构说明
本项目为标准的 eos 项目,不包含具体业务代码,所有依赖均通过 pom 文件进行引入,便于开发者在此基础上进行定制化开发。
# 三、导入项目到开发工具
# (一)目的
在本地开发环境中正确配置项目,确保项目能够正常加载和运行,为后续开发工作做好准备。
# (二)操作步骤
安装项目所需的开发工具(如 IntelliJ IDEA 等)以及相关依赖,下文中使用的是 IDEA 为例,不再重复说明。
打开安装好的 IDEA,通过“打开项目”功能选择下载的项目文件夹,将项目导入到 IDEA 中。
下载 EOS_Platform_8.3.3_Private_Medium_Develop.zip,使用此介质中的 repository 作为 maven 仓库文件夹。
导入 Maven 项目:在 IDEA 中找到 Maven 面板,点击“刷新”按钮,让 IDEA 自动识别并导入项目的 Maven 依赖。同时,需要修改 Maven 的 settings.xml 文件,以保证项目依赖能够正确下载,避免出现报错。
相关配置参考如下(需将部分远程仓库没有的依赖 jar 单独手动放置到仓库目录下):下载依赖 jar
<?xml version="1.0" encoding="UTF-8"?>
<settings xmlns="http://maven.apache.org/SETTINGS/1.0.0"
          xmlns:xsi="http://www.w3.org/2001/XMLSchema-instance"
          xsi:schemaLocation="http://maven.apache.org/SETTINGS/1.0.0 http://maven.apache.org/xsd/settings-1.0.0.xsd">
    <mirrors>
         <mirror>
             <id>mirror</id>
             <mirrorOf>central,jcenter,!aliyun-rdc-releases,!aliyun-rdc-snapshots
             </mirrorOf>
             <name>mirror</name>
             <url>https://maven.aliyun.com/nexus/content/groups/public</url>
         </mirror>
     </mirrors>
     <profiles>
         <profile>
             <id>primeton</id>
             <repositories>
                 <repository>
                     <id>central</id>
                     <url>https://maven.aliyun.com/nexus/content/groups/public</url>
                     <releases>
                         <enabled>true</enabled>
                     </releases>
                     <snapshots>
                         <enabled>false</enabled>
                     </snapshots>
                 </repository>
                 <repository>
                     <id>snapshots</id>
                     <url>https://maven.aliyun.com/nexus/content/groups/public</url>
                     <releases>
                         <enabled>false</enabled>
                     </releases>
                     <snapshots>
                         <enabled>true</enabled>
                     </snapshots>
                 </repository>
                 <repository>
                     <id>aliyun-rdc-releases</id>
                     <url>https://packages.aliyun.com/maven/repository/2208165-release-FizKV7/
                     </url>
                     <releases>
                         <enabled>true</enabled>
                     </releases>
                     <snapshots>
                         <enabled>false</enabled>
                     </snapshots>
                 </repository>
                 <repository>
                     <id>aliyun-rdc-snapshots</id>
                     <url>https://packages.aliyun.com/maven/repository/2208165-snapshot-deBt2F/
                     </url>
                     <releases>
                         <enabled>false</enabled>
                     </releases>
                     <snapshots>
                         <enabled>true</enabled>
                     </snapshots>
                 </repository>
             </repositories>
             <pluginRepositories>
                 <pluginRepository>
                     <id>central</id>
                     <url>https://maven.aliyun.com/nexus/content/groups/public</url>
                     <releases>
                         <enabled>true</enabled>
                     </releases>
                     <snapshots>
                         <enabled>false</enabled>
                     </snapshots>
                 </pluginRepository>
                 <pluginRepository>
                     <id>snapshots</id>
                     <url>https://maven.aliyun.com/nexus/content/groups/public</url>
                     <releases>
                         <enabled>false</enabled>
                     </releases>
                     <snapshots>
                         <enabled>true</enabled>
                     </snapshots>
                 </pluginRepository>
                 <pluginRepository>
                     <id>aliyun-rdc-releases</id>
                     <url>https://packages.aliyun.com/maven/repository/2208165-release-FizKV7/
                     </url>
                     <releases>
                         <enabled>true</enabled>
                     </releases>
                     <snapshots>
                         <enabled>false</enabled>
                     </snapshots>
                 </pluginRepository>
                 <pluginRepository>
                     <id>aliyun-rdc-snapshots</id>
                     <url>https://packages.aliyun.com/maven/repository/2208165-snapshot-deBt2F/
                     </url>
                     <releases>
                         <enabled>false</enabled>
                     </releases>
                     <snapshots>
                         <enabled>true</enabled>
                     </snapshots>
                 </pluginRepository>
             </pluginRepositories>
         </profile>
     </profiles>
     <activeProfiles>
         <activeProfile>primeton</activeProfile>
     </activeProfiles>
     <servers>
         <server>
             <id>aliyun-rdc-releases</id>
             <username>623db7e13c6b5273a0764cb4</username>
             <password>UP1dH-IITR[I</password>
         </server>
         <server>
             <id>aliyun-rdc-snapshots</id>
             <username>623db7e13c6b5273a0764cb4</username>
             <password>UP1dH-IITR[I</password>
         </server>
     </servers>
</settings>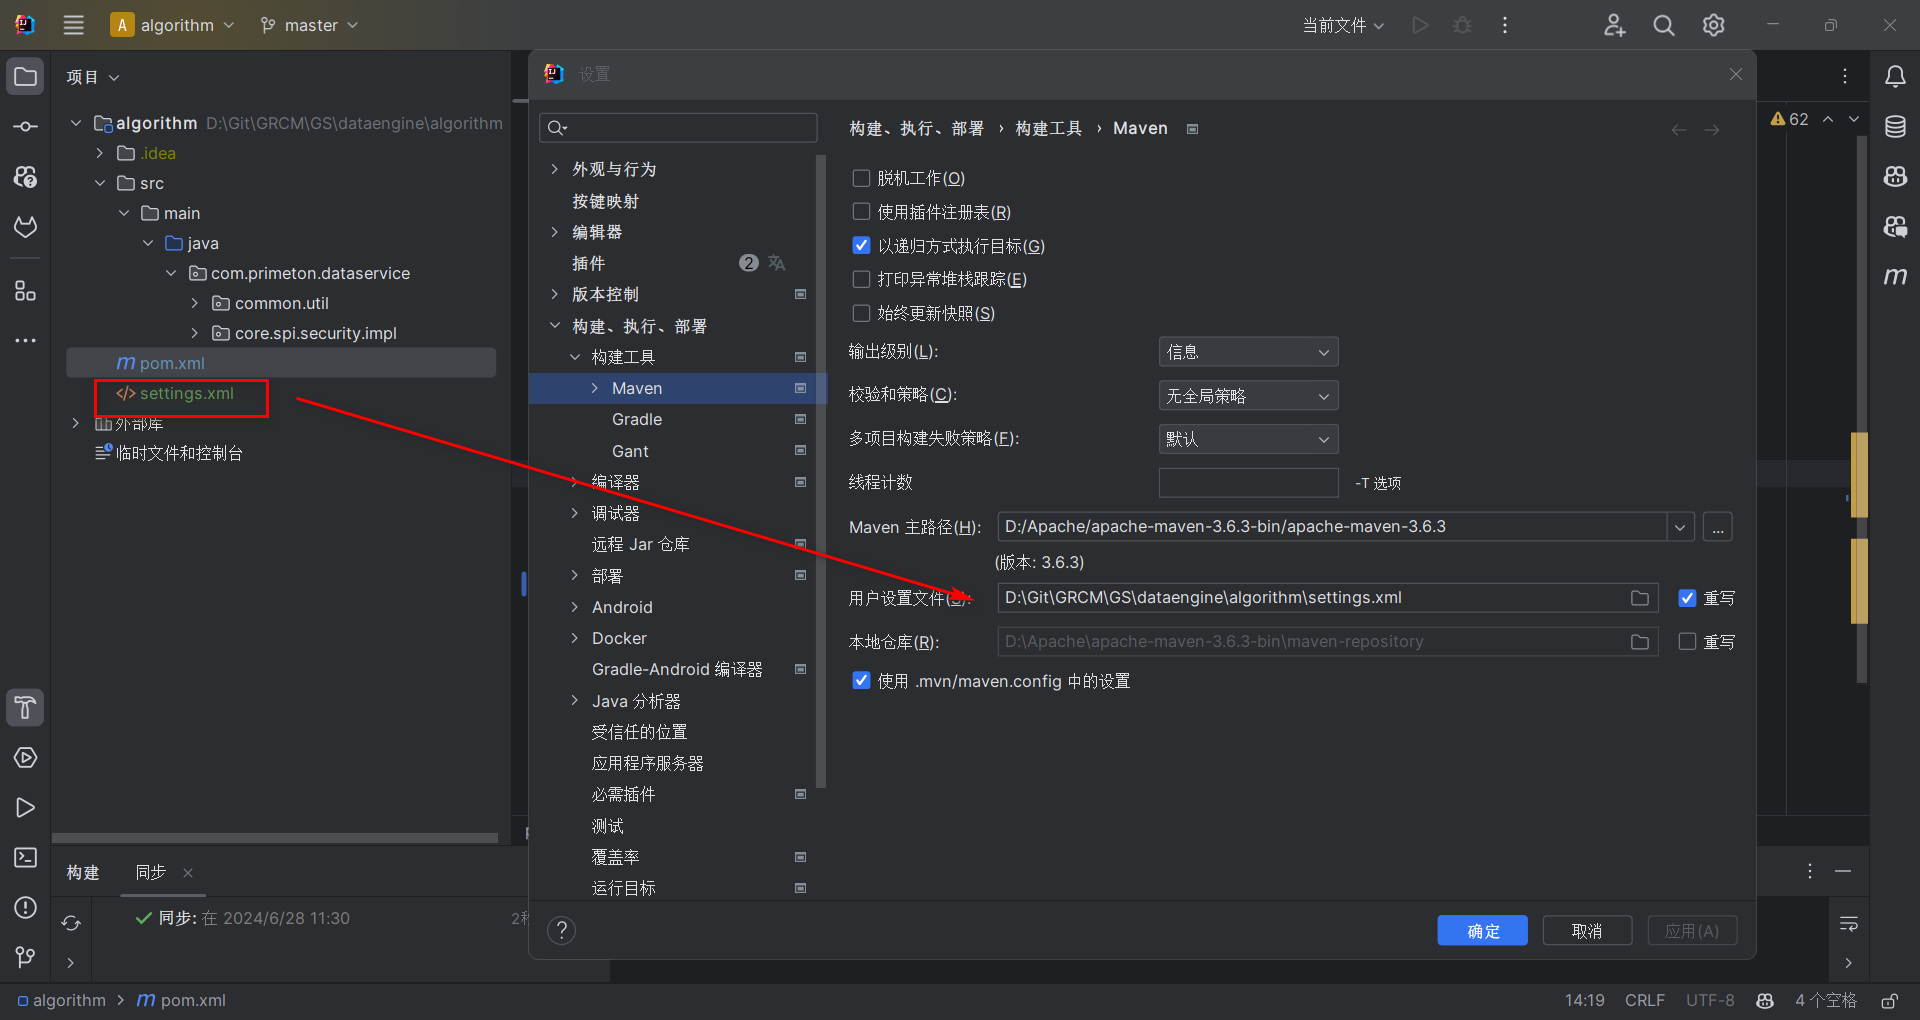
# 四、项目开发
# (一)目的
基于示例项目框架,根据实际业务需求进行定制化代码开发,实现资产后端的个性化功能。
# (二)操作步骤
开发中分为多种场景,下文会根据实际场景分开说明。
- 增量开发 申请产品部分代码,有针对性的调整部分代码。最终通过增量补丁方式构建补丁 jar,放到项目 lib 目录下优先加载应用。
- 自定义逻辑开发 自定义完整功能特性,对产品原有功能无侵入,仅调用已有 api 或新增单独逻辑。最终构建完成构件包 jar,放到项目 lib 中运行加载。
# 增量开发
将申请的代码导入项目,如果是全量代码则直接以项目方式导入即可,此处仅介绍申请增量代码后的开发逻辑。
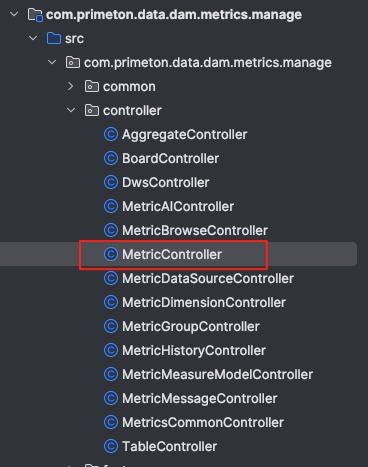
- 在项目中创建同名构件包,具体可以参考代码中的 package 属性来确定。
package com.primeton.data.dam.metrics.manage.controller;// 以此为例,指标中的构件包名是:com.primeton.data.dam.metrics.manage

import ...

@Api(tags = "指标管理")
@RestController
@RequestMapping("/api/damp/metrics")
public class MetricController {

    private final MetricService metricService;
- 构建相同的包路径,将申请的代码放到对应位置,修改代码逻辑即可。
# 自定义逻辑开发
自定义逻辑开发因为不受原有产品逻辑限制,可以自定义构建报名称,并按照项目功能特性开发逻辑即可。如果涉及到调用产品 sdk 或者逻辑,可以在构件包的 pom 文件对应的依赖。具体产品可以询问研发或者参考打包项目中 core 构件包中的 pom 文件。
    <-- afcenter相关依赖 -->
    <dependency>
      <groupId>com.primeton.gocom</groupId>
      <artifactId>com.primeton.gocom.afcenter.starter</artifactId>
    </dependency>
    <dependency>
      <groupId>com.primeton.gocom</groupId>
      <artifactId>com.primeton.gocom.message.starter</artifactId>
    </dependency>
    <-- bps相关依赖 -->
    <dependency>
      <groupId>com.primeton.bps</groupId>
      <artifactId>com.primeton.bps.taskcenter.starter</artifactId>
    </dependency>
    <dependency>
      <groupId>com.primeton.gocom.bfp</groupId>
      <artifactId>com.primeton.gocom.bfp.framework.starter</artifactId>
    </dependency>
    ...
# 五、打包部署
# (一)目的
将开发完成的项目代码及相关资源文件进行打包,生成可在服务器上部署的文件。
# (二)操作步骤
根据上一步的操作,你已经完成了代码的开发工作。接下来需要将代码构建为 jar 包放到套件中加载运行。和项目开发的逻辑一样,打包同样区分文件增量构建和构件包增量构建两种方式。
注意:打包本质上都是增量方式,目前不建议直接通过构建完整jar替换套件fatjar的方式,因此下文中不会介绍fatjar的打包和部署。
# 文件增量构建
在开发工具中右键你修改的 java 文件,点击导出,导出 jar 包的方式对应生成包含增量 class 文件的 jar。示例以 eos studio 工具来演示。
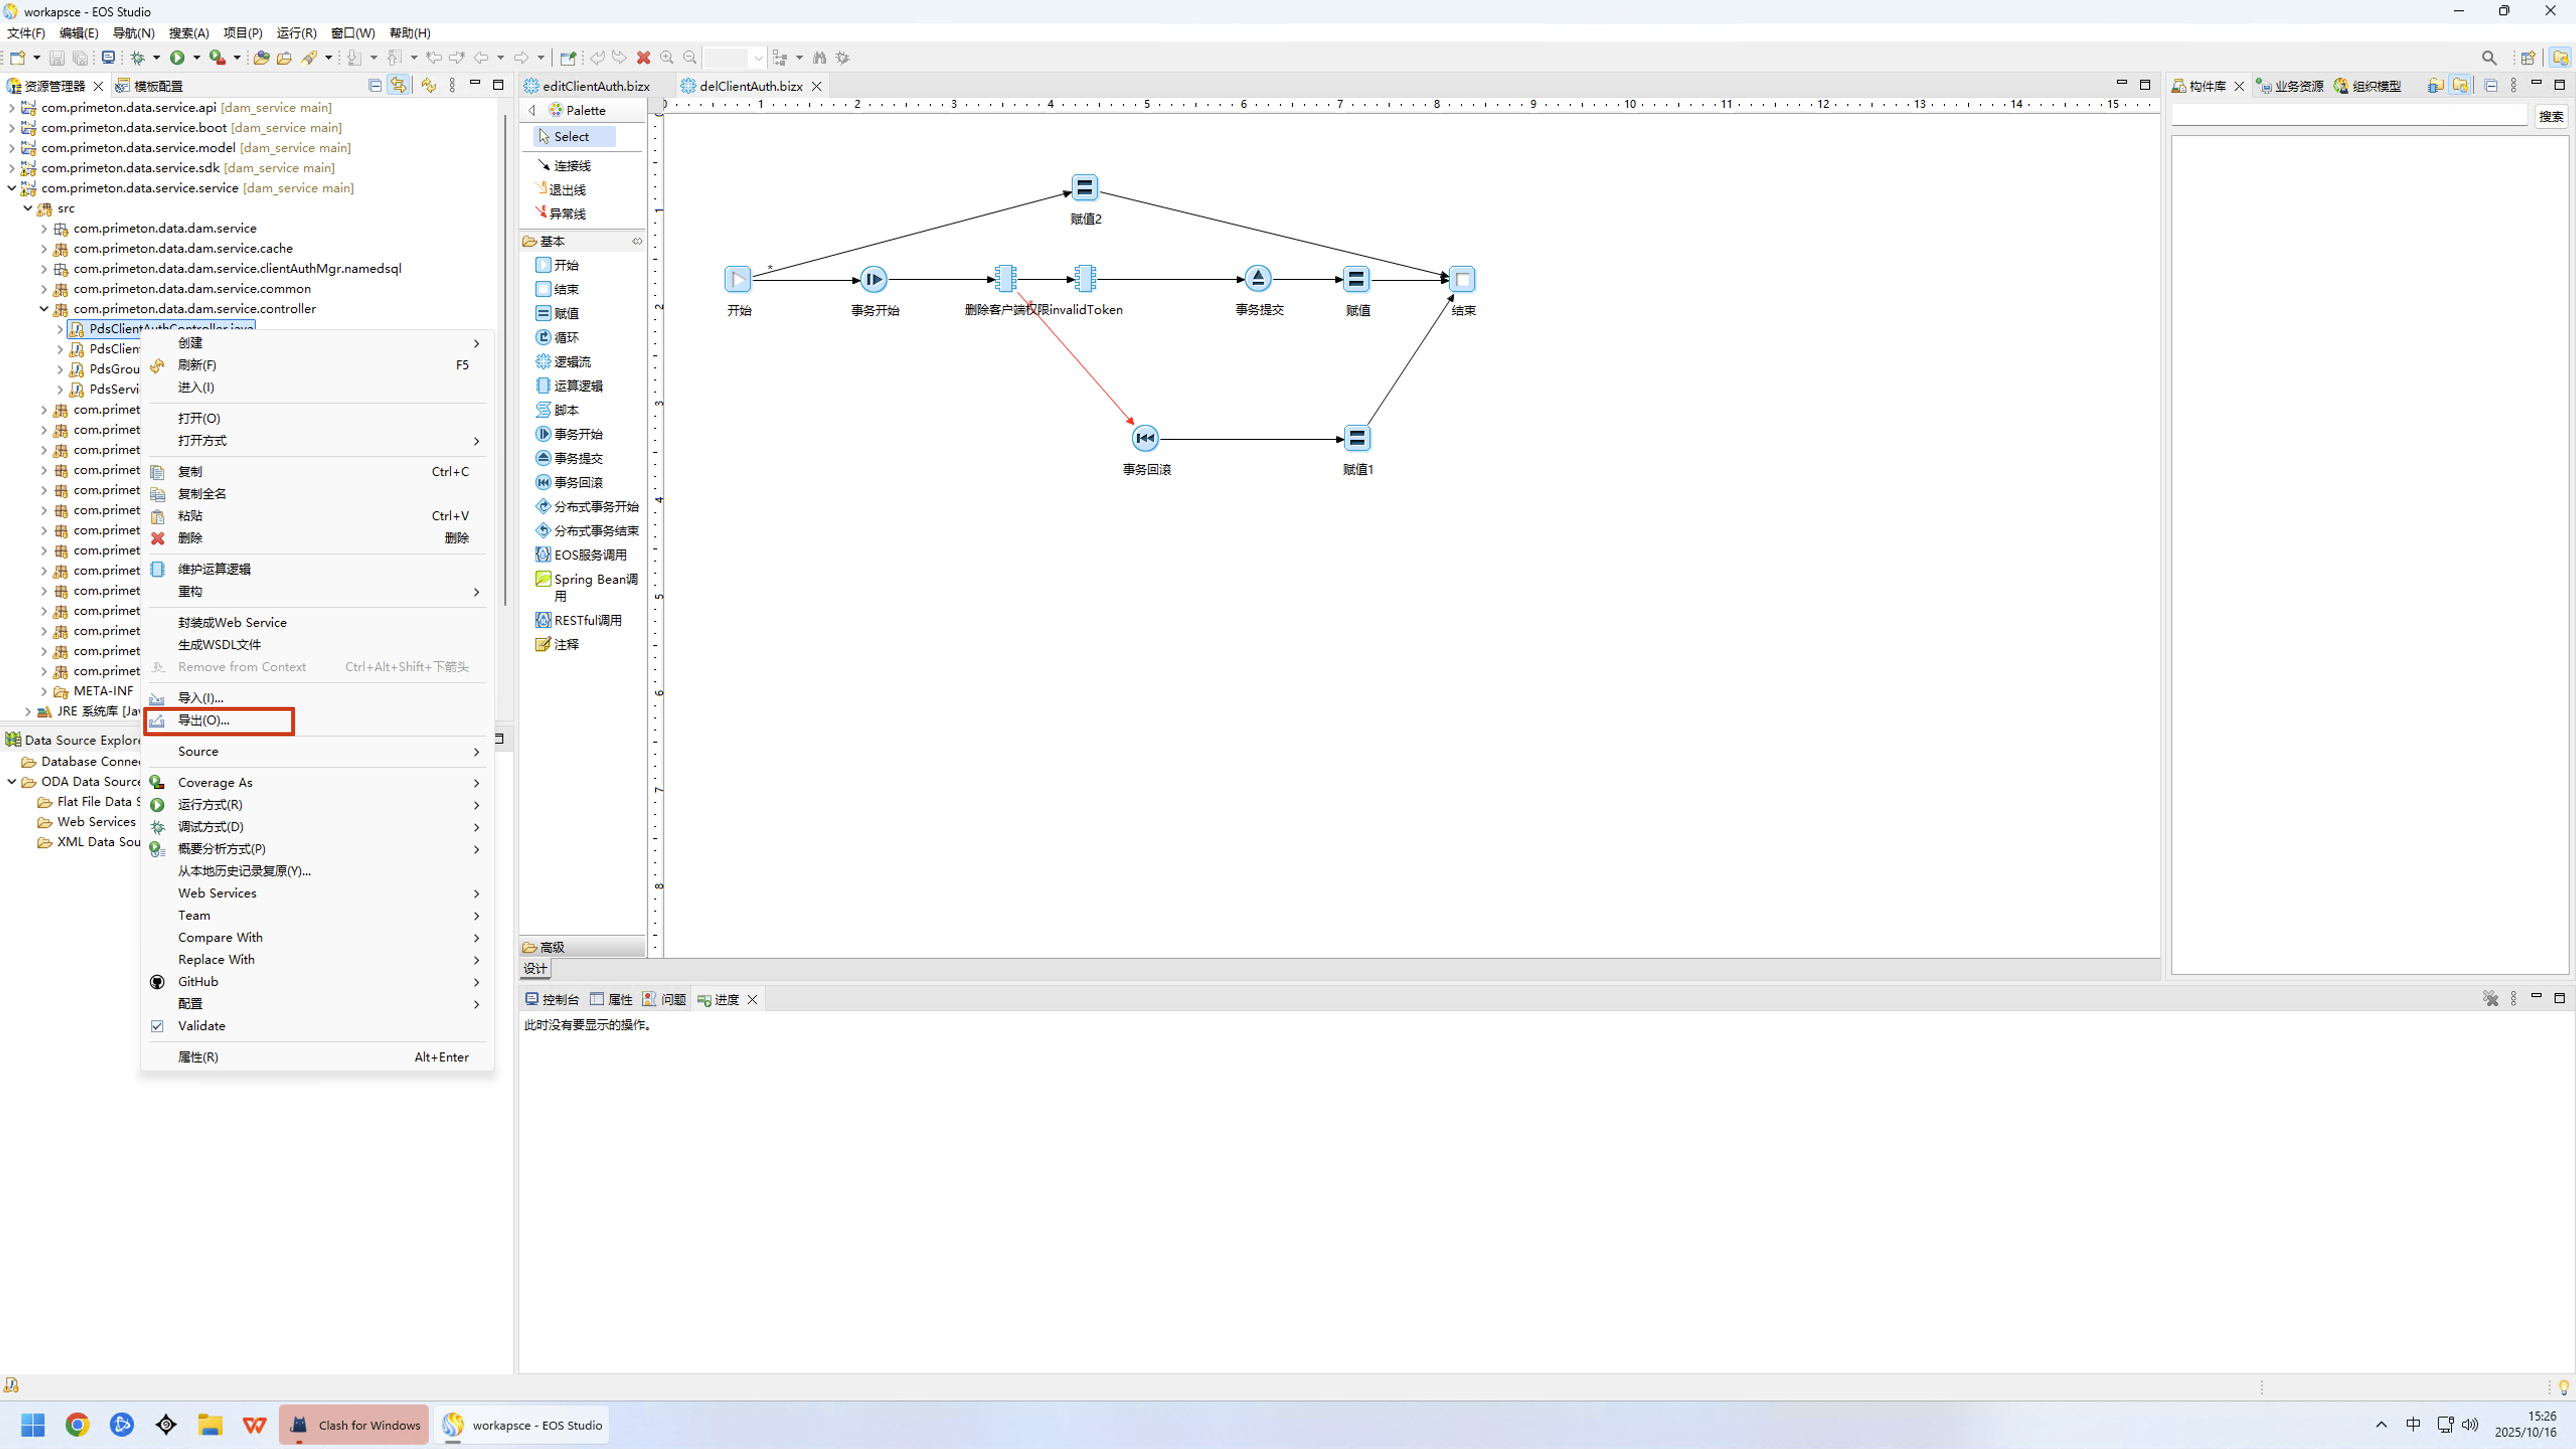
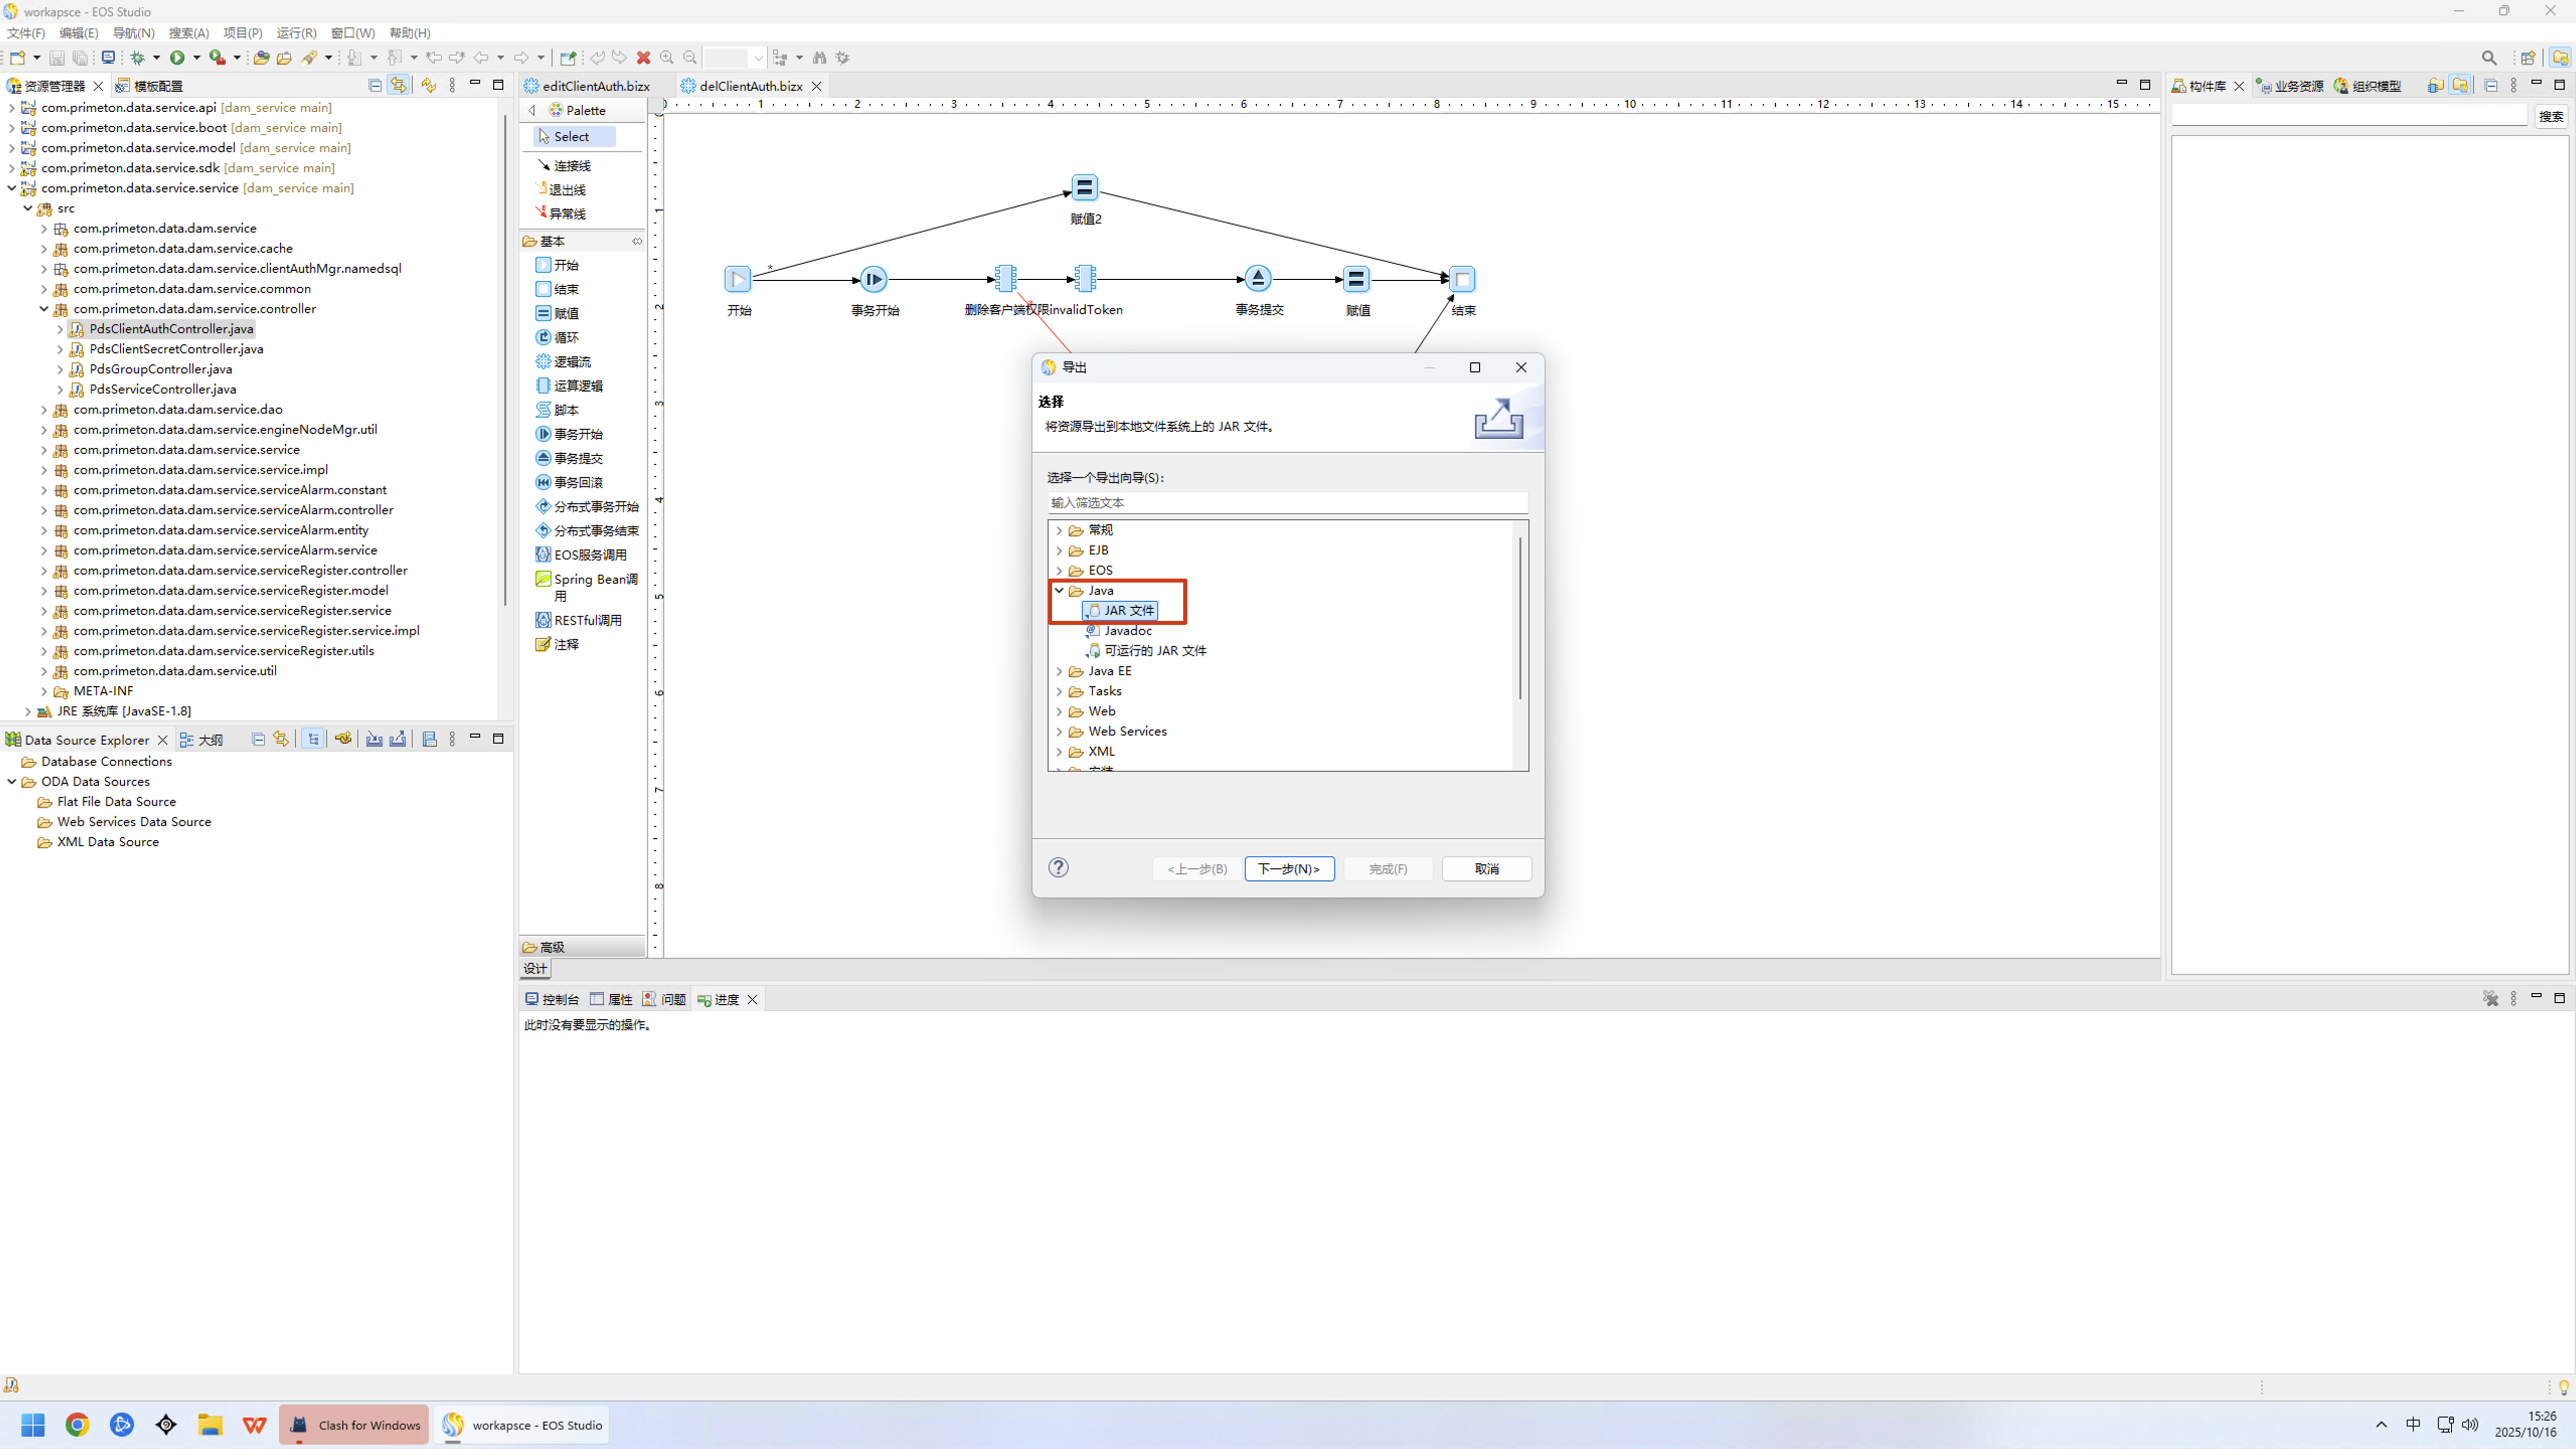
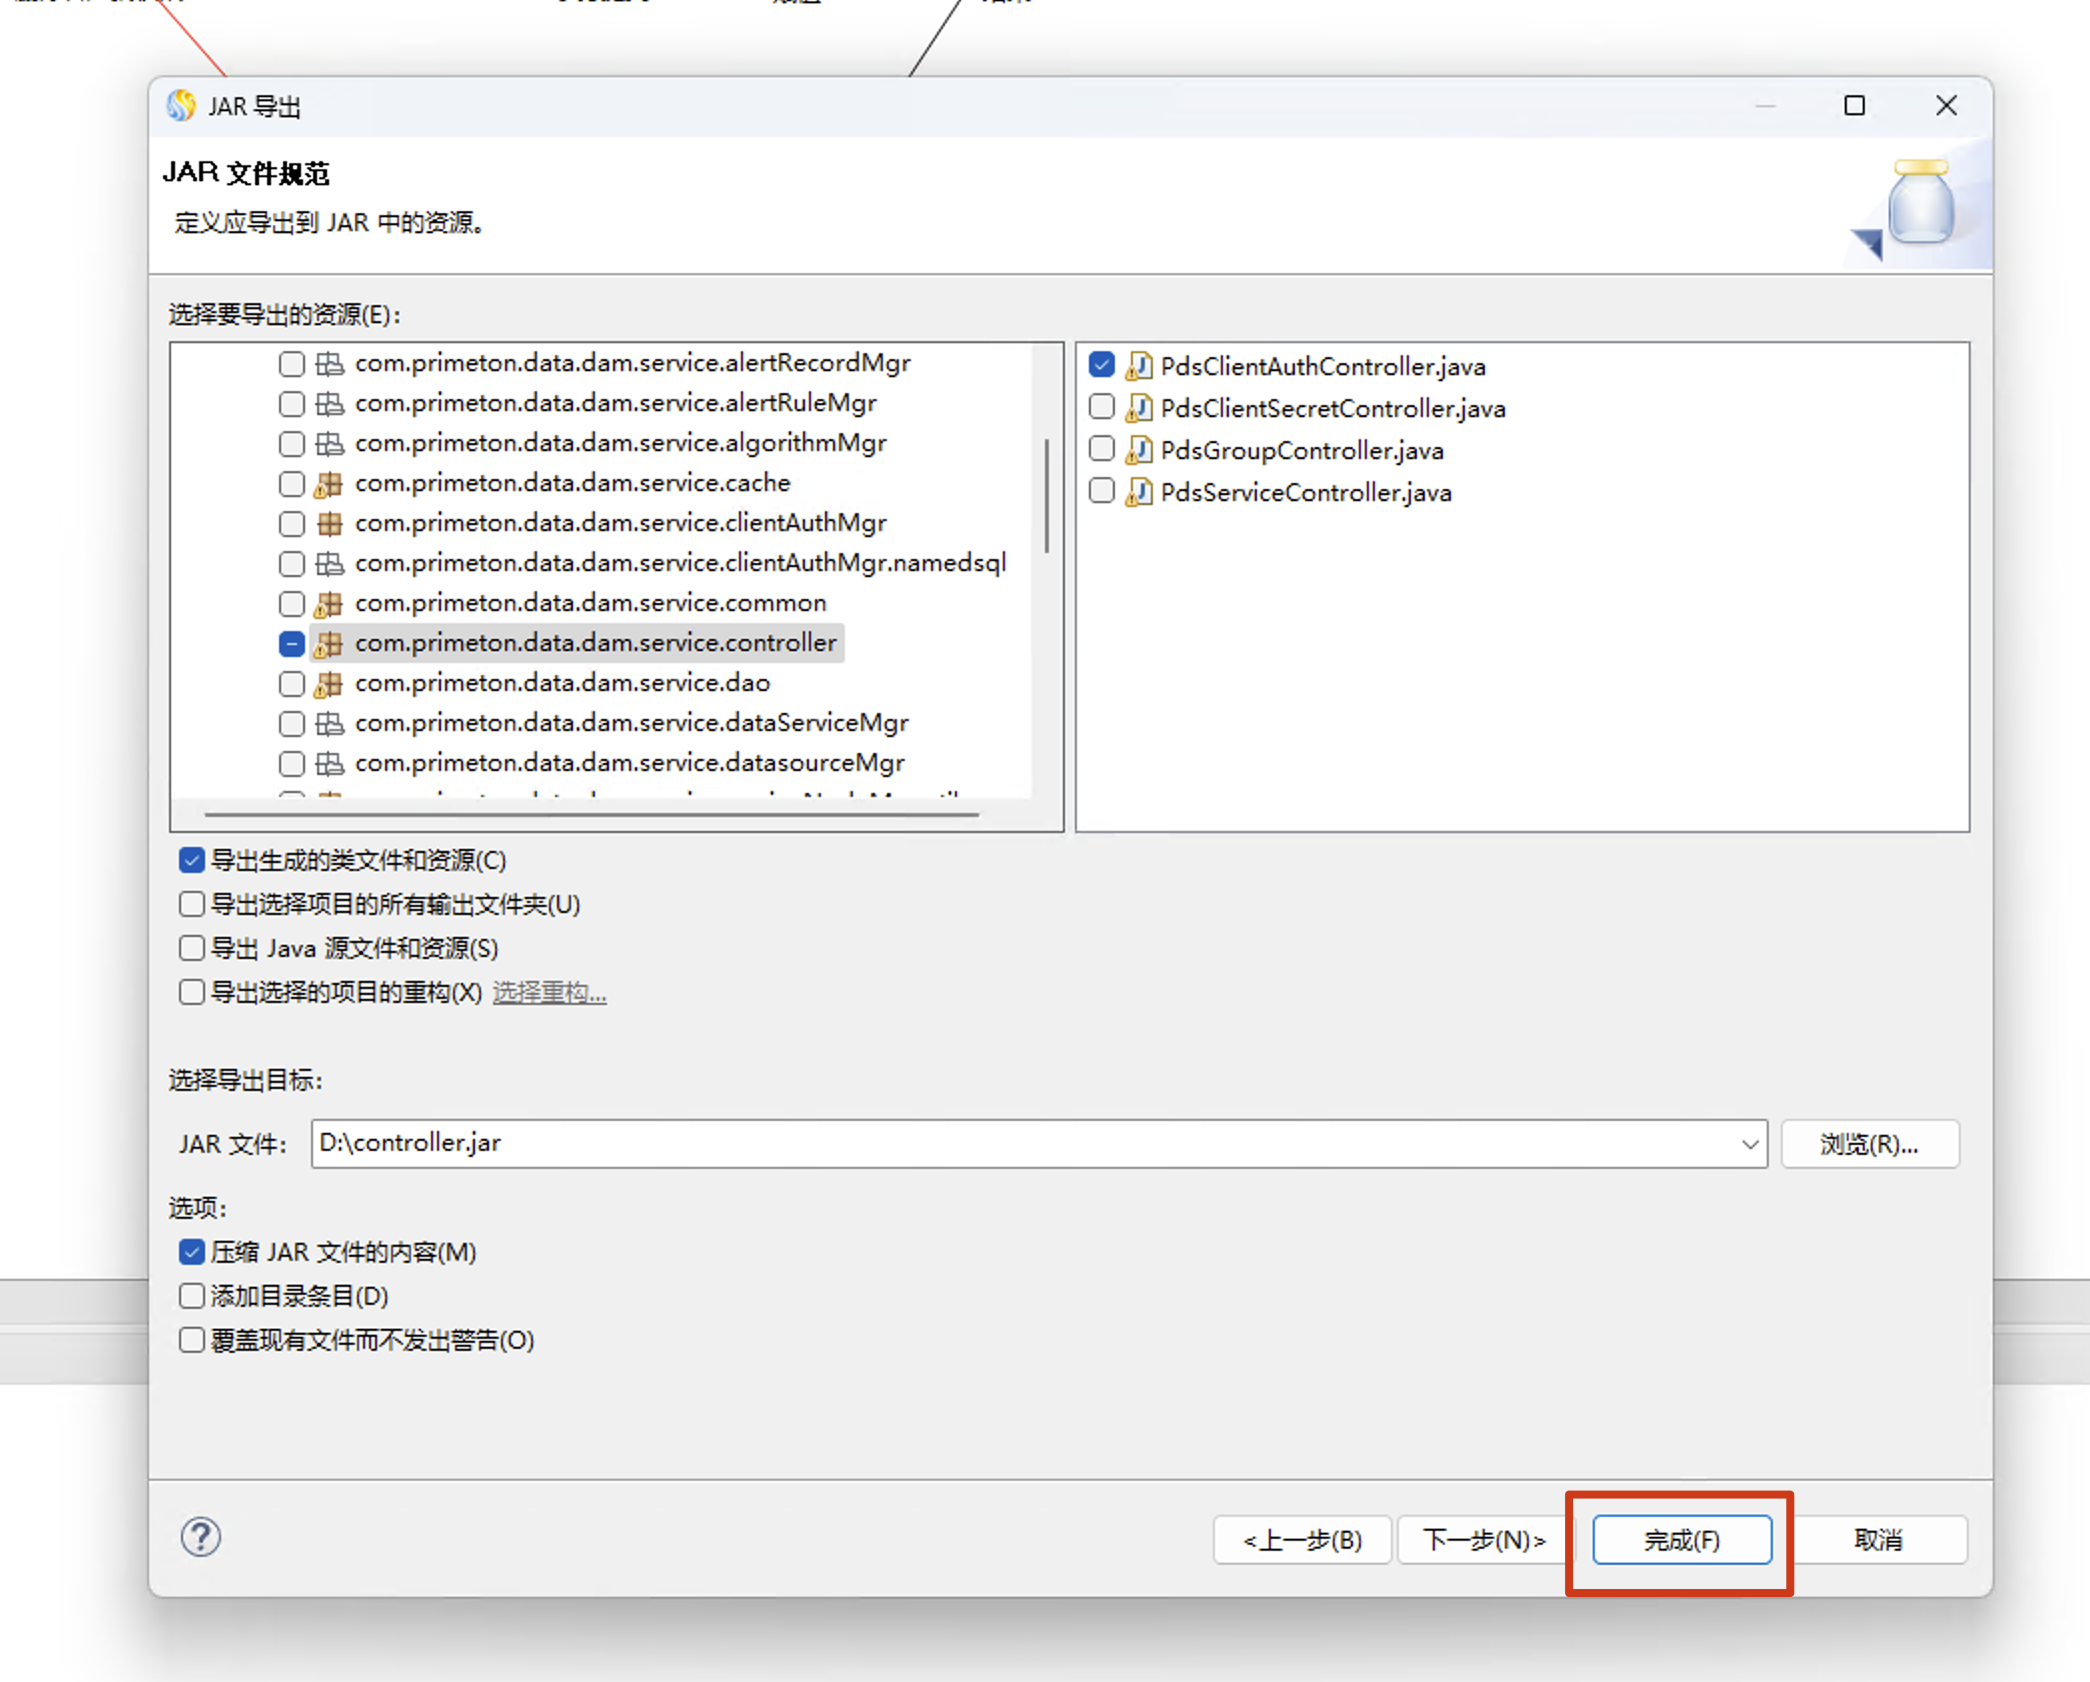
将生成的 jar 包放到套件的 lib 目录下重启 DAMP 即可完成部署。

# 构件包增量构建
通过 maven 正常构建自定义构件包,确保构建成功。在当前构件包的 target 目录下找到生成的构件包同名 jar。
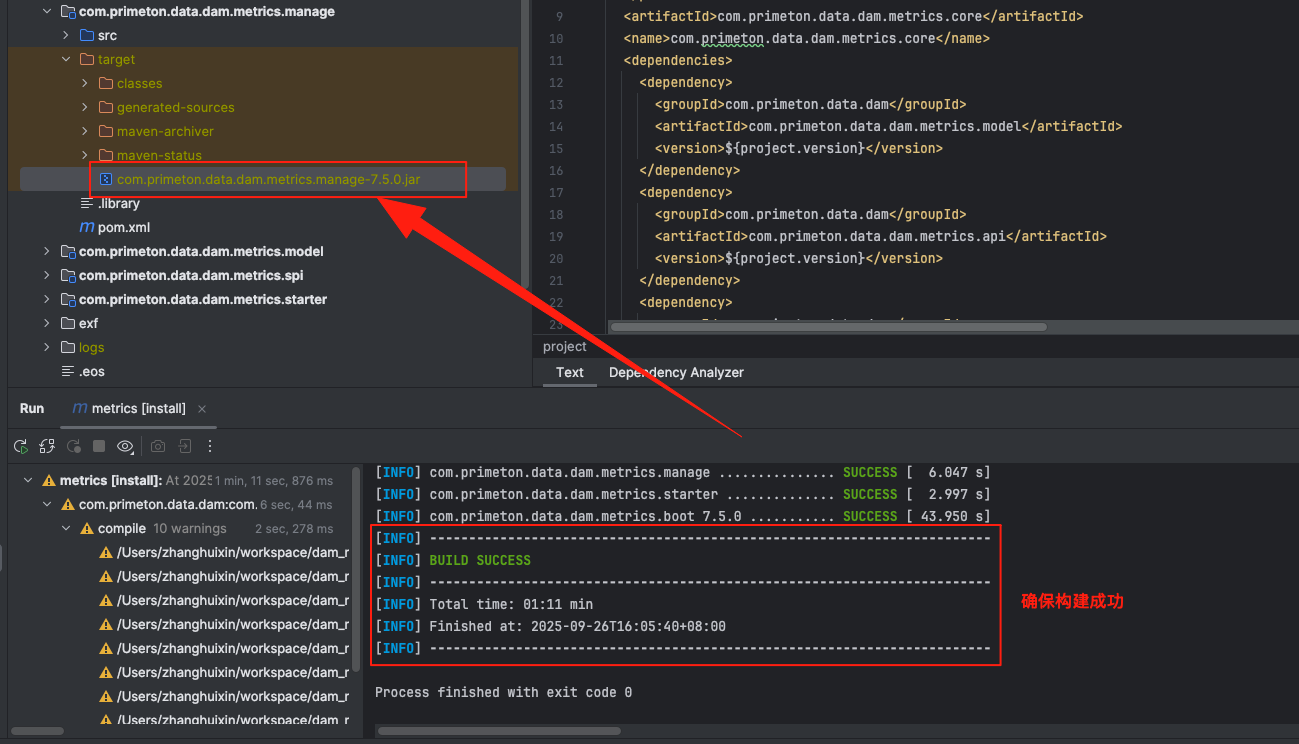
将生成的 jar 包放到套件的 lib 目录下重启 DAMP 即可完成部署,截图同上。
# 附录一、本地启动注意事项
# (一)修改 mybatis.mapper-locations 配置
找到项目中的 application-dqms.properties 文件。
将其中的 mybatis.mapper-locations 属性值修改为本地 mapper 文件夹的绝对路径。
mapper 文件夹可从 standalone 介质中获取,路径为{standalone_path}/server/damp/lib/mapper。
配置示例:
mybatis.mapper-locations=file:/Users/xxx/Downloads/mapper/**/*Mapper.xml
mybatis.mapper-locations=file:D:/xxx/mapper/**/*Mapper.xml
# (二)修改 public-resource.database.library.path 配置
打开 application-pubresmng.properties 文件。
将 public-resource.database.library.path 属性值修改为本地 pubresmng_ext_lib 文件夹的绝对路径。
pubresmng_ext_lib 文件夹可从 standalone 介质中获取,路径为{standalone_path}/server/pubresmng_ext_lib。
配置示例:
public-resource.database.library.path=/Users/xxx/Downloads/pubresmng_ext_lib
public-resource.database.library.path=D:/xxx/pubresmng_ext_lib