# 文档说明
本文档主要介绍在 Windows 系统中,基于 EOS 8.3.3、AFCenter 8.3.3、MySQL数据库,使用示例项目进行二次开发,适用的主数据版本为:7.3.0。
文档主要介绍独立应用和微服务两种开发模式。
- 独立应用模式:应用以独立进程进行运行,应用中包括AFcenter、低开(Lowcode)、流程(BPS)、主数据(MDM)、数据质量(QUALITY)、数据标准(DAMP)、数据开发(DWS)组件。
- 微服务模式:应用需要基于AFCenter进行集成,包含了低开(Lowcode)组件,其他组件比如流程(BPS)、主数据(MDM)、数据质量(QUALITY)、数据资产(DAMP)、数据开发(DWS)也需要以微服务的方式部署集成。
# 准备
导入示例项目前,先在开发IDE中配置EOS提供的默认settings配置文件。
# 独立应用模式
本章节以独立应用模型,介绍基于示例项目进行开发。
# 导入示例项目
点击链接下载示例项目:下载独立应用示例项目
启动EOS Studio 8.3.3,解压并导入示例项目,导入时选择“Maven - Existing Maven Projects”。
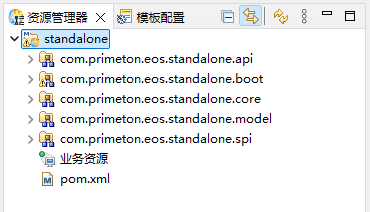
导入后,项目结构如下:
# 初始化数据库
创建两个数据库作为主数据的管理库(mdm)和业务库(mdm_pub)。获取套件版的安装包(Primeton_MDM_7.3.0_Standalone.tar.gz),解压后执行如下脚本:
# 在主数据管理库执行(mdm)
Primeton_MDM_7.3.0_Standalone/server/mdm/db-scripts/all/mysql/mdm-all.sql
# 在主数据业务库执行(mdm_pub)
Primeton_MDM_7.3.0_Standalone/server/mdm/db-scripts/all/mdmpub-all.sql
# 修改user-config.xml配置文件
修改user-config.xml中的数据源配置,将配置内容修改为实际使用的数据库信息。
<group name="default">
<configValue key="Database-Type">MySql</configValue>
<configValue key="Jdbc-Type"/>
<configValue key="C3p0-DriverClass">com.mysql.cj.jdbc.Driver</configValue>
<configValue key="C3p0-Url">jdbc:mysql://127.0.0.1:3306/mdm?serverTimezone=Asia/Shanghai&useUnicode=true&characterEncoding=utf8&useSSL=false&autoReconnect=true</configValue>
<configValue key="C3p0-UserName">username</configValue>
<configValue key="C3p0-Password">password</configValue>
<configValue key="C3p0-PoolSize">10</configValue>
<configValue key="C3p0-MaxPoolSize">50</configValue>
<configValue key="C3p0-MinPoolSize">10</configValue>
<!-- //seconds, 0 means connections never expire -->
<configValue key="C3p0-MaxIdleTime">100</configValue>
<!-- //idle connections never tested -->
<configValue key="C3p0-IdleConnectionTestPeriod">900</configValue>
<configValue key="C3p0-MaxStatements">0</configValue>
<configValue key="C3p0-NumHelperThreads">3</configValue>
<configValue key="C3p0.preferredTestQuery">SELECT 1</configValue>
<configValue key="C3p0.testConnectionOnCheckout">true</configValue>
<!-- Forced Recycling connection after n seconds
<configValue key="C3p0.unreturnedConnectionTimeout">360</configValue>
<configValue key="C3p0.debugUnreturnedConnectionStackTraces">true</configValue>
-->
<configValue key="C3p0.maxConnectionAge">25200</configValue>
<!-- seconds, must be letter than MySQL(wait_timeout=8h) -->
<configValue key="Transaction-Isolation">ISOLATION_DEFAULT</configValue>
<configValue key="Test-Connect-Sql">SELECT count(*) from EOS_UNIQUE_TABLE</configValue>
<configValue key="Retry-Connect-Count">-1</configValue>
</group>
<group name="MDM_PUB">
<configValue key="Database-Type">MySql</configValue>
<configValue key="Jdbc-Type"/>
<configValue key="C3p0-DriverClass">com.mysql.cj.jdbc.Driver</configValue>
<configValue key="C3p0-Url">jdbc:mysql://127.0.0.1:3306/mdm_pub?useUnicode=true&characterEncoding=utf8&useSSL=false&autoReconnect=true</configValue>
<configValue key="C3p0-UserName">username</configValue>
<configValue key="C3p0-Password">password</configValue>
<configValue key="C3p0-PoolSize">10</configValue>
<configValue key="C3p0-MaxPoolSize">50</configValue>
<configValue key="C3p0-MinPoolSize">10</configValue>
<!-- //seconds, 0 means connections never expire -->
<configValue key="C3p0-MaxIdleTime">100</configValue>
<!-- //idle connections never tested -->
<configValue key="C3p0-IdleConnectionTestPeriod">900</configValue>
<configValue key="C3p0-MaxStatements">0</configValue>
<configValue key="C3p0-NumHelperThreads">3</configValue>
<configValue key="C3p0.preferredTestQuery">SELECT 1</configValue>
<configValue key="C3p0.testConnectionOnCheckout">true</configValue>
<!-- Forced Recycling connection after n seconds
<configValue key="C3p0.unreturnedConnectionTimeout">360</configValue>
<configValue key="C3p0.debugUnreturnedConnectionStackTraces">true</configValue>
-->
<configValue key="C3p0.maxConnectionAge">25200</configValue>
<!-- seconds, must be letter than MySQL(wait_timeout=8h) -->
<configValue key="Transaction-Isolation">ISOLATION_DEFAULT</configValue>
<configValue key="Test-Connect-Sql">SELECT count(*) from EOS_UNIQUE_TABLE</configValue>
<configValue key="Retry-Connect-Count">-1</configValue>
</group>
# 修改properties配置文件
在application.properties文件中修改redis配置。
#应用端口,可以按照需要修改端口
server.port=28084
在application-dqms.properties文件中修改数据质量的mapper路径配置
mybatis.mapper-locations=META-INF/mapper/**/*Mapper.xml
如需打包fatjar,建议将mapper目录外置,便于修改,并将
mybatis.mapper-locations改为实际外置路径。
# 更新license文件
将项目中的license文件primetonlicense.xml替换为有效license,文件路径为:standalone/com.primeton.eos.standalone.boot/src/META-INF/_srv/primetonlicense.xml。
# 代码说明
在示例项目中com.primeton.eos.standalone.core构件包下可以看到示例代码,如图。
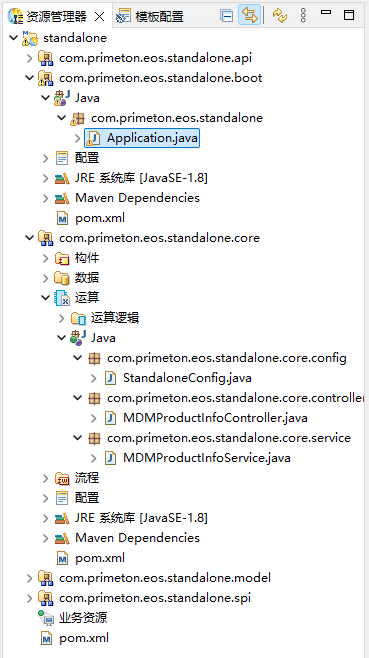
以查询产品信息为示例,代码说明如下:
MDMProductInfoService
// com.primeton.eos.standalone.core.service.MDMProductInfoService

@Service
public class MDMProductInfoService {
    private final MDMAboutService mdmAboutService;

    public MDMProductInfoService(MDMAboutService mdmAboutService) {
        this.mdmAboutService = mdmAboutService;
    }

    public String getProductInfo() {
        Properties product = mdmAboutService.product();
        return product.toString();
    }
}
MDMProductInfoController
// com.primeton.eos.standalone.core.controller.MDMProductInfoController

@RestController
@RequestMapping("/api/standalone/product")
public class MDMProductInfoController {
    @Autowired
    private MDMProductInfoService mdmProductInfoService;

    @GetMapping("/info")
    public String getProductInfo() {
        return mdmProductInfoService.getProductInfo();
    }
}
# 运行和验证
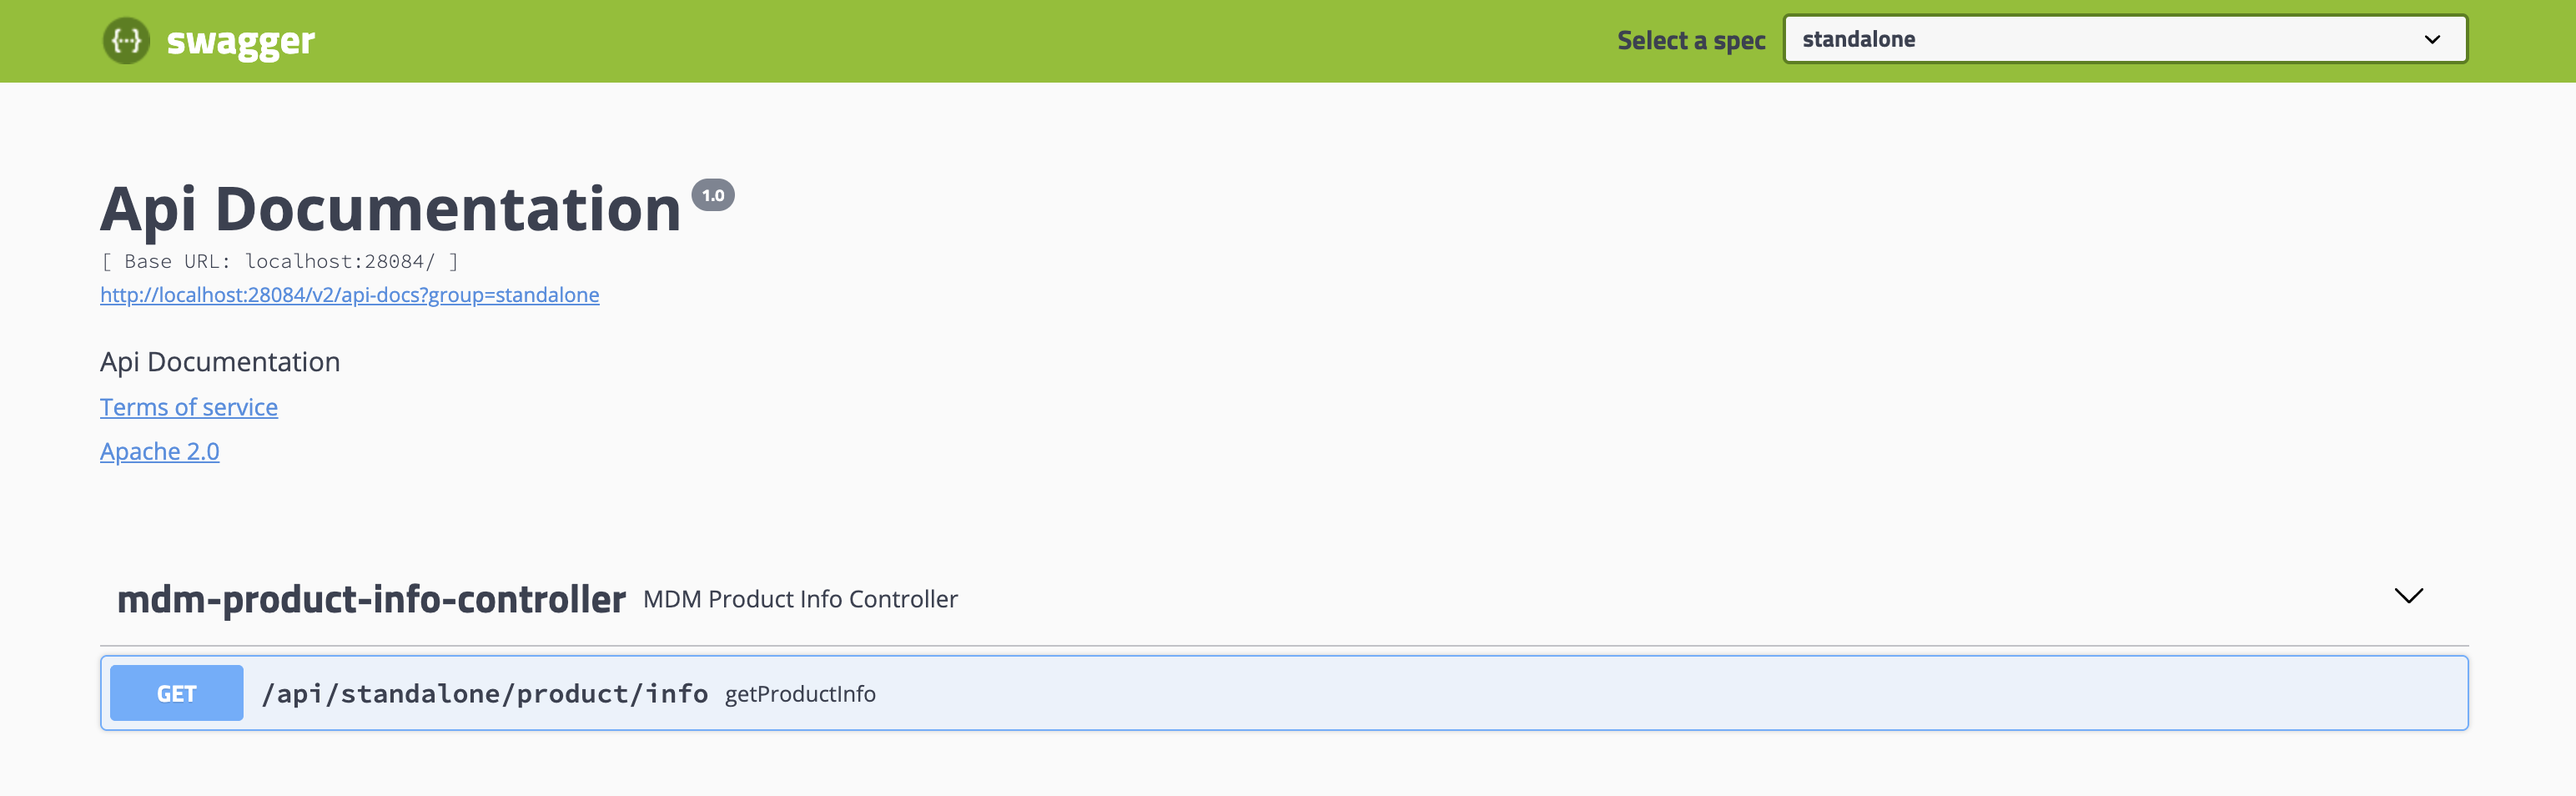
运行com.primeton.eos.standalone.boot构件包下的Application。启动完成后,访问http://127.0.0.1:28084/swagger-ui.html。选择“Select a spec”下拉列表,切换到standalone,看到如下页面,说明接口开发完成。
# 微服务应用模式
# 导入示例项目
点击链接下载示例项目:下载微服务示例项目
启动EOS Studio 8.3.3,解压并导入示例项目,导入时选择“Maven - Existing Maven Projects”。
注意,微服务模式需要先部署AFCenter环境,项目的运行依赖AFCenter环境。
导入后,项目结构如下:
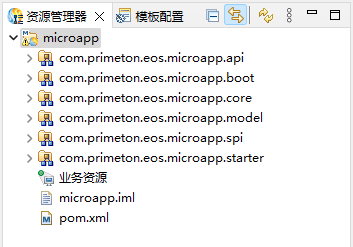
示例项目中已包含了,项目启动所需的配置,只需修改对应的依赖组件配置即可。
# 初始化数据库
创建两个数据库作为主数据的管理库(mdm)和业务库(mdm_pub)。获取微服务版的安装包(Primeton_MDM_7.3.0_MicroApp.tar.gz),解压后执行如下脚本:
# 在主数据管理库执行
Primeton_MDM_7.3.0_Server/db-scripts/all/mysql/mdm-all.sql
# 在主数据业务库执行
Primeton_MDM_7.3.0_Server/db-scripts/all/mysql/mdmpub-all.sql
# 修改user-config.xml配置文件
修改user-config.xml中的数据源配置,将配置内容修改为实际使用的数据库信息。
<group name="default">
<configValue key="Database-Type">MySql</configValue>
<configValue key="Jdbc-Type"/>
<configValue key="C3p0-DriverClass">com.mysql.cj.jdbc.Driver</configValue>
<configValue key="C3p0-Url">jdbc:mysql://127.0.0.1:3306/mdm?serverTimezone=Asia/Shanghai&useUnicode=true&characterEncoding=utf8&useSSL=false&autoReconnect=true</configValue>
<configValue key="C3p0-UserName">username</configValue>
<configValue key="C3p0-Password">password</configValue>
<configValue key="C3p0-PoolSize">10</configValue>
<configValue key="C3p0-MaxPoolSize">50</configValue>
<configValue key="C3p0-MinPoolSize">10</configValue>
<!-- //seconds, 0 means connections never expire -->
<configValue key="C3p0-MaxIdleTime">100</configValue>
<!-- //idle connections never tested -->
<configValue key="C3p0-IdleConnectionTestPeriod">900</configValue>
<configValue key="C3p0-MaxStatements">0</configValue>
<configValue key="C3p0-NumHelperThreads">3</configValue>
<configValue key="C3p0.preferredTestQuery">SELECT 1</configValue>
<configValue key="C3p0.testConnectionOnCheckout">true</configValue>
<!-- Forced Recycling connection after n seconds
<configValue key="C3p0.unreturnedConnectionTimeout">360</configValue>
<configValue key="C3p0.debugUnreturnedConnectionStackTraces">true</configValue>
-->
<configValue key="C3p0.maxConnectionAge">25200</configValue>
<!-- seconds, must be letter than MySQL(wait_timeout=8h) -->
<configValue key="Transaction-Isolation">ISOLATION_DEFAULT</configValue>
<configValue key="Test-Connect-Sql">SELECT count(*) from EOS_UNIQUE_TABLE</configValue>
<configValue key="Retry-Connect-Count">-1</configValue>
</group>
<group name="MDM_PUB">
<configValue key="Database-Type">MySql</configValue>
<configValue key="Jdbc-Type"/>
<configValue key="C3p0-DriverClass">com.mysql.cj.jdbc.Driver</configValue>
<configValue key="C3p0-Url">jdbc:mysql://127.0.0.1:3306/mdm_pub?serverTimezone=Asia/Shanghai&useUnicode=true&characterEncoding=utf8&useSSL=false&autoReconnect=true</configValue>
<configValue key="C3p0-UserName">username</configValue>
<configValue key="C3p0-Password">password</configValue>
<configValue key="C3p0-PoolSize">10</configValue>
<configValue key="C3p0-MaxPoolSize">50</configValue>
<configValue key="C3p0-MinPoolSize">10</configValue>
<!-- //seconds, 0 means connections never expire -->
<configValue key="C3p0-MaxIdleTime">100</configValue>
<!-- //idle connections never tested -->
<configValue key="C3p0-IdleConnectionTestPeriod">900</configValue>
<configValue key="C3p0-MaxStatements">0</configValue>
<configValue key="C3p0-NumHelperThreads">3</configValue>
<configValue key="C3p0.preferredTestQuery">SELECT 1</configValue>
<configValue key="C3p0.testConnectionOnCheckout">true</configValue>
<!-- Forced Recycling connection after n seconds
<configValue key="C3p0.unreturnedConnectionTimeout">360</configValue>
<configValue key="C3p0.debugUnreturnedConnectionStackTraces">true</configValue>
-->
<configValue key="C3p0.maxConnectionAge">25200</configValue>
<!-- seconds, must be letter than MySQL(wait_timeout=8h) -->
<configValue key="Transaction-Isolation">ISOLATION_DEFAULT</configValue>
<configValue key="Test-Connect-Sql">SELECT count(*) from EOS_UNIQUE_TABLE</configValue>
<configValue key="Retry-Connect-Count">-1</configValue>
</group>
# 修改properties配置文件
在application.properties文件中修改redis配置。
#应用端口,可以按照需要修改端口
server.port=28084

# 更改redis配置,微应用项目需要与AFCenter的redis配置相同
spring.redis.host=127.0.0.1
spring.redis.port=6379
spring.redis.password=
在application-afc.properties文件中修改AFCenter的应用名
# 可以使用固定应用名AFCENTER,或ip:port
afc.application.name=AFCENTER
在application-damp.properties文件中修改数据资产的应用名
# 可以使用固定应用名DAMP,或ip:port
standard.application.name=DAMP
在application-dqms.properties文件中修改数据质量的应用名及mapper路径配置
# 可以使用固定应用名QUALITY,或ip:port
quality.application.name=QUALITY

mybatis.mapper-locations=META-INF/mapper/**/*Mapper.xml
在application-dws.properties文件中修改数据开发的应用名
# 可以使用固定应用名DWS,或ip:port
dws.application.name=DWS
# 更新license文件
将项目中的license文件primetonlicense.xml替换为有效license,文件路径为:microapp/com.primeton.eos.standalone.boot/src/META-INF/_srv/primetonlicense.xml。
# 代码说明
示例项目中示例代码在com.primeton.eos.microapp.core构件包下,如图。
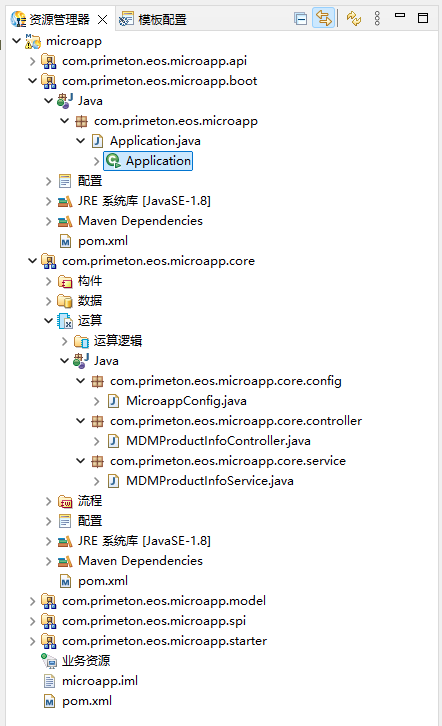
以查询产品信息为示例,代码说明如下:
MDMProductInfoService
// com.primeton.eos.microapp.core.service.MDMProductInfoService

@Service
public class MDMProductInfoService {
    private final MDMAboutService mdmAboutService;

    public MDMProductInfoService(MDMAboutService mdmAboutService) {
        this.mdmAboutService = mdmAboutService;
    }

    public String getProductInfo() {
        Properties product = mdmAboutService.product();
        return product.toString();
    }
}
MDMProductInfoController
// com.primeton.eos.microapp.core.controller.MDMProductInfoController

@RestController
@RequestMapping("/api/microapp/product")
public class MDMProductInfoController {
    @Autowired
    private MDMProductInfoService mdmProductInfoService;

    @GetMapping("/info")
    public String getProductInfo() {
        return mdmProductInfoService.getProductInfo();
    }
}
# 运行和验证
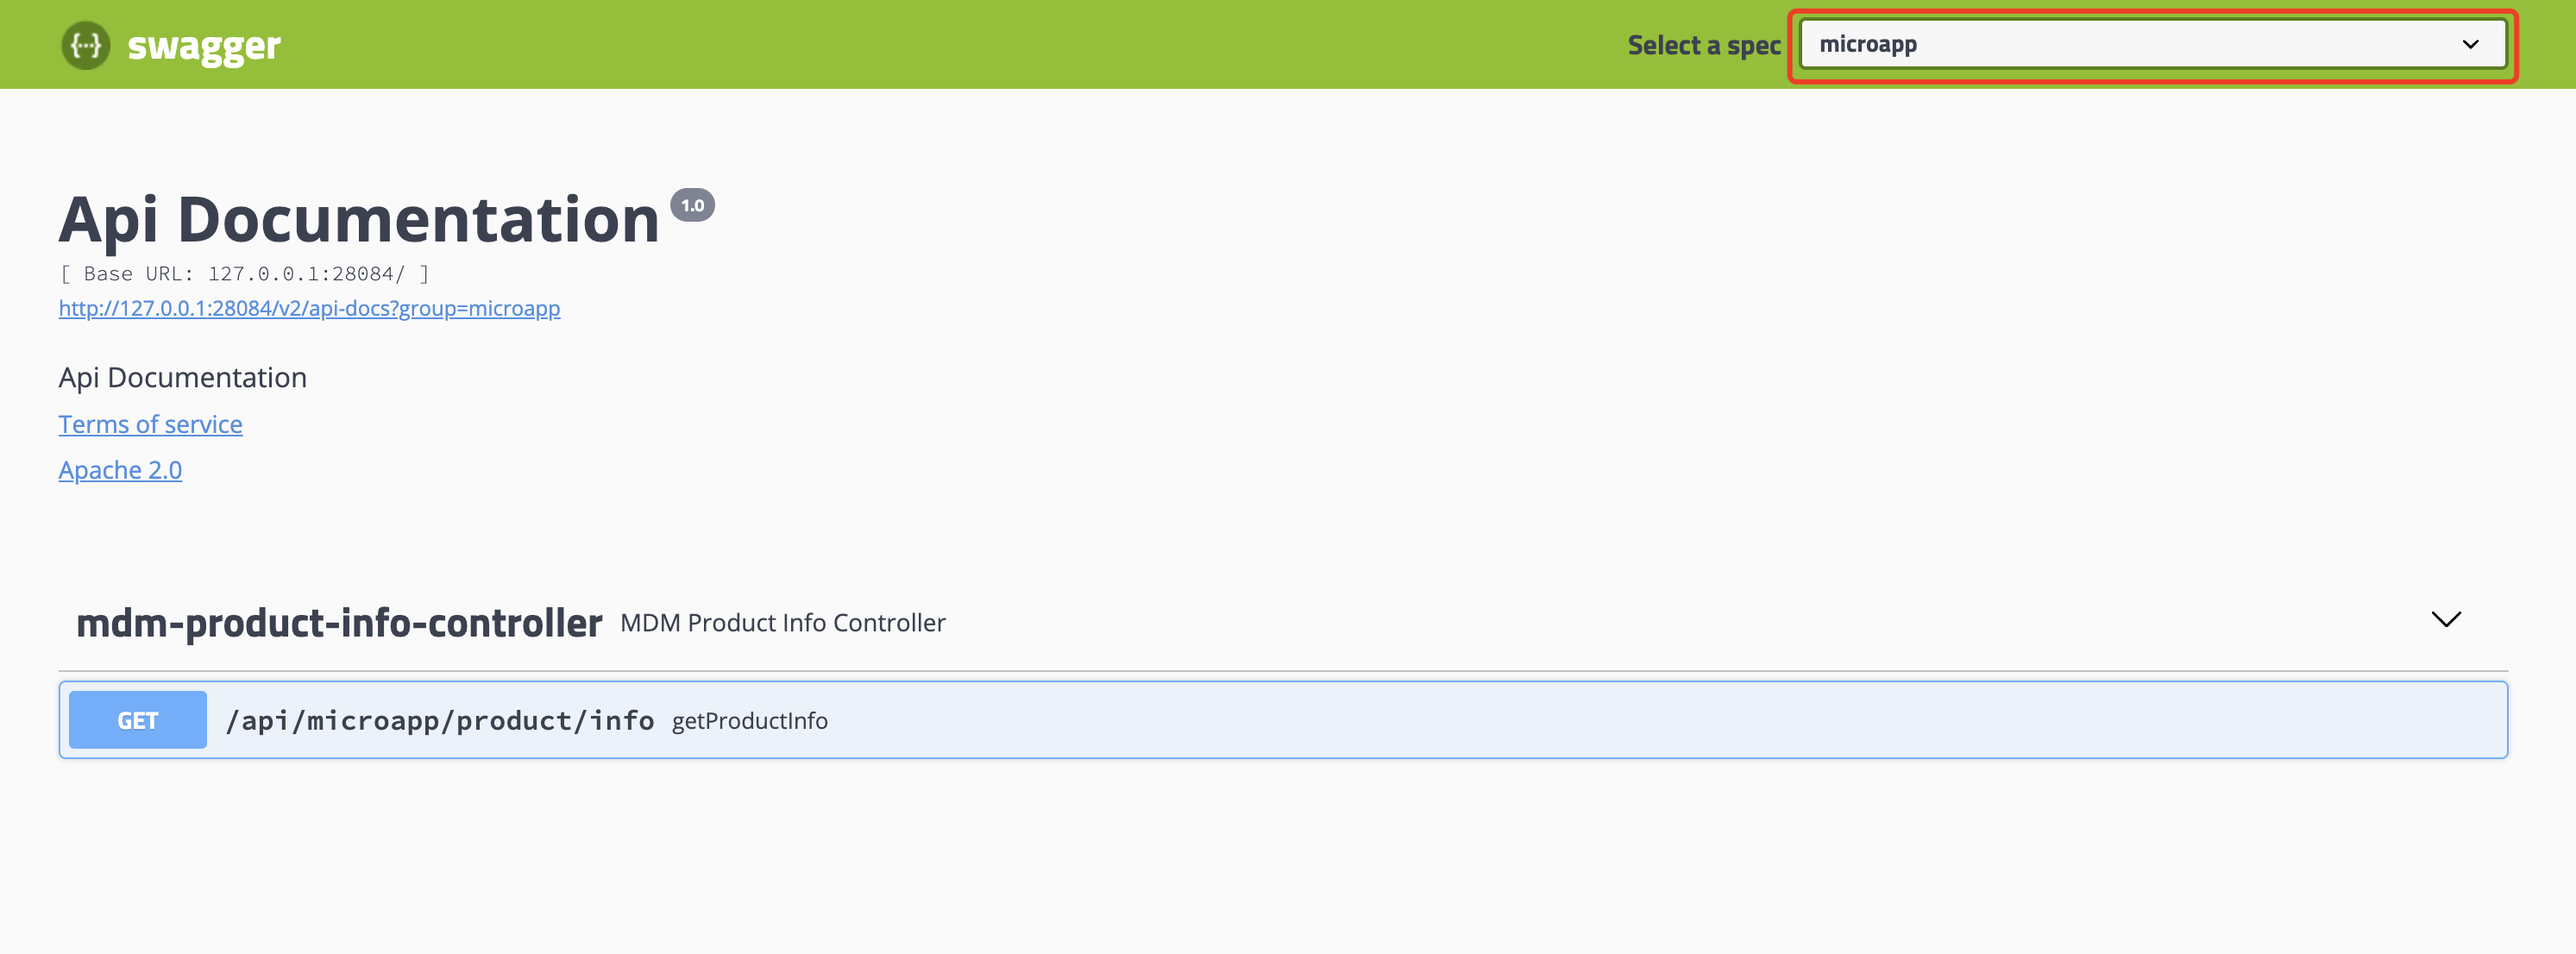
运行com.primeton.eos.microapp.boot构件包下的Application。启动完成后,访问http://127.0.0.1:28084/swagger-ui.html。选择“Select a spec”下拉列表,切换到microapp,看到如下页面,说明接口开发完成。
# 定制开发示例
本章节以开发自定义码段为示例,介绍如何进行定制开发一个自定义码段,并将编译包部署到主数据环境中。本示例同时适用于独立应用模式和微服务应用模式。示例中,新增一个UUIDv7的码段,用于生成v7版本的UUID。
# 增加实现类
在构件包com.primeton.eos.standalone.core中创建com.primeton.eos.standalone.core.encoder包,并创建自定义码段的配置实现和编码实现,如下。
自定义码段的实现说明请参考
主数据接口文档的字段编码——码段类型扩展SPI章节。
CustomUUIDv7Config
package com.primeton.eos.standalone.core.encoder;

import com.primeton.mdm.management.spi.code.Config;
import lombok.Getter;
import lombok.Setter;

/**
 * 自定义无状态编码
 */
@Getter
@Setter
public class CustomUUIDv7Config extends Config {
    public static final String TYPE = "CUSTOM_UUID_V7";

    private boolean delimiter;
    private boolean uppercase;
    private int length;

    @Override
    public String getType() {
        return TYPE;
    }
}
CustomUUIDv7Encoder
package com.primeton.eos.standalone.core.encoder;

import com.primeton.mdm.management.spi.code.Formatter;
import com.primeton.mdm.management.spi.code.StatelessEncoder;
import org.springframework.stereotype.Component;

import java.util.Map;
import java.util.UUID;

@Component("MDMCustomUUID7Encoder")
public class CustomUUIDv7Encoder implements StatelessEncoder<CustomUUIDv7Config>, Formatter<CustomUUIDv7Config> {

    @Override
    public String name() {
        return CustomUUIDv7Config.TYPE;
    }

    @Override
    public Class<CustomUUIDv7Config> type() {
        return CustomUUIDv7Config.class;
    }

    @Override
    public String generate(String model, CustomUUIDv7Config config, Map<String, Object> data) {
        String uuid = UUIDv7.randomUUID().toString();
        uuid = config.isDelimiter() ? uuid : uuid.replace("-", "");
        uuid = config.isUppercase() ? uuid.toUpperCase() : uuid;
        int length = uuid.length();
        if (length > 0 && length < 32) {
            if (!config.isDelimiter()) {
                return format(config, uuid.substring(0, length));
            }
            for (int i = 0, j = 0; i < uuid.length(); i++) {
                if (j == length) {
                    return uuid.substring(0, i);
                }
                if (uuid.charAt(i) == '-') {
                    continue;
                }
                j++;
            }
        }
        return format(config, uuid);
    }
}
在构件包com.primeton.eos.standalone.core中创建com.primeton.eos.standalone.core.util包,增加用于生成UUID的工具类型UUIDv7,如下。
package com.primeton.eos.standalone.core.util;

import java.nio.ByteBuffer;
import java.util.Objects;
import java.util.UUID;
import java.util.concurrent.ThreadLocalRandom;

/**
 * 生成 UUID v7 的工具类(基于时间戳 + 随机数)
 */
public final class UUIDv7 {
    private static final int VERSION = 0x7; // v7

    private UUIDv7() {
    }

    /**
     * 生成 UUID v7
     *
     * @return UUID 对象
     */
    public static UUID randomUUID() {
        byte[] bytes = new byte[16];
        ThreadLocalRandom rnd = ThreadLocalRandom.current();

        // 1) timestamp 48 bits (millis)
        long unixMillis = System.currentTimeMillis();
        // 保持低 48 bit
        long ts48 = unixMillis & 0x0000FFFFFFFFFFFFL;

        // 写入前 6 个字节(big-endian)
        for (int i = 0; i < 6; i++) {
            bytes[i] = (byte) ((ts48 >>> (8 * (5 - i))) & 0xFF);
        }

        // 2) 16 bits: version (high 4 bits) + 12 bits random
        int rand12 = rnd.nextInt(1 << 12); // 0..4095
        int versionAndRand = ((VERSION & 0x0F) << 12) | (rand12 & 0x0FFF);
        bytes[6] = (byte) ((versionAndRand >>> 8) & 0xFF);
        bytes[7] = (byte) (versionAndRand & 0xFF);

        // 3) 16 bits: clock sequence (set variant bits to RFC4122: "10" in top two bits)
        int rand14 = rnd.nextInt(1 << 14); // 0..16383
        int clockSeq = (rand14 & 0x3FFF) | 0x8000; // set bits 15..14 as 10
        bytes[8] = (byte) ((clockSeq >>> 8) & 0xFF);
        bytes[9] = (byte) (clockSeq & 0xFF);

        // 4) 48 bits node random
        for (int i = 10; i < 16; i++) {
            bytes[i] = (byte) rnd.nextInt(0, 256);
        }

        // 构造 UUID(msb, lsb)
        ByteBuffer bb = ByteBuffer.wrap(bytes);
        long msb = bb.getLong(0);
        long lsb = bb.getLong(8);
        return new UUID(msb, lsb);
    }

    /**
     * 从 v7 UUID 中提取出时间戳(毫秒级)
     *
     * @param uuid UUID 对象
     * @return 间戳毫秒(或 null 如果无法识别)
     */
    public static Long extractTimestamp(UUID uuid) {
        Objects.requireNonNull(uuid);
        // 把 msb 的前 48 bits 提取出来
        long msb = uuid.getMostSignificantBits();
        // msb 是 signed long,但我们只关心最高 64 bits,取前 48 bits:
        // 去掉低 16 位(version+rand)
        return (msb >>> 16) & 0x0000FFFFFFFFFFFFL;
    }
}
# 增加国际化配置
在构件包com.primeton.eos.standalone.core的配置/resources/i18n目录下创建encoder目录,并创建国际化文件CUSTOM_UUID_V7.properties,内容如下。⚠️注意,此国际化文件的文件名,必须和CustomUUIDv7Config.TYPE的值保持一致。
en=UUID v7
en_US=UUID v7
zh=UUID v7 版本
zh_CN=UUID v7 版本
其中,zh及zh_CN用于中文环境下显示,en及en_US用于英文环境下显示。
# 执行编译
在IDE(EOS Studio或IDEA)中执行项目编译,编译完成后,在构件包com.primeton.eos.standalone.core的target目录下会生成com.primeton.eos.standalone.core-1.0.0.jar文件。
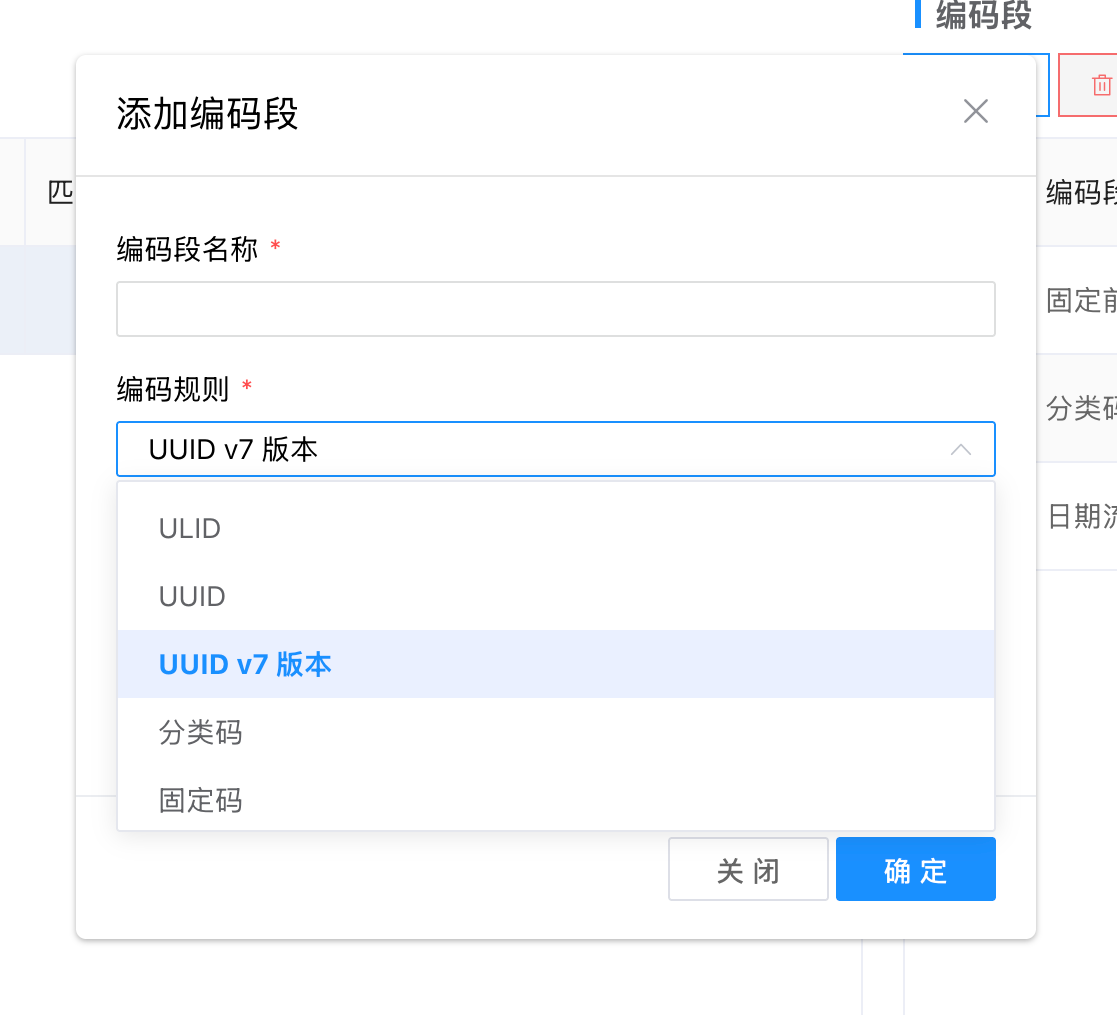
# 部署
将编译出的com.primeton.eos.standalone.core-1.0.0.jar文件,复制到主数据的lib目录下,并重启服务。重新登录后,在模型配置的编码规则步骤,可以看到自定义的码段,如下图。